How does an idea scribbled on a sheet of paper become a 3D image capable of making us believe in a world that does not exist?
At first, there is almost nothing.
A sentence.
A silhouette.
An atmosphere that is difficult to explain.
Perhaps a character lost in a vast city. A creature crossing a forest. A product rotating beneath perfect lighting. A scene that no one has ever seen because, for now, it exists only in the minds of a few creators.
Then the project moves forward.
The idea becomes a story. The story becomes a storyboard. The storyboard becomes a scene. The scene receives volumes, textures, skeletons, movement, lighting and effects.
In the end, an image appears.
Sometimes it seems obvious.
As though it had always been destined to exist in that form.
Yet behind a few seconds of animation often lies a long chain of decisions, approvals, corrections and exchanges between several professions.
This chain has a name:
The 3D production pipeline.
A pipeline is not merely a list of software applications.
It is a method for progressively transforming a creative intention into a final result without losing information, files, responsibilities or the project’s overall coherence along the way.
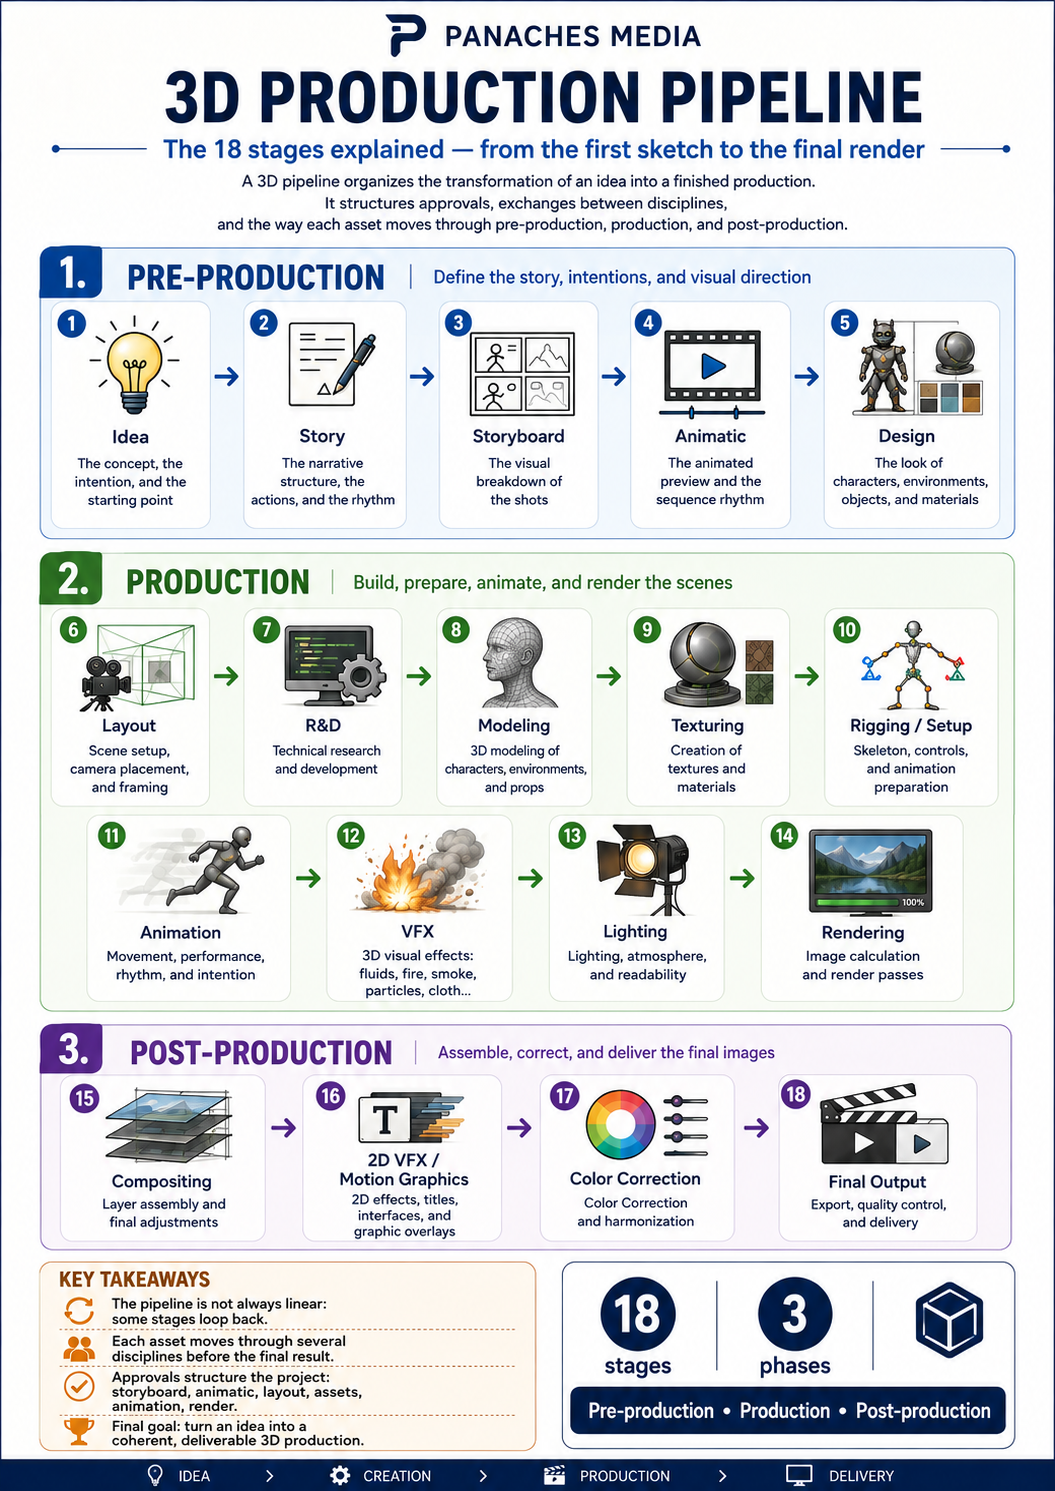
In its clearest form, the pipeline presented here contains 18 stages, divided into three major phases:
- Pre-production — defining what is going to be created;
- Production — building and animating the project’s elements;
- Post-production — assembling, correcting and finalising the images.
However, this process is not a perfectly straight line.
Some stages overlap. Others restart after a failed approval. A problem discovered during animation may require the rig to be corrected. A texture can reveal a modelling error. A render that is too slow may require a new research and development phase.
The pipeline is therefore less like a conveyor belt than a living system.
It organises the project’s movement.
It does not eliminate the need to go backwards.
It simply prevents those returns from becoming chaos.
The 3D pipeline at a glance
| Phase | Stages | Primary objective |
|---|---|---|
| Pre-production | 5 | Define the story, intentions and visual direction |
| Production | 9 | Build, prepare, animate and render the scenes |
| Post-production | 4 | Assemble, correct and deliver the final images |
| Total | 18 | Transform an idea into a completed 3D production |
Pre-production
Idea → Story → Storyboard → Animatic → Design
Production
Layout → R&D → Modelling → Texturing → Rigging / Setup → Animation → VFX → Lighting → Rendering
Post-production
Compositing → 2D VFX / Motion Graphics → Colour Correction → Final Output
This pipeline can be used for:
- an animated short or feature film;
- a video-game cinematic;
- an advertisement;
- an architectural visualisation;
- a music video;
- a product film;
- an animated series;
- a production combining live-action footage and computer-generated imagery.
The proportions change depending on the project.
The principles remain similar.
First phase: pre-production
Pre-production is sometimes treated as the part that comes before the “real work”.
That is an expensive mistake.
Production truly begins here.
Every decision that is not made during pre-production will probably need to be made later, when more people, files and working hours already depend on the project.
Changing a story on paper costs very little.
Changing an entire sequence after rigging, animation, lighting and rendering costs considerably more.
Pre-production therefore serves to answer one simple question:
What are we going to create, and why must we create it in this way?
1. Idea — The initial idea
Everything begins with an intention.
The idea may be narrative:
A child discovers that the shadows in her city are alive.
It may be visual:
An impossible structure inspired by organic forms.
It may be commercial:
Present a technical product in a clear and spectacular way.
It may also be emotional:
Create a scene that communicates loneliness without using dialogue.
At this stage, the idea does not need to contain every answer.
Above all, it needs a direction.
The idea should help identify:
- the main subject;
- the desired emotion;
- the intended audience;
- the project format;
- its approximate length;
- the level of visual ambition;
- the main constraints;
- the project’s reason for existing.
Possible deliverables
- a concept sentence;
- a short pitch;
- a statement of intent;
- a few visual references;
- an initial mood board;
- a description of the audience;
- a list of constraints.
The main risk
Beginning production with an idea that is too vague.
A team can work extremely hard while still moving in several opposing directions.
The idea does not need to explain everything.
It needs to create a centre of gravity.
2. Story — The story or screenplay
The idea then becomes a narrative structure.
Even a very short animation contains some form of story.
A product appears.
It transforms.
A function is revealed.
A conclusion gives meaning to what has just been shown.
The story defines what happens, in what order, to whom and with what consequences.
The screenplay may specify:
- the characters;
- their objectives;
- the obstacles;
- the locations;
- the actions;
- the dialogue;
- the rhythm;
- the transitions;
- the beginning and the ending;
- the emotional progression.
In a narrative project, this stage may produce a complete screenplay.
In an advertisement, it may take the form of a visual script.
In a technical visualisation, it may become a sequence of information to reveal in a precise order.
Possible deliverables
- synopsis;
- treatment;
- screenplay;
- script;
- sequence breakdown;
- dialogue;
- descriptions of actions;
- directing intentions.
The main risk
Confusing an accumulation of events with storytelling.
A story does not become clear merely because it contains more actions.
It becomes clear when each action prepares, transforms or concludes something.
3. Storyboard — The visual breakdown
The storyboard translates the screenplay into a sequence of images.
It shows the main shots before the 3D scenes are built.
The drawings can be extremely simple.
A few silhouettes, arrows, a frame and a movement indication may be enough to determine whether a sequence works.
The storyboard helps decide:
- where to position the camera;
- what the viewer needs to see;
- the order in which information appears;
- which characters are present;
- how an action begins and ends;
- where the transitions occur;
- which shots will be complex or expensive.
The storyboard answers a central question
How can this story be told through images?
A screenplay might state:
The character realises that someone is watching them.
The storyboard must decide how to show it.
A close-up of the eyes?
A silhouette in a reflection?
A camera that remains still as the character turns around?
The text provides the information.
The storyboard chooses the staging.
Possible deliverables
- storyboard panels;
- shot numbers;
- camera indications;
- main movements;
- associated dialogue and sound;
- approximate shot duration;
- staging notes.
The main risk
Trying to create beautiful drawings instead of solving the storytelling.
A magnificent storyboard can still be confusing.
A very simple storyboard can perfectly show where to look, what is happening and why the shot exists.
4. Animatic — The animated preview
The animatic transforms the storyboard into the first time-based sequence.
The storyboard images are placed on a timeline. Simple movements, temporary dialogue, sound effects and sometimes provisional music are added.
The project then begins to exist in time.
This is an essential stage because a collection of good images does not automatically create a good sequence.
A shot may be too long.
An action may appear incomprehensible.
A line of dialogue may arrive too early.
A transition may break the rhythm.
The animatic reveals these problems before the final elements are produced.
The animatic makes it possible to test:
- shot duration;
- the overall rhythm;
- the clarity of the action;
- continuity;
- camera movements;
- dialogue placement;
- the relationship between image and sound;
- the project’s total duration.
Possible deliverables
- preview video;
- temporary soundtrack;
- estimated duration of every shot;
- list of approved shots;
- initial editing indications.
The main risk
Treating the animatic as an unimportant draft.
A poorly resolved animatic will transmit its weaknesses to every stage that follows.
In production, one additional second can represent dozens of images that need to be modelled, animated, lit and rendered.
Time becomes a material here.
It is better to sculpt it early.
5. Design — Visual development
Design defines the appearance of the world.
Characters, environments, objects, colours, materials, costumes and sometimes visual effects are explored before they are produced in 3D.
This stage transforms abstract intentions into references that production teams can use.
A concept artist does not merely draw something attractive.
They must provide usable information.
How is the character constructed?
Which parts move?
What materials make up the costume?
How large is the object?
How does light react to its surface?
Design may include:
- concept art;
- character design;
- environment design;
- prop design;
- colour studies;
- material studies;
- turnarounds;
- expression sheets;
- silhouette studies;
- proportion guides;
- mood boards;
- style frames.
Possible deliverables
- approved designs;
- front, side and rear views;
- colour palettes;
- material references;
- scale indications;
- art-direction documents;
- reference libraries.
The main risk
Approving a spectacular concept that is impossible to produce with the available resources.
Hair made from thousands of glowing filaments may look magnificent in an illustration.
It may also consume half of the project’s technical budget.
Design must dream.
But it must dream with some awareness of the pipeline.
Second phase: production
Pre-production has defined the project.
Production must now build it.
This is where ideas become scenes, objects, characters and calculable images.
This phase brings together several professions that depend on one another.
The model must be able to receive its textures.
The character must be suitable for rigging.
The rig must meet the needs of animation.
The animation must work with the simulations.
The effects must integrate with the lighting.
The render must preserve all the information required for compositing.
Each team therefore produces a result that becomes the starting point for another.
The pipeline organises this transmission.
6. Layout — Establishing scenes and camera framing
Layout translates the storyboard and animatic into 3D space.
The scenes are constructed using temporary or simplified models. Characters are positioned. Cameras are placed. The main movements begin to be defined.
Layout does not yet aim for polish.
It aims for spatial clarity.
Layout determines, among other things:
- camera positions;
- focal lengths;
- framing;
- composition;
- environment dimensions;
- overall movement;
- the precise duration of the shots;
- character entrances and exits;
- continuity between shots.
Why is this stage important?
A storyboard drawing can cheat with space.
A 3D scene must exist within coherent dimensions.
The camera must genuinely be able to occupy the planned position. The character must be able to cover the distance within the available time. The environment must contain everything visible on screen.
Possible deliverables
- simplified 3D scenes;
- approved cameras;
- character blocking;
- precise shot breakdown;
- layout edit;
- timing and scale information.
The main risk
Adding detail too early.
A temporary building does not need to contain every window in order to test the shot’s composition.
Layout must solve the space before production invests in detail.
7. R&D — Research and development
Research and development intervenes when the project requires a solution that does not yet exist in the pipeline.
How can this material be simulated?
How should a crowd be managed?
How can an enormous scene be rendered without exceeding the available memory?
How can a repetitive task be automated?
How can data be transferred correctly between two software applications?
R&D can be artistic, technical or both.
It may involve:
- shader creation;
- tool development;
- simulations;
- crowd systems;
- hair and fur;
- fluids;
- destruction;
- optimisation;
- automation;
- exchange formats;
- validation scripts;
- rendering methods;
- the integration of new technologies.
Possible deliverables
- technical prototypes;
- visual tests;
- internal tools;
- scripts;
- documentation;
- approved methods;
- performance estimates;
- recommendations for other departments.
The main risk
Discovering too late that a central effect is technically impossible.
An entire scene may depend on a destruction system, a water simulation or a particularly complex character.
R&D tests the unknown before the whole production begins to depend on it.
8. Modelling — 3D modelling
Modelling transforms concepts into three-dimensional volumes.
Artists create the characters, environments, props, vehicles, architecture and every object required by the scenes.
Depending on the project, modelling may be realistic, stylised, organic, mechanical, highly detailed or deliberately minimal.
The work may include:
- blocking out the main forms;
- sculpting;
- polygonal modelling;
- retopology;
- detail creation;
- subdivision preparation;
- geometry cleanup;
- UV creation;
- levels of detail;
- object organisation;
- scale compliance.
A model must not merely look good
It must function throughout the rest of the pipeline.
A character intended for animation needs topology that can deform correctly.
An object seen only from a distance does not require the same level of detail as a face shown in close-up.
An environment should be built according to what the camera will actually see.
Possible deliverables
- high-resolution models;
- optimised models;
- approved topology;
- prepared UVs;
- multiple resolutions;
- correctly named objects;
- files ready for texturing or rigging.
The main risk
Modelling invisible details while neglecting the important forms.
The viewer first perceives the silhouette, proportions and relationships between masses.
A perfectly sculpted screw will not save a car whose wheels look too small.
9. Texturing — Creating and applying textures
Texturing gives surfaces their appearance.
Geometry alone does not indicate whether an object is made from wood, metal, skin, plastic or stone.
Textures and materials define how the surface reacts to light.
Texturing may include:
- base colour;
- roughness;
- metallic properties;
- height;
- normal maps;
- displacement;
- transparency;
- light emission;
- dirt;
- wear;
- surface variations;
- microscopic details.
In modern pipelines, materials are often constructed according to physically based principles.
The objective is not merely to paint a colour.
It is to describe the behaviour of the material.
A metallic surface does not diffuse light like fabric. Skin does not react like plastic. Old paint does not have the same roughness as a new object.
Possible deliverables
- textures;
- materials;
- shaders;
- surface libraries;
- wear variations;
- files optimised for the required resolutions.
The main risk
Adding detail without understanding the material.
A texture can be technically rich while still looking visually false.
Realism does not come from the number of scratches.
It comes from the logic explaining how they appeared.
10. Rigging / Setup — The skeleton and controls
Rigging prepares characters and objects for animation.
A skeleton is created inside the model. Controls then allow animators to manipulate the different parts of the body without directly moving every point of the geometry.
Setup may also be used for vehicles, creatures, machines, faces or mechanical objects.
A rig may contain:
- a skeleton;
- controls;
- inverse kinematics;
- forward kinematics;
- constraints;
- deformations;
- muscle systems;
- facial controls;
- shape changes;
- automation;
- joint limits;
- animator interfaces.
A good rig should be:
- stable;
- predictable;
- fast;
- flexible enough;
- suited to the animation style;
- understandable;
- compatible with the pipeline.
Rigging sits at the intersection of anatomy, mechanics, mathematics and user experience.
The rigger builds a machine.
The animator should then be able to forget about the machine and concentrate on the character’s performance.
Possible deliverables
- rigged character;
- documented controls;
- deformation tests;
- extreme poses;
- facial expressions;
- additional tools;
- version approved for animation.
The main risk
Creating a technically impressive rig that is difficult to use.
A system with four hundred controls is not necessarily four times more powerful.
It may simply take four times longer to locate the one that closes the left eyelid.
11. Animation — Creating movement and intention
Animation brings characters, creatures, objects and cameras to life.
The animator does not merely move elements.
They construct weight, rhythm, balance, intention and sometimes thought.
A character can walk in many different ways.
They can move with confidence, exhaustion, fear, anger or hesitation.
The general displacement remains similar.
The meaning changes completely.
Animation work may include:
- blocking the main poses;
- timing;
- spacing;
- transitions;
- body animation;
- facial animation;
- lip synchronisation;
- camera animation;
- object animation;
- motion capture;
- mocap cleanup;
- secondary animation;
- polishing.
The main internal stages
Blocking
The main poses are placed to define the action.
Spline or interpolation
The movements between the poses are developed.
Polishing
Arcs, contacts, offsets, expressions and details are refined.
Possible deliverables
- animated shots;
- animation caches;
- motion data;
- animated cameras;
- versions approved by the director.
The main risk
Confusing smoothness with quality.
A movement can be perfectly smooth while expressing nothing.
Animation works when poses, rhythm and changes in direction tell us something.
The movement should feel inevitable.
As though the character could not have reacted in any other way.
12. VFX — 3D visual effects
VFX create phenomena that are difficult or impossible to animate manually.
Fire, smoke, water, dust, explosions, magic, destruction, crowds, hair, cloth and particles can be simulated or generated through procedural systems.
3D VFX may include:
- particles;
- smoke;
- fire;
- fluids;
- oceans;
- rain;
- snow;
- dust;
- destruction;
- debris;
- cloth;
- hair;
- fur;
- crowds;
- magical effects;
- atmospheric phenomena.
The effects must satisfy several constraints at once:
- the art direction;
- the physics of the world;
- character movement;
- framing;
- lighting;
- calculation time;
- compositing requirements.
Possible deliverables
- simulations;
- caches;
- volumes;
- particles;
- procedural geometry;
- specific render passes;
- data intended for lighting and rendering.
The main risk
Producing a spectacular effect that distracts from the scene.
A successful visual effect does not merely demonstrate the software’s power.
It supports the action.
The best explosion is not necessarily the largest.
It is the one that occurs in the right place, at the right moment and with the right weight.
13. Lighting — Lighting the scene
Lighting organises the light within a scene.
It must make volumes readable, guide the viewer’s eye, create an atmosphere and maintain continuity between shots.
Lighting may seek realism.
It may also deliberately move away from realism to reinforce an emotion or composition.
Lighting determines:
- the main direction of the light;
- contrast;
- shadows;
- colour temperature;
- exposure;
- depth;
- separation between characters and the environment;
- reflections;
- atmosphere;
- continuity between shots.
Lighting is both technical and narrative
A scene lit from above may feel cold or threatening.
Low light can create the impression of late afternoon.
Leaving part of a face in shadow may suggest doubt, danger or hidden information.
Light does not merely reveal objects.
It indicates how they should be seen.
Possible deliverables
- lit scenes;
- lighting setups;
- approved exposures;
- prepared render passes;
- visual continuity between shots.
The main risk
Lighting every element separately without constructing a coherent overall image.
A scene may contain beautiful lights and still remain visually confusing.
Lighting must organise the hierarchy.
Everything cannot be important at the same time.
14. Rendering — Calculating the images
Rendering transforms 3D scenes into 2D images.
The software calculates geometry, materials, lights, shadows, reflections, effects and movement to produce the final images or the various passes required for post-production.
Rendering may produce:
- final images;
- image sequences;
- colour layers;
- shadows;
- reflections;
- depth;
- normals;
- masks;
- motion data;
- volumes;
- effect passes;
- compositing data.
Rendering requires choices
- render engine;
- resolution;
- sampling;
- noise management;
- ray depth;
- motion blur;
- depth of field;
- file format;
- colour space;
- compression;
- acceptable calculation time.
Rendering is often one of the most computationally expensive stages.
A few seconds of animation may require hundreds of images.
Each image may take a few seconds, several minutes or several hours.
Possible deliverables
- rendered sequences;
- separate passes;
- high-dynamic-range files;
- compositing data;
- error reports;
- review versions.
The main risk
Discovering during the final render that the scenes are too heavy or that essential information was not exported.
The final render should not be the first time the pipeline genuinely tests the shots.
Intermediate renders should accompany the entire production.
Otherwise, the render farm becomes a very expensive place to discover very simple problems.
Third phase: post-production
The images have been calculated.
The project is not yet complete.
The various layers must be assembled, harmonised and prepared for their final medium.
Post-production transforms technically correct images into a coherent sequence.
It also allows certain adjustments to be made without relaunching the entire 3D scene.
It is a phase of finishing.
But also a phase of reconstruction.
15. Compositing — Assembling the visual layers
Compositing combines the different renders produced by the 3D pipeline.
Characters, environments, effects, shadows, reflections, volumes and atmospheres can be assembled and adjusted separately.
The compositor can correct the intensity of a light, strengthen the fog, modify the depth or integrate an additional element without recalculating the entire scene.
Compositing may include:
- assembling render passes;
- integrating elements;
- masks;
- exposure correction;
- depth of field;
- motion blur;
- atmosphere;
- glow;
- reflections;
- shadows;
- defect removal;
- continuity between shots;
- integration of 3D and live-action footage.
Possible deliverables
- composited shots;
- approval versions;
- final layers;
- files intended for 2D effects and colour grading.
The main risk
Trying to fix in compositing a problem that should have been resolved earlier.
Compositing is powerful.
It does not automatically transform poor animation, inconsistent lighting or confusing composition into a good shot.
It can save many things.
It should not have to save the entire project.
16. 2D VFX / Motion Graphics — 2D effects and graphic animation
Some effects are added directly in post-production rather than simulated in 3D.
This stage may integrate 2D particles, graphic elements, titles, interfaces, impacts, glows, speed lines or animated information.
It may include:
- atmospheric effects;
- flashes;
- sparks;
- 2D smoke;
- impacts;
- futuristic interfaces;
- screens;
- titles;
- animated typography;
- graphics;
- logos;
- transitions;
- visual packaging;
- explanatory elements.
Motion design is particularly important in advertisements, product videos, title sequences, interfaces and educational productions.
Possible deliverables
- 2D effects;
- graphic animations;
- titles;
- interfaces;
- overlays;
- transitions;
- shots finalised for colour correction.
The main risk
Adding effects merely to fill the image.
Graphic movement should guide, explain or reinforce.
When it serves no function, it simply becomes one more thing the viewer has to try to ignore.
17. Colour Correction — Correcting and harmonising colour
Colour correction harmonises the shots.
Two images produced with different lights, environments or settings need to appear as though they belong to the same sequence.
This stage first corrects technical inconsistencies and can then reinforce the art direction.
Colour correction may affect:
- exposure;
- contrast;
- white balance;
- saturation;
- hue;
- blacks;
- highlights;
- skin tones;
- continuity between shots;
- the overall atmosphere;
- the readability of important elements.
A distinction is often made between:
- correction, which seeks consistency;
- creative grading, which creates a specific look.
Possible deliverables
- harmonised shots;
- final look;
- versions adapted to different media;
- colour-reference files.
The main risk
Applying a global style before correcting inconsistencies on a shot-by-shot basis.
A spectacular colour cast does not replace correct exposure.
Style comes after control.
18. Final Output — Final export and delivery
The final stage prepares the project for distribution.
The result must be exported in the correct formats, resolutions, codecs, colour spaces and aspect ratios.
A single production may require several deliverables:
- cinema version;
- web version;
- social-media version;
- vertical version;
- textless version;
- high-quality master;
- compressed file;
- image sequence;
- project archive;
- subtitles;
- separate elements for the client.
This stage generally includes:
- quality control;
- image verification;
- audio verification;
- title approval;
- subtitle verification;
- codec selection;
- export;
- compression;
- verification of the final file;
- naming;
- archiving;
- delivery.
Possible deliverables
- final master;
- distribution exports;
- thumbnails;
- audio files;
- localised versions;
- archives;
- delivery documentation.
The main risk
Considering the project finished as soon as the timeline can be played.
A mistake in a title, an incorrect frame rate, the wrong colour space or saturated audio can make a technically completed production unusable.
The final stage of the pipeline is not pressing “Export”.
It is checking that the delivered file is genuinely something another person can use.
The pipeline is not always linear
Presenting the stages in a precise order makes the process easier to understand.
In a real production, they often overlap.
While some characters are being modelled, others may already be rigged.
Lighting may begin on scenes whose textures are not yet final.
R&D may continue during animation.
Compositing may reveal a problem requiring a new render.
The pipeline therefore operates through several movements:
- progression;
- approval;
- return;
- correction;
- new approval;
- transmission to the next stage.
Example of moving backwards
The animator discovers that the shoulder deforms poorly.
The problem is passed back to rigging.
The rigger checks whether its origin lies in the skeleton or the skin weights.
The model may then return to modelling so that its topology can be corrected.
The new version goes through rigging again.
The animation is then updated.
This return is not necessarily a failure.
It is part of the work.
The real problem begins when no one knows:
- which version to use;
- who needs to correct the file;
- where the source is located;
- which stages depend on the modification;
- who must approve the result.
The pipeline exists precisely to answer these questions.
The approvals that structure the project
Not every stage should progress to its maximum level of finish before being shown.
An efficient production uses progressive approvals.
Concept approval
Do the idea, story and general direction work?
Storyboard approval
Is the sequence understandable?
Animatic approval
Do the rhythm and duration work?
Design approval
Can the characters and environments enter production?
Layout approval
Are the cameras, scales and overall movements correct?
Asset approval
Do the models, textures and rigs meet the needs of the shots?
Animation approval
Are the action, performance and rhythm convincing?
Lighting and rendering approval
Does the image correspond to the art direction?
Final approval
Are the sound, colour, effects, titles and exports correct?
Each approval temporarily closes a door.
Without this, everything can be modified indefinitely.
And when a project can always change everything, it often ends up no longer knowing what it is trying to finish.
Example of a character moving through the pipeline
Let us take a main character.
During pre-production
- their role is defined in the story;
- their actions appear in the storyboard;
- their screen time is checked in the animatic;
- their appearance is developed during design.
During production
- their size and position are tested in layout;
- the technical challenges are studied in R&D;
- their body and clothing are modelled;
- their skin and materials are textured;
- a skeleton and controls are created;
- their performance is constructed in animation;
- their hair and clothing may be simulated in VFX;
- they are integrated into the lighting of the shot;
- their different layers are rendered.
During post-production
- their passes are assembled with the environment;
- 2D effects may be added around them;
- their colours are harmonised with the rest of the sequence;
- the final shot is exported and delivered.
The character is therefore not “created” during a single stage.
They travel through the entire pipeline.
Each department adds a new layer of existence.
The professions behind the 18 stages
Depending on the size of the project, one person may fulfil several roles, or each function may be entrusted to an entire team.
| Stage | Professions frequently involved |
|---|---|
| Idea | Writer, director, creative director, producer |
| Story | Screenwriter, director, script editor |
| Storyboard | Storyboard artist, director |
| Animatic | Editor, storyboard artist, director |
| Design | Concept artist, character designer, environment designer |
| Layout | Layout artist, director, director of photography |
| R&D | Technical director, pipeline developer, FX TD |
| Modelling | 3D modeller, character artist, environment artist |
| Texturing | Texture artist, look-development artist |
| Rigging | Rigger, character TD |
| Animation | 3D animator, mocap artist |
| VFX | FX artist, simulation artist |
| Lighting | Lighting artist, director of photography |
| Rendering | Rendering TD, pipeline TD |
| Compositing | Compositor |
| 2D VFX / Motion Graphics | Motion designer, 2D FX artist |
| Colour Correction | Colourist |
| Final Output | Editor, delivery manager, post-production supervisor |
On an independent project, a single person may move from one profession to another.
In a major studio, an asset may pass through dozens of hands.
The pipeline needs to work in both situations.
It is not reserved for large teams.
A solo creator also needs to know which stage is in progress, which version has been approved and what remains to be produced.
The only difference is that they hold all the meetings with themselves.
How can this pipeline be adapted to a small project?
A complete pipeline does not mean that every stage must become a complex department.
For a short independent animation, it can be simplified.
Simplified pre-production
Idea → short synopsis → storyboard → animatic → visual references
Simplified production
Layout → modelling → materials → rigging → animation → lighting → rendering
Simplified post-production
Compositing → colour correction → editing → export
Some stages can be combined.
Design may be completed directly during storyboarding.
R&D may consist of a few technical tests.
2D effects may be integrated into compositing.
The aim is not to artificially reproduce the organisation of a major studio.
The aim is to preserve the essential questions:
- What has been approved?
- What is still temporary?
- Which stage depends on this one?
- Which file is the reference version?
- What result must be delivered?
A small, clear pipeline is better than a large decorative pipeline that no one follows.
Common mistakes in a 3D pipeline
Beginning modelling before approving the project
3D quickly creates the impression of making progress.
But producing the wrong element early remains a highly effective way to waste time.
Skipping the animatic
Without an animatic, rhythm problems appear when the shots are already expensive.
Adding detail before approving the volumes
A scene should work with simple forms before it works with complex textures.
Neglecting naming conventions
A file named character_final_v7_corrected_final2 is a cry for help disguised as a production method.
Modifying an asset without informing the following stages
A small model correction may break the rig, textures, simulations and renders.
Waiting until the end to test the render
A scene that works in the editor does not guarantee a fast, stable or correct render.
Treating export as a formality
The delivered file is the project that the audience or client will receive.
Everything that came before was merely its preparation.
The pipeline transforms uncertainty into stages
A 3D production can feel overwhelming.
It requires storytelling, drawing, modelling, texturing, rigging, animating, simulating, lighting, rendering and assembling.
From the beginning, everything appears to require attention at the same time.
The pipeline changes this perception.
It does not necessarily reduce the amount of work.
It makes it possible to move through it.
Today, the idea needs to be approved.
Then the storyboard.
Then the layout.
Then the model.
Each stage receives a question smaller than the project as a whole.
Little by little, the image stops being an abstraction.
It becomes a series of concrete decisions.
The idea gives it a direction.
The story gives it meaning.
The storyboard gives it images.
The animatic gives it time.
The design gives it an identity.
The layout gives it a space.
The modelling gives it volume.
The textures give it material.
The rig gives it a structure.
The animation gives it intention.
The effects give it energy.
The lighting gives it atmosphere.
The rendering gives it a visible form.
The compositing gives it coherence.
The colour gives it unity.
And the export finally gives it a destination.
The 3D production pipeline is therefore not merely a technical organisation.
It is the path through which an idea gradually learns to become real.