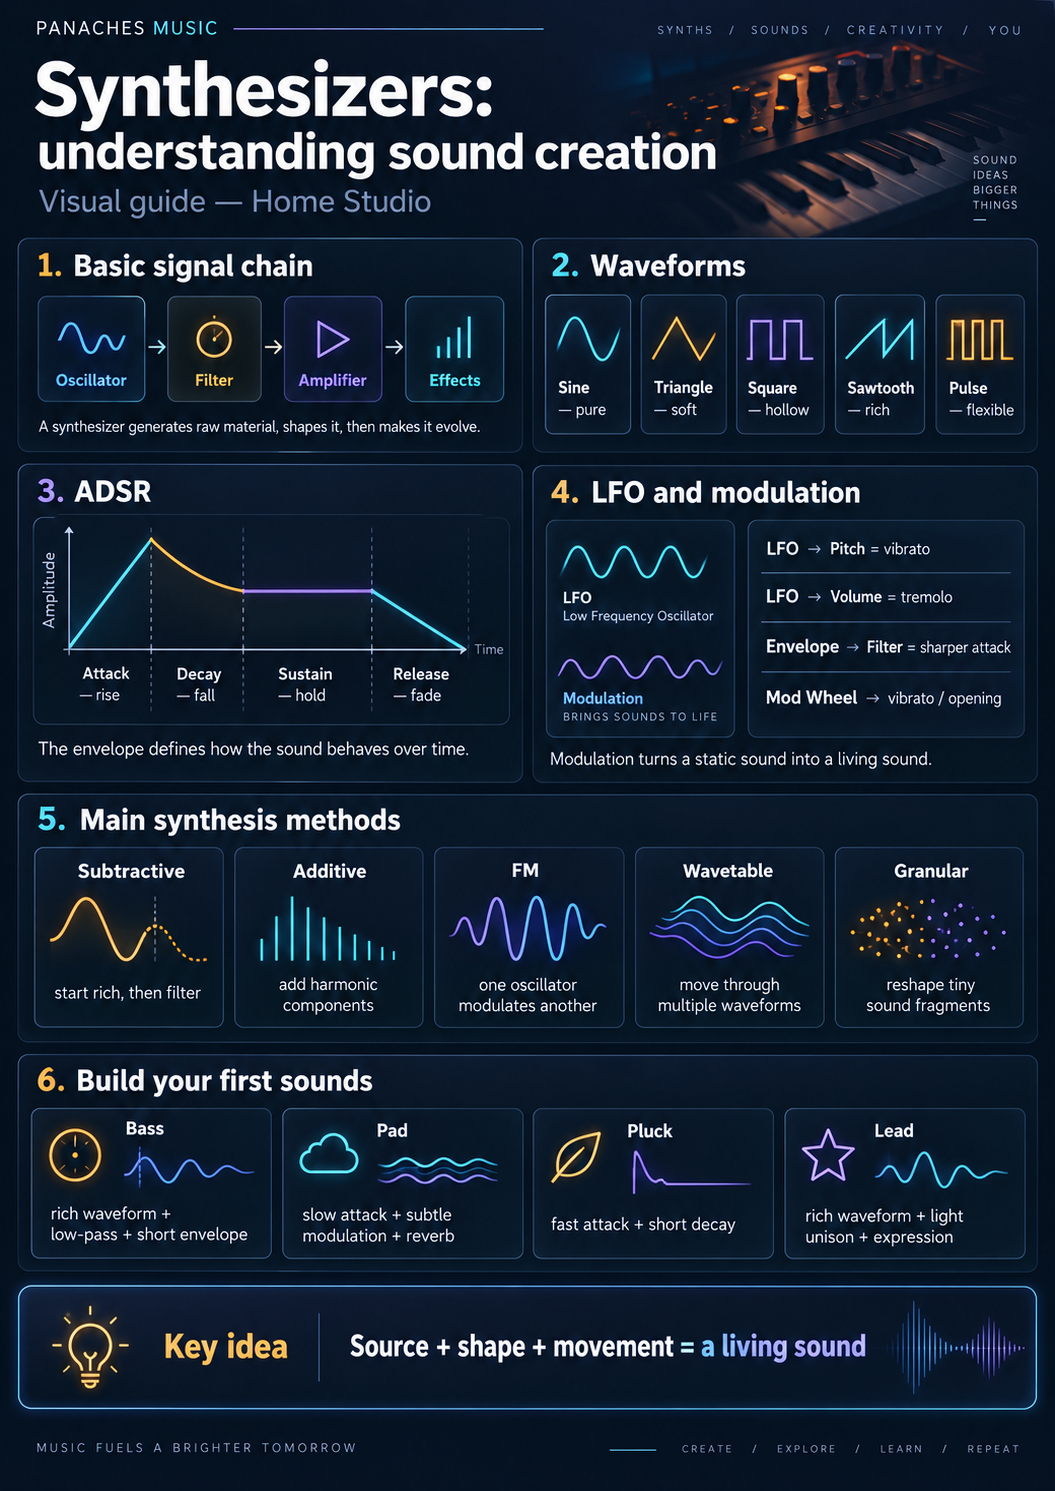
A synthesizer does not just play sounds: it builds them
A piano produces its timbre through struck strings. A guitar uses vibrating strings. A synthesizer follows a different logic: it generates or transforms a signal in order to build a sound.
That construction can be extremely simple or become highly complex.
In its most classic form, a synthesizer first generates raw sound material, transforms it with a filter, controls how it evolves over time and then adds different forms of modulation.
A large part of this logic can be summarized as:
Oscillator → filter → amplifier → effects
Envelopes, LFOs, modulation and controllers are then added to make these different stages evolve.
Understanding a synthesizer therefore has less to do with memorizing hundreds of knobs and more to do with understanding how the signal flows and what each block contributes to it.
The audio signal and control signals are not the same thing
Two types of information often circulate inside a synthesizer.
The audio signal is the sound itself.
Modulation signals are used to change certain parameters of that sound.
An envelope can, for example, control volume. An LFO can gradually change pitch. MIDI velocity can influence filter cutoff.
Audio = what you hear
Modulation = what makes what you hear evolve
This distinction is fundamental to understanding sound design.
When you turn a knob or assign a modulation, you are not necessarily creating a new sound source: you are often changing the behavior of an element that is already present.
The oscillator: the raw material of sound
In many synthesizers, sound begins with an oscillator, often abbreviated OSC or VCO on certain analog instruments.
The oscillator generates a periodic waveform.
The most common waveforms each have a different character.
| Waveform | General character |
|---|---|
| Sine | Very pure, few harmonics |
| Triangle | Soft, slightly richer |
| Square | Hollow and rich in harmonics |
| Sawtooth | Very rich, bright, ideal for filtering |
| Pulse | A variation of the square wave whose width can be modulated |
These descriptions are starting points, not absolute rules.
A sawtooth wave can become extremely soft after filtering. A sine wave can become aggressive when distorted or used in certain synthesis methods.
The oscillator provides the material. The rest of the synthesizer decides what that material becomes.
Pitch, octave and tuning
The oscillator frequency directly determines the pitch of the produced note.
A synthesizer usually lets you shift that pitch by octaves, semitones or finer tuning adjustments.
When several oscillators are used together, they can be tuned slightly differently.
Two almost identical oscillators that are slightly detuned create beating, which gives the sound more width or movement.
They can also be placed in different octaves.
For example:
OSC 1: fundamental
OSC 2: one octave lower
This technique can easily strengthen a lead or build a more massive bass sound.
Why use several oscillators?
Many synthesizers include two, three or more oscillators.
They can be mixed together to create a more complex source before the filter is even used.
For example, you might combine:
Sawtooth + square wave + sub-oscillator
The first oscillator provides a rich foundation. The second changes the texture. The sub-oscillator reinforces the low frequencies.
Oscillators can also be detuned from one another to widen the sound or create natural chorus-like effects.
Modern synthesizers can go much further with unison systems capable of virtually multiplying several slightly detuned voices.
Noise is also a sound source
Many synthesizers include a noise generator.
Unlike a traditional waveform, noise contains a very broad range of frequencies without a clearly defined musical pitch.
It may sound unmusical when used alone, but it becomes extremely useful in sound design.
A small amount of noise can add air to a pad, strengthen the attack of a percussive sound or help create wind, textures and certain effects.
It can also serve as the basis for synthetic percussion.
Noise clearly shows that a synthesizer is not limited to traditional notes: it can also build materials and textures.
The filter: shaping frequencies
After the oscillators, the filter is one of the most important blocks in classic synthesis.
Its role is to reduce certain parts of the frequency spectrum.
The most common type is the low-pass filter. It allows low frequencies to pass while progressively reducing frequencies above a certain point.
That point is determined by the cutoff frequency.
| Filter type | Main action |
|---|---|
| Low-pass | Reduces high frequencies |
| High-pass | Reduces low frequencies |
| Band-pass | Mainly keeps a middle frequency range |
| Notch | Reduces a targeted frequency band |
On a very bright sawtooth wave, gradually closing a low-pass filter makes the sound much darker.
This is one of the fundamental gestures of subtractive synthesis.
Resonance: emphasizing the filter area
Next to cutoff, there is often a parameter called resonance, sometimes abbreviated RES or Q.
It emphasizes the frequencies around the cutoff point.
At a low resonance setting, the effect can be subtle.
At higher values, the filter can produce a strong emphasis that gives the sound a very distinctive character. Some filters can even enter self-oscillation when resonance becomes high enough.
At that point, the filter almost stops behaving only as a frequency-reduction tool and becomes a potential sound source itself.
The envelope: shaping sound over time
A sound is not defined only by its spectrum.
The way it appears, sustains and then disappears is just as important.
That is the role of the envelope.
The classic form uses four stages, usually summarized by the acronym ADSR.
| Stage | Function |
|---|---|
| Attack | Time needed to reach the maximum level |
| Decay | Time needed to fall toward the sustain level |
| Sustain | Level maintained while the note is held |
| Release | Time needed to fade after the note is released |
A very fast attack creates a sound that appears immediately.
A long attack produces a gradual fade-in, which is especially useful for pads.
A short release stops the note quickly. A long release lets the sound fade gradually.
Two sounds using exactly the same oscillator can feel completely different simply because of their envelope.
The amplitude envelope controls volume
One of the most common uses of ADSR is to control the synthesizer’s amplifier.
This is often called an amplitude envelope.
To build a pad, you can use a relatively slow attack and a long release.
To create a pluck, the attack will be fast, the decay short and the sustain low or zero.
The same oscillator can therefore become:
- a slow pad;
- a short bass;
- a pluck;
- a sustained lead.
The sound source has not changed. Only its evolution over time has been transformed.
An envelope can also control the filter
The envelope is not only used to control volume.
It can also change the filter cutoff every time a note is triggered.
When a note begins, the filter can open quickly and then gradually close again.
This creates movement and makes it possible to build many classic synthesizer sounds: percussive basses, plucks, synthetic brass or leads.
The amount of envelope influence on the filter is often controlled by a parameter such as Envelope Amount.
You then get a modulation chain:
Envelope → filter cutoff
The filter evolves automatically with each note without requiring you to turn the knob manually.
The LFO: creating repeating movement
The LFO, or Low Frequency Oscillator, is also an oscillator.
But unlike the main audio oscillators, it usually operates at a frequency too low to be heard directly as a note.
It is used to modulate other parameters.
A few classic applications immediately show its purpose.
| LFO applied to… | Result |
|---|---|
| Pitch | Vibrato |
| Volume | Tremolo |
| Filter | Cyclic timbral movement |
| Pan | Left-right movement |
| Pulse Width | Animation of a pulse wave |
The LFO speed determines how fast the movement occurs.
Its amount determines the depth of the modulation.
Synchronizing the LFO to tempo
An LFO can run freely at a frequency expressed in hertz.
But it can also be synchronized to the track tempo.
Its cycle can then match a quarter note, eighth note, bar or other rhythmic division.
This synchronization makes it possible to create movements that fit perfectly into the groove of the track.
A filter modulation can, for example, follow every eighth note precisely.
In electronic music, this turns the LFO into a tool that is as rhythmic as it is sonic.
Modulation: the real heart of sound design
Oscillators, filters and envelopes provide the main building blocks.
But much of a synthesizer’s personality comes from the way those blocks interact.
A modulation simply means that one source automatically controls one destination.
A few examples:
LFO → Pitch
Envelope → Filter
Velocity → Volume
Mod Wheel → Vibrato amount
The more routing possibilities there are, the more the synthesizer can create evolving sounds.
Some instruments include a modulation matrix that clearly shows these assignments.
| Source | Destination | Possible effect |
|---|---|---|
| LFO | Cutoff | Cyclic filter movement |
| Envelope | Pitch | Rising or falling attack |
| Velocity | Cutoff | Timbre changes depending on playing strength |
| Aftertouch | Vibrato | Expression after the note |
| Mod Wheel | Multiple parameters | Real-time expressive control |
Modulation is often what turns a static sound into a living sound.
Subtractive synthesis: start with a rich sound and shape it
Subtractive synthesis is probably one of the best ways to begin understanding synthesizers.
Its principle is simple.
You begin with a harmonically rich source such as a sawtooth wave, then progressively remove part of those frequencies with a filter.
The classic chain becomes:
Oscillator → filter → amplifier
Envelopes and LFOs then animate the different parameters.
This architecture appears in a huge number of analog, virtual-analog and software synthesizers.
It can already create basses, leads, pads, plucks, synthetic brass and many other textures.
Additive synthesis: building sound harmonic by harmonic
Additive synthesis follows almost the opposite logic.
Instead of starting with a rich signal and removing frequencies, it builds the timbre by adding several components together.
Sine waves can be combined at different frequencies and amplitudes to create a more complex spectrum.
Component 1 + component 2 + component 3 + … = timbre
This approach allows extremely precise control over harmonic structure.
However, it can become less intuitive when a large number of components are used.
Modern interfaces can sometimes make it much more visual than early additive synthesis systems.
FM synthesis: oscillators modulating other oscillators
FM synthesis, or Frequency Modulation, uses the frequency of one oscillator to modify the frequency of another.
The oscillators are often described as operators.
One operator can produce the sound you hear while another modulates its frequency.
Simple ratios can produce relatively harmonic tones, while other settings create very complex spectra.
FM can easily generate metallic sounds, bells, basses, electric pianos or digital textures.
It can seem less intuitive than subtractive synthesis because small changes in ratios or modulation levels can radically transform the result.
Wavetable synthesis: moving through multiple waveforms
Wavetable synthesis uses a collection of waveforms stored inside a table.
Instead of staying on a single waveform, the synthesizer can gradually move through that collection.
The position itself can also be modulated.
LFO → wavetable position
The timbre then changes continuously.
This approach is especially useful for pads, leads, complex basses and moving textures.
It has become very common in modern software synthesizers because it combines rich sound possibilities with a relatively visual workflow.
Granular synthesis: turning sound into fragments
Granular synthesis works with very small fragments of sound called grains.
These fragments can be reorganized, layered, transposed or stretched.
A voice, instrument or simple noise can therefore become a texture completely different from the original source.
This method is especially suited to atmospheres, drones, cinematic sound design and experimental textures.
Unlike classic subtractive synthesis, the source here can be an existing recording rather than a simple waveform generated by a traditional oscillator.
Sampling and synthesis can meet
The boundary between synthesizer and sampler has become much less strict.
Some instruments use samples as raw material while still providing filters, envelopes, LFOs and modulation matrices similar to those of a synthesizer.
A recorded piano note can therefore be transformed until it becomes unrecognizable.
Conversely, many synthesizers allow custom waveforms or wavetables to be imported.
Modern sound design therefore often mixes synthesis, sampling and audio processing.
Analog and digital: two ways of building the same functions
A synthesizer can use analog circuits, digital processing or a combination of both.
In an analog synthesizer, certain functions such as oscillators or filters are carried out directly by electronic circuits.
A digital synthesizer uses calculations to generate or transform the signal.
| Analog | Digital |
|---|---|
| Electronic circuits | Digital processing |
| Often immediate architecture | Very wide variety of methods |
| Behavior may vary slightly | High precision and easy recall |
| Often associated with subtractive synthesis | FM, wavetable, granular and many other approaches |
These categories are not a quality ranking.
A digital synthesizer can reproduce an analog-style architecture, while a modern instrument may combine digital oscillators with an analog filter.
The more useful question remains what the instrument’s architecture actually allows you to do.
Hardware synthesizer or virtual instrument?
The same comparison exists between hardware and software synthesizers.
| Hardware synthesizer | Software synthesizer |
|---|---|
| Immediate physical controls | Integrated directly into the DAW |
| Can sometimes operate without a computer | Number of instances is often more flexible |
| Has its own audio outputs | Saves directly with the project |
| Requires space and cabling | Very practical for automation |
| Direct tactile experience | Huge variety of instruments available |
A hardware synthesizer can provide a very physical relationship with sound.
A virtual instrument makes production integration extremely easy: automation, patch saving, duplication and project recall.
The two can obviously be used together.
MIDI and audio remain separate with a hardware synthesizer
When a hardware synthesizer is controlled from a DAW, two separate signal flows can be involved.
MIDI carries notes and commands.
Audio carries the sound actually produced.
A common setup becomes:
DAW → MIDI → synthesizer → audio → audio interface → DAW
This distinction is essential.
Recording only the MIDI track preserves the instructions but not necessarily the final sound.
Recording the synthesizer’s audio output preserves its actual signal inside the project.
Monophonic, polyphonic and paraphonic
Not all synthesizers can play the same number of notes at once.
A monophonic synthesizer generally plays one note at a time.
It is particularly well suited to basses, leads and melodic lines.
A polyphonic synthesizer can play several voices simultaneously and can therefore create chords and pads.
The term paraphonic describes intermediate architectures in which several pitches can be produced while sharing some elements of the synthesis path.
| Architecture | Typical use |
|---|---|
| Monophonic | Basses, leads |
| Polyphonic | Chords, pads, sustained textures |
| Paraphonic | Multiple notes with shared architecture |
The number of available voices can therefore become an important criterion depending on the kind of music being produced.
Unison and detune: adding width
Unison mode layers several voices playing the same note.
These voices can be slightly detuned using detune and sometimes spread across the stereo field.
The result becomes wider and denser.
This technique is widely used for modern leads, pads and basses.
But more voices do not automatically mean a better sound.
Too much unison can make a timbre blurry or take up a huge amount of space in the mix.
Width is a sound-design choice, not a requirement.
Effects are often part of the patch
Reverb, delay, chorus, distortion or phaser are not always simple treatments added after the synthesizer.
On many modern instruments, they are part of the patch itself.
A chorus can turn a simple pad into a much wider texture.
A delay can transform a very short lead into a complex rhythmic phrase.
Distortion can enrich an oscillator that is poor in harmonics.
| Effect | Common contribution |
|---|---|
| Chorus | Width and movement |
| Delay | Repetition and rhythm |
| Reverb | Space and depth |
| Distortion / saturation | Harmonics and character |
| Phaser / flanger | Spectral movement |
The important thing is to remember that some presets sound impressive mainly because of their effects.
A preset is a starting point, not cheating
Modern synthesizers often include libraries of presets, or patches.
They make it possible to load a complete sound instantly.
Using a preset does not prevent you from learning sound design.
In fact, one of the best exercises is to load a sound and then study how it was built: which oscillators are used, where the filter is, which envelopes control which parameters and which modulations create the movement.
You can then modify the patch gradually.
Understanding why a preset works is often more educational than turning every knob at random.
Init Patch: starting from zero
Many synthesizers provide an Init Patch, a deliberately simple configuration used as a starting point.
It is an excellent learning tool.
A sound-design workflow can then follow a few logical steps:
- choose the sound source;
- define the volume envelope;
- shape the spectrum with the filter;
- add one useful modulation;
- finish with the necessary effects.
This method prevents you from changing ten parameters at once without understanding which one is actually changing the sound.
Building a simple bass
A bass sound is a good exercise for learning synthesis.
You can start with a sawtooth or square wave, possibly reinforced by a sub-oscillator.
The low-pass filter then reduces the brightest frequencies.
A relatively fast envelope keeps the sound precise.
A light filter envelope can create more attack.
The structure remains very simple:
Rich oscillator → low-pass filter → short envelope → bass
You can then add saturation, glide or modulation depending on the desired character.
Building a pad
A pad generally follows almost the opposite logic.
Several slightly detuned oscillators can provide a wide foundation.
The amplitude envelope uses a slower attack and relatively long release.
A filter softens the spectrum.
A very slow LFO can then slightly move the cutoff or wavetable position.
Reverb or chorus often completes the result.
Slow evolution + subtle modulation + space = an effective starting point for a pad
The movement should generally stay slow enough not to draw all the attention.
Building a pluck
A pluck is mainly built around a very short envelope.
The attack is almost immediate, the decay is fast and the sustain is low.
A second envelope can control the filter in a similar way.
The note therefore begins with more harmonics before quickly becoming darker.
With a tempo-synced delay, a very simple sound can immediately become much more musical.
This example shows how the envelope can matter more than oscillator complexity.
Building a lead
A lead generally needs to remain clear while playing a melody.
One or more harmonically rich waveforms are often a good starting point.
A light unison can add width, while glide can optionally make the pitch slide gradually between some notes.
The modulation wheel or aftertouch can then control vibrato or filter opening.
The patch becomes more expressive while being played instead of remaining static.
The modulation matrix: organizing complex movement
On advanced synthesizers, modulation possibilities can become numerous.
The modulation matrix helps organize them.
Each assignment generally relies on three elements:
Source → amount → destination
For example:
LFO 1 → +25% → Cutoff
Velocity → +40% → Volume
Aftertouch → +15% → Pitch
This representation makes it immediately clear why a sound is evolving.
When the patch becomes complex, the matrix becomes almost the wiring diagram of sonic movement.
Modulation does not need to be spectacular
A common mistake is to make every parameter move simply because the synthesizer allows it.
The most effective modulations can be almost imperceptible.
A slight pitch movement, a small filter variation or slow panning can be enough to prevent a sound from feeling completely static.
The goal is not to demonstrate the power of the synthesizer.
The goal is for the movement to serve the role of the sound inside the track.
Which type of synthesizer for which need?
No synthesis method is limited to one use, but a few directions can help when choosing.
| Need | Useful starting point |
|---|---|
| Learn synthesis | Subtractive with a clear interface |
| Classic basses and leads | Analog or virtual analog |
| Evolving pads | Wavetable, hybrid or granular |
| Metallic / digital sounds | FM |
| Experimental textures | Granular |
| Very precise harmonic design | Additive |
| Versatile production | Multi-engine software synthesizer |
The best instrument for learning is therefore not necessarily the one with the most synthesis methods.
A clear interface that makes oscillator, filter, envelope and modulation easy to understand can be far more educational.
Mistakes to avoid
| Mistake | Why it causes problems |
|---|---|
| Changing every parameter at once | It becomes impossible to understand their role |
| Only searching for spectacular presets | The sound may be difficult to fit into a track |
| Confusing oscillator and LFO | They usually serve different roles |
| Ignoring envelopes | They determine a large part of the sound’s behavior |
| Using too much unison | The patch can become blurry and overwhelming |
| Adding too many effects too early | They can hide the basic sound |
| Adding modulation without a purpose | The movement becomes confusing |
| Constantly switching synthesizers | The same fundamentals still need to be learned |
The best progression is often to master one relatively simple synthesizer deeply before looking for more possibilities.
Understanding a few blocks unlocks almost every synthesizer
Interfaces can look extremely different from one instrument to another.
Some resemble traditional analog machines. Others display wavetables, FM operators or huge modulation matrices.
Yet several principles keep returning.
A source generates or provides raw sound material. Processing changes its spectrum. Envelopes organize its evolution. Modulations introduce movement. Effects complete the result.
Source → shape → movement → space
Understanding this logic makes many synthesizers immediately less intimidating.
You can approach a new instrument by simply asking: where is the sound material created, how is it transformed and what makes it evolve?
Creating a sound means organizing an evolution
Sound design is ultimately not an accumulation of knobs.
It means deciding how a sound begins, how it evolves, which frequencies dominate, how it responds to performance and how it disappears.
An oscillator provides a foundation. A filter gives it spectral shape. An envelope organizes time. An LFO creates movement. Modulation connects the player’s gestures to different parameters.
Different synthesis methods change the way that raw material is created, but the principle remains the same: build a coherent sonic evolution.
A synthesizer becomes truly understandable when you stop seeing a front panel full of knobs and start seeing a path traveled by the sound.
From there, creating your own patches becomes much less mysterious.
You stop searching randomly for the knob that will produce a good sound.
You gradually learn to imagine a transformation, then use the synthesizer to build it.