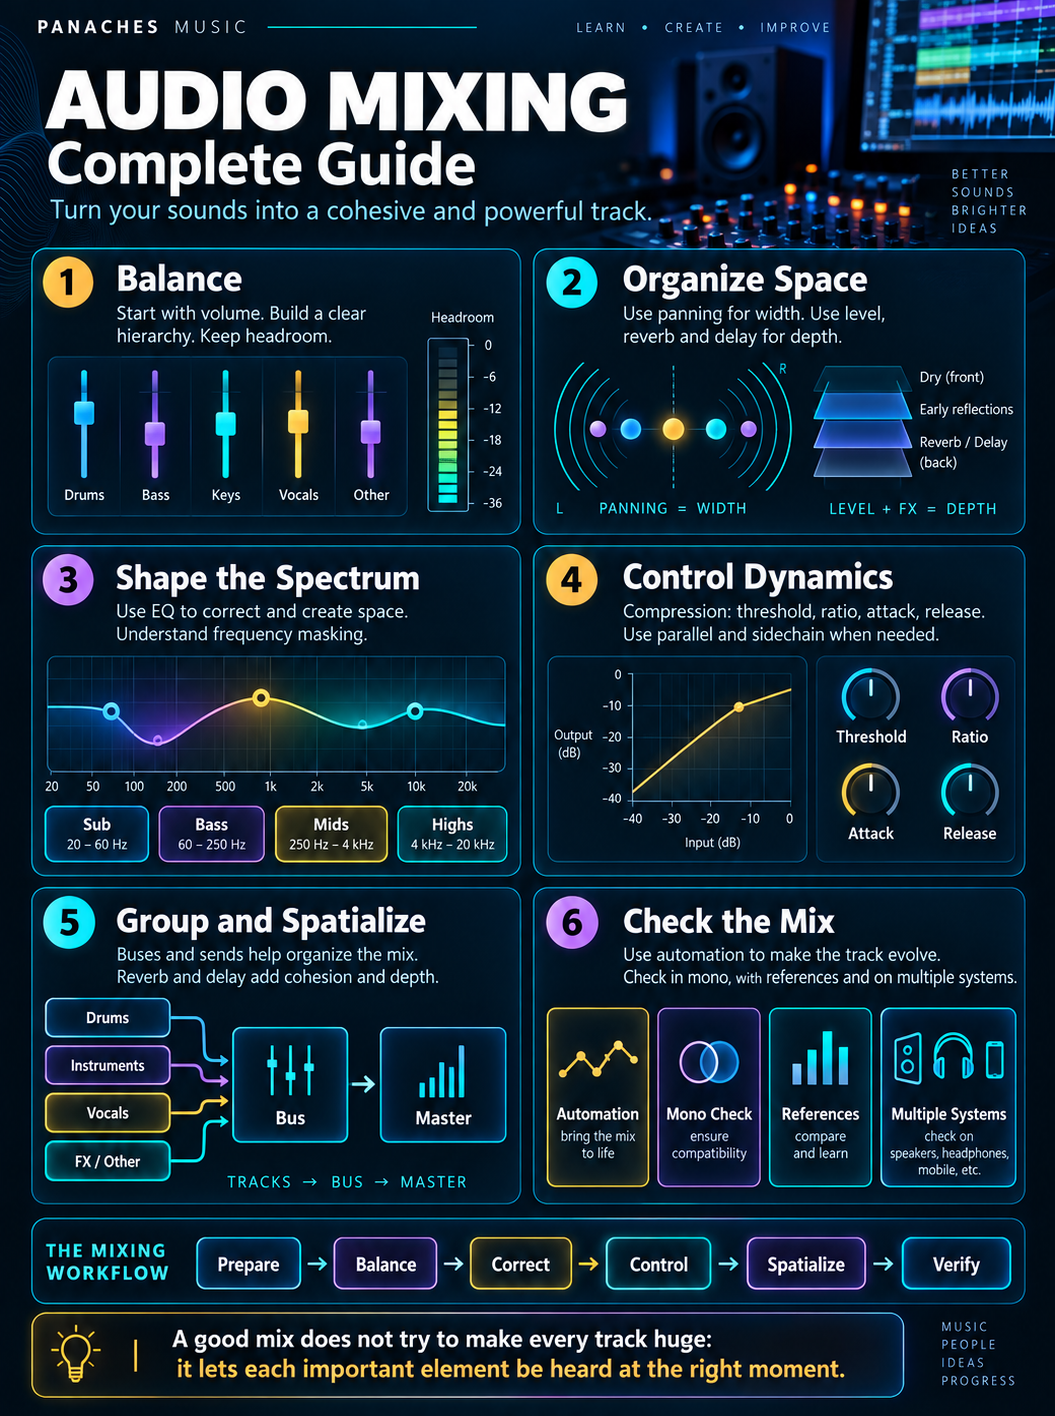
Mixing means organizing a track
Audio mixing begins when several tracks need to work together as a single piece of music.
A production can contain vocals, drums, bass, several guitars, synthesizers, samples, effects and dozens of other elements. Heard separately, each one may sound excellent. Together, however, they can mask one another, occupy the same space or completely unbalance the track.
Mixing therefore consists of organizing these different sources.
Mixing is not about making every track sound spectacular: it is about making every track serve the song.
This organization involves several dimensions: level, frequency, dynamics, stereo image, depth and evolution over time.
A simple way to think about the process is:
Balance → space → control → movement → verification
Plugins then become tools used to achieve those goals.
The mix begins before the first plugin
A poor arrangement does not automatically become a good song through mixing.
When three instruments play simultaneously in the same register with very similar timbres, they may mask one another before any EQ is added.
Sound selection, arrangement and performance are therefore already part of the future mix.
A short kick leaves different space for the bass than a very long one. A guitar played an octave higher can naturally free up the midrange. A simpler melody can leave more room for the vocal.
Sometimes the easiest way to create space in a mix is simply not to ask two elements to occupy exactly the same role.
Mixing therefore begins by listening to what is actually there, not by opening a collection of plugins.
Prepare the session before mixing
A disorganized session quickly slows down the work.
Renaming tracks, removing unused takes and grouping similar elements makes the structure of the song immediately easier to understand.
A simple organization can use a few broad families:
| Group | Examples |
|---|---|
| Drums | Kick, snare, hi-hats, toms, overheads |
| Bass | Electric bass, synth bass, 808 |
| Harmony | Guitars, pianos, synths, chords |
| Melodies | Leads, solos, motifs |
| Vocals | Lead, doubles, backing vocals |
| FX | Risers, impacts, textures, transitions |
Buses can then bring these different groups together.
The goal is not to build an extremely sophisticated session, but to know immediately where each element is and how it flows through the project.
Start with volume
Volume is probably the most important mixing tool.
Before EQ, compression or saturation, the relationship between levels already determines a large part of the song.
A vocal that is too loud will remain too loud even with an excellent compressor. A snare that is almost inaudible does not necessarily need more upper-mid presence: its fader may simply be too low.
A first mix can therefore begin with no plugins at all.
Lower the faders, play the track and progressively build a balance.
If the track does not work with levels alone, plugins should not be the first solution.
This first balance also forces you to decide which elements are actually important.
Build a hierarchy
Not every instrument can be in the foreground at the same time.
A song usually has a hierarchy.
In a vocal track, the lead vocal may be the central element. In electronic music, kick and bass may occupy more space. In an instrumental piece, a guitar or synthesizer may become the focal point.
The rest of the mix should support that hierarchy.
| Layer | Possible role |
|---|---|
| Foreground | Main element, vocal, lead |
| Middle ground | Accompaniment, drums, harmony |
| Background | Pads, textures, ambience, effects |
This hierarchy can obviously change throughout the track.
A guitar that is discreet during the verse can move to the foreground during a solo.
Gain staging: keeping the signal chain healthy
Gain staging means managing levels at different stages of the audio chain.
A track can pass through several plugins, buses and effects before reaching the master. If every processor significantly increases the level, the session quickly becomes difficult to control.
The issue is not only final clipping.
Some plugins react differently depending on the level entering the processor.
It is therefore useful to monitor levels before and after plugins.
Adding processing should not automatically mean making the track louder.
Comparing a plugin at roughly the same perceived level before and after processing also helps you judge its real effect without being fooled by a simple increase in volume.
Headroom and clipping
In a digital system, the maximum level is represented by 0 dBFS.
When a signal exceeds that limit in certain parts of the chain, it can cause digital clipping.
During mixing, it is therefore preferable to keep some margin, or headroom.
This does not mean obsessively targeting one exact value on every track.
The idea is simpler: avoid pushing every track and every bus right up to the limit.
A master bus with remaining space is much easier to manage.
The power of a mix does not come from every meter constantly sitting at maximum level.
The final loudness will be handled later, especially during mastering.
Panning organizes horizontal space
Panning positions an element between the left and right channels.
It helps prevent everything from being stacked in the center.
Kick, bass and lead vocal often remain close to the center, but this is not an absolute rule.
Guitars, percussion, backing vocals or synthesizers can be spread around them.
A simple stereo arrangement might become:
Left guitar ← Vocal / Kick / Bass → Right guitar
Panning creates separation without changing the frequency content of the tracks.
However, the overall picture still needs to remain coherent: pushing every element hard left or right does not automatically make a mix wider.
Stereo width and depth are not the same thing
Stereo has several dimensions.
Panning mainly affects the left-right position.
Depth is more about the sense of near-far.
A dry, loud and detailed sound usually feels closer. A quieter, darker sound with more reverb can feel farther away.
The mix can therefore be imagined as a three-dimensional space:
| Dimension | Main tools |
|---|---|
| Frequency height | Arrangement, EQ |
| Left-right width | Panning, stereo |
| Front-back depth | Volume, reverb, delay, tone |
This representation helps explain why two tracks can coexist even when they play at the same time.
EQ: shaping the spectrum
The equalizer, or EQ, lets you increase or reduce certain frequency areas.
It is one of the most commonly used tools in mixing.
But its purpose is not to turn every track into something impressive when heard on its own.
EQ often helps tracks work together.
A piano may sound beautiful with a lot of low end when soloed, but that energy can interfere with the bass and kick in the full mix.
A targeted reduction may therefore make the mix clearer even if the piano sounds slightly less massive on its own.
The best EQ move is not necessarily the one that improves a track in solo: it is the one that improves its role in the mix.
Understanding the main frequency ranges
Exact boundaries vary depending on the instrument and situation, but a few broad areas help provide orientation.
| Approximate range | Common perception |
|---|---|
| Sub-bass | Depth, vibration |
| Bass | Weight, body |
| Low mids | Warmth, density, sometimes muddiness |
| Mids | Core presence of many instruments |
| Upper mids | Attack, intelligibility, possible harshness |
| Highs | Brightness, detail |
| Air | Openness, airiness |
These descriptions are not recipes.
A problematic frequency always depends on the sound, context and arrangement.
High-pass filters: useful, but not automatic
A high-pass filter reduces frequencies below a chosen point.
It can remove unnecessary rumble or free up space in the low end.
On vocals, guitars or certain percussive elements, it can be very useful.
But automatically applying an aggressive high-pass filter to every track can make the mix unnecessarily thin.
Some instruments contain useful energy lower than expected.
Filtering because a frequency is not useful makes sense. Filtering simply because a rule says so makes much less sense.
Listening remains the reference.
Cut before boosting?
It is often said that frequencies should always be reduced rather than boosted.
The reality is more nuanced.
A cut can solve masking or resonance.
A boost can be perfectly appropriate for adding presence, body or air.
What matters is understanding why the adjustment is being made.
If a vocal lacks clarity, the issue may come from too much low-mid energy, not enough upper mids, or simply another instrument masking it.
The mixer’s job is to identify the cause, not automatically apply a technique.
Frequency masking
Two sources can contain a lot of energy in the same region of the spectrum.
One can then make the other harder to hear.
This is frequency masking.
Bass and kick are a classic example, but the same thing can happen between vocal and guitar, snare and synth, or several melodic layers.
There are several possible solutions: change the arrangement, adjust level, move an element in the stereo field or use EQ.
Frequency processing is therefore only one possible answer.
The best way to solve a frequency conflict may sometimes be to change the musical relationship between the tracks.
Dynamic EQ: correcting only when needed
A dynamic EQ combines part of an equalizer’s behavior with level detection.
A band only cuts or boosts frequencies when certain conditions are met.
This can be useful when a frequency becomes problematic only at specific moments.
A vocal, for example, may become harsh only on certain syllables.
Instead of reducing that area throughout the entire song, dynamic EQ can react only when it becomes too strong.
This approach allows more targeted corrections, but it should not replace careful listening or good basic settings.
Compression: controlling dynamics
Compression reduces the difference between quieter and louder parts of a signal according to the chosen settings.
It can stabilize a vocal, increase the sense of impact in drums, control a bass line or alter the movement of an instrument.
The main parameters explain how it works.
| Parameter | Function |
|---|---|
| Threshold | Level at which compression begins |
| Ratio | Amount of reduction above the threshold |
| Attack | How quickly the compressor reacts |
| Release | How quickly it stops compressing |
| Make-up Gain | Level added after gain reduction |
| Knee | How gradually compression begins |
Compression does not therefore simply mean “making volume more even”.
Attack and release can deeply alter the rhythmic character of a sound.
Attack: preserve or reduce transients
A transient is the very fast beginning of many sounds.
The impact of a kick, the crack of a snare or the attack of a plucked string are good examples.
A compressor with a very fast attack can strongly control that transient.
A slower attack lets more of the initial impact pass before compression begins.
This can make drums feel punchier.
Compression can change the envelope of a sound just as much as its level.
The right setting therefore depends on what you want to preserve or control.
Release: letting the compressor breathe
Release determines how long the compressor takes to return toward its normal state after reducing the signal.
A release that is too long may keep the compressor working while the next event is already arriving.
A very fast release can create audible movement, sometimes useful and sometimes distracting.
On rhythmic elements, release can even contribute to the groove.
The gain-reduction meter helps explain what the compressor is doing, but it should never replace listening to the result.
Parallel compression: combining control and dynamics
Parallel compression means blending the original signal with a more heavily compressed version.
The compressed signal adds density and stability while the original preserves more transients and dynamics.
This technique is commonly used on drums, vocals or groups of instruments.
The chain can be thought of as:
Original signal + compressed signal = balance between natural dynamics and density
Many plugins now include a mix control that can achieve this effect without creating a separate bus.
Sidechain: one signal can control another processor
Sidechain processing allows one signal to trigger the behavior of a processor placed on another track.
The best-known example uses the kick to control a compressor on the bass.
When the kick hits, the bass is reduced slightly.
Kick → detection → bass compression
This temporarily creates more space.
Sidechain processing can be very subtle or deliberately audible as a rhythmic effect.
It can also be used in other situations: a vocal can trigger a slight reduction on an instrumental bus to remain more intelligible.
Saturation and distortion: adding harmonics
Saturation adds harmonics to a signal.
It can add density, make a bass easier to hear on small speakers or give more character to a vocal, drum sound or bus.
Distortion pushes that transformation further.
These processes can also slightly alter dynamics.
Subtle saturation is not necessarily heard as obvious distortion: it may simply feel like added presence or density.
Adding harmonics can sometimes make a sound easier to hear without simply turning it up.
As always, the effect should be judged in the context of the track.
Reverb builds space
Reverb simulates or recreates the way sound reflects inside an environment.
It can place elements in a shared space or create a particular sense of depth.
A small amount of reverb can add cohesion.
A long reverb can completely transform a vocal, pad or percussion sound.
But reverb also adds energy to the mix and can quickly mask detail.
Several parameters are especially useful:
| Parameter | Effect |
|---|---|
| Pre-delay | Time before the reverb begins |
| Decay | Length of the reverberation |
| Damping | How high frequencies decay inside the reverb |
| Size | Perceived size of the space |
| Mix / Send | Amount of reverb used |
Pre-delay can, for example, keep a vocal feeling close while placing a sense of space behind it.
Delay can create space without blurring everything
Delay repeats the signal after a chosen amount of time.
It can create depth, fill spaces between phrases or become a true rhythmic element.
A tempo-synced delay can follow musical values such as quarter notes, eighth notes, dotted eighths and other divisions.
At a low level, it can create a sense of space without producing the same density as a long reverb.
Filters inside the delay can also darken the repeats so they do not compete with the original signal.
Use sends instead of a separate effect on every track
Sends allow several tracks to feed the same auxiliary effect.
You can create one reverb bus and send different amounts from the vocal, snare or synthesizers.
This has several advantages.
The tracks can share the same acoustic space, and a single plugin can serve multiple sources.
The send level remains independent for each track.
Several instruments → Send → same reverb
The same logic can be used for delays, parallel compression or shared special effects.
Buses group tracks together
A bus allows several tracks to pass through one common channel.
All drum tracks, for example, can be sent to a Drums bus.
Kick + Snare + Hi-hats + Toms → Drums Bus
The level of the entire group can then be controlled with one fader.
You can also apply shared processing such as light compression, saturation or EQ.
Other groups can be created for vocals, guitars, synthesizers or effects.
Routing becomes clearer and the mix becomes easier to control.
Bus compression: creating cohesion
Light compression on a group can help the elements feel more connected.
On a drum bus, it can strengthen the sense that the individual drum sounds belong to the same kit.
On the master, very subtle compression can sometimes add overall cohesion.
But this is not mandatory.
Too much bus compression can flatten transients or reduce dynamics unnecessarily.
The treatment should therefore solve a specific need rather than follow the idea that a bus “must” contain a compressor.
Automation transforms a static mix
A song changes over time.
The mix settings can change too.
Automation allows almost any parameter to evolve automatically throughout the track.
A vocal can be adjusted phrase by phrase. Reverb can rise on the final syllable. A synthesizer can gradually become wider. A delay can appear only during a transition.
A living mix does not necessarily use the same settings from beginning to end.
Automation is often what turns a good static balance into a truly musical mix.
Volume automation can sound more natural than excessive compression
A highly uneven vocal does not necessarily need extremely aggressive compression.
Certain sections can be corrected manually with automation or clip gain before compression.
The compressor then receives a more consistent signal.
This approach often preserves more natural dynamics.
It takes more time, but it also provides very precise control over the performance.
The same principle can be used on bass, guitar or any track whose level occasionally jumps out of the mix.
Phase can completely change some sounds
When several microphones or layers record the same source, their waveforms may not be perfectly aligned.
Some frequencies can then reinforce each other while others become weaker.
This behavior is related to phase relationships.
It appears frequently with multi-miked drums, guitars recorded with several microphones or certain layering techniques.
A sound that suddenly becomes very thin when two tracks are played together may indicate this type of issue.
Before adding extreme EQ, it can be useful to check timing alignment, polarity or the relative position of the tracks.
Check the mix in mono
Temporarily switching a mix to mono provides several useful checks.
Elements spread across the stereo field become stacked in the same position, making some masking problems easier to hear.
Phase issues can also become more obvious.
A very wide sound that nearly disappears in mono deserves particular attention.
The mix does not need to sound identical in mono and stereo.
The goal is simply to ensure that the essential elements remain present and understandable.
Vocals should be integrated, not simply placed on top
In a vocal production, it is easy to simply raise the vocal fader until the voice becomes audible.
But a truly integrated vocal depends on several relationships.
The instrumental should leave enough frequency space. The vocal dynamics should be controlled enough. Reverb and delay should match the desired depth.
Doubles and backing vocals should support the lead without masking it.
A well-integrated vocal may need less level than expected when the rest of the track genuinely leaves room for it.
Drums need impact, but also balance
A powerful drum section does not necessarily mean every element must be extremely loud.
Kick, snare, hi-hats and cymbals still need a hierarchy.
Compression can change transients. EQ can create separation. Saturation can add character.
But the first question remains level balance.
A hi-hat that is too loud can make the entire track harsh even if the kick and snare are perfectly processed.
The drums should function as one rhythmic section.
Kick and bass: building one foundation
The relationship between kick and bass is often crucial.
Both occupy an important part of the low-frequency spectrum.
There is no single universal method for separating them.
You might choose a very deep kick with a bass that sits slightly higher, or the opposite.
The rhythmic arrangement itself can already prevent some conflicts.
EQ, compression, sidechain processing or saturation then refine that relationship.
Before processing kick and bass separately, listen to them as one foundation.
Reference tracks help restore perspective
After several hours of mixing, the ear adapts.
Too much bass can begin to sound normal. An overly bright vocal can too.
Reference tracks provide an external point of comparison.
They can help you judge:
- overall frequency balance;
- the relationship between vocal and instrumental;
- the amount of low end;
- width and depth.
It is important to compare at similar listening levels.
A louder track can easily feel more impressive even when its balance is not better.
Mix at several listening levels
A mix should be checked at different volumes.
At low volume, the main elements become easier to identify.
The vocal, snare or lead should still retain their role when the level is reduced.
Louder listening can occasionally reveal low-end behavior or harshness, but it also tires the ears more quickly.
Most of the work therefore benefits from being done at a reasonable listening level.
If you keep turning the volume up just to feel the track again, it is often time to take a listening break.
Listening fatigue changes your decisions
After several hours, the ears and attention no longer react exactly as they did at the beginning of the session.
Certain frequencies become less obvious. You may begin changing settings that were already working correctly.
Short breaks help restore perspective.
Coming back to the track the next day can immediately reveal problems that were invisible the day before.
Mixing therefore requires managing listening fatigue as much as technical tools.
Check the track on several systems
A mix will not exist only on Home Studio monitors.
It may be heard on headphones, cars, phones, small speakers, Hi-Fi systems or earbuds.
These systems do not reproduce frequencies in the same way.
The goal is not for the song to sound identical everywhere.
The essential balance should simply survive.
The vocal should remain understandable. The bass should not become uncontrollable. The kick should not completely disappear.
This ability is called mix translation.
Do not correct each playback system individually
When a mix sounds bad in a car, it is tempting to immediately return to the studio and adjust the song specifically for that car.
But every playback system has its own flaws.
The goal is not to create a mix that is perfect on one particular device.
Look for problems that repeat across several systems.
If the bass sounds excessive on the monitors, headphones and in the car, the problem probably comes from the mix.
If it only sounds strange on one specific device, that playback system may be responsible.
The master bus is not mastering
The master bus is the final channel through which the entire mix passes.
Some processing can be used there during mixing: a very light EQ, subtle compression or controlled saturation.
But that does not automatically turn the process into mastering.
Mastering is a separate stage focused on finalization, overall level, delivery consistency and preparation of the final file.
It is therefore useful to distinguish:
Mixing = internal balance of the track
Mastering = finalization of the completed track
The two processes are related, but their goals are not identical.
A progressive mixing method
There is no universal workflow, but working in a logical order helps prevent confusion.
| Step | Goal |
|---|---|
| 1. Prepare | Organize, clean and rename tracks |
| 2. Balance | Build the mix with levels |
| 3. Pan | Organize left-right space |
| 4. Correct | Address frequency conflicts |
| 5. Control dynamics | Use compression or automation when needed |
| 6. Create depth | Add reverb and delay |
| 7. Group | Organize buses and shared processing |
| 8. Automate | Make the mix evolve |
| 9. Compare | Use reference tracks |
| 10. Verify | Mono, headphones, monitors and other systems |
This progression does not prevent you from going back.
Changing EQ may require another level adjustment. Automation can change the way compression feels.
Mixing remains an interactive process.
Mistakes to avoid
| Mistake | Why it causes problems |
|---|---|
| Starting immediately with lots of plugins | The basic balance is never properly built |
| Mixing every track only in solo | Decisions ignore the song as a whole |
| Compressing out of habit | Not every track needs compression |
| Applying the same EQ moves everywhere | Every source and arrangement is different |
| Trying to make every track sound huge | Every element competes for the foreground |
| Using too much reverb | The mix quickly loses definition |
| Ignoring phase | Some frequencies can cancel |
| Constantly pushing the master toward 0 dBFS | The mix loses headroom |
| Always mixing very loud | Fatigue changes decisions |
| Never using references | Your perspective gradually drifts |
These mistakes often share the same cause: using a tool before identifying the problem it is supposed to solve.
There is no universal plugin chain
It is tempting to search for a perfect chain:
EQ → Compressor → Saturation → Reverb
But one track may need nothing more than a level adjustment.
Another may need significant automation and no compression at all.
A third may need a filter, then saturation, then another EQ.
The order itself can change the result.
A plugin should enter the chain because it has a job to do, not because a recipe says it should be there.
Understanding the role of each tool gradually makes plugin chains much simpler.
A finished mix is not a perfect mix
A mix can be changed forever.
Every listen may reveal another tiny possible correction.
The problem is that endless tweaking can also damage decisions that were already working.
You therefore need to recognize when the main goals have been achieved.
The track is balanced. Important elements are clear. The low end is controlled. The stereo image works. The mix translates well across several systems.
At that point, moving an EQ by a fraction of a decibel does not necessarily improve the music.
Mixing is a sequence of decisions
EQ, compression, reverb, buses and automation may seem like the heart of mixing.
But none of these tools makes decisions for the mixer.
The fundamental question remains the same:
What am I trying to improve?
Is a track too loud? Too close? Too aggressive? Too dynamic? Masked by another? Too wide? Too bright?
Once the problem is clearly identified, choosing the right tool becomes much easier.
Mixing then stops being an accumulation of plugins.
It becomes a way of organizing the listener’s attention.
A good mix does not try to show everything that was recorded: it allows every important element to be heard at the right moment, in the right place and with the right energy.
That coherence is what gradually turns a collection of separate tracks into one clear, unified and living piece of music.