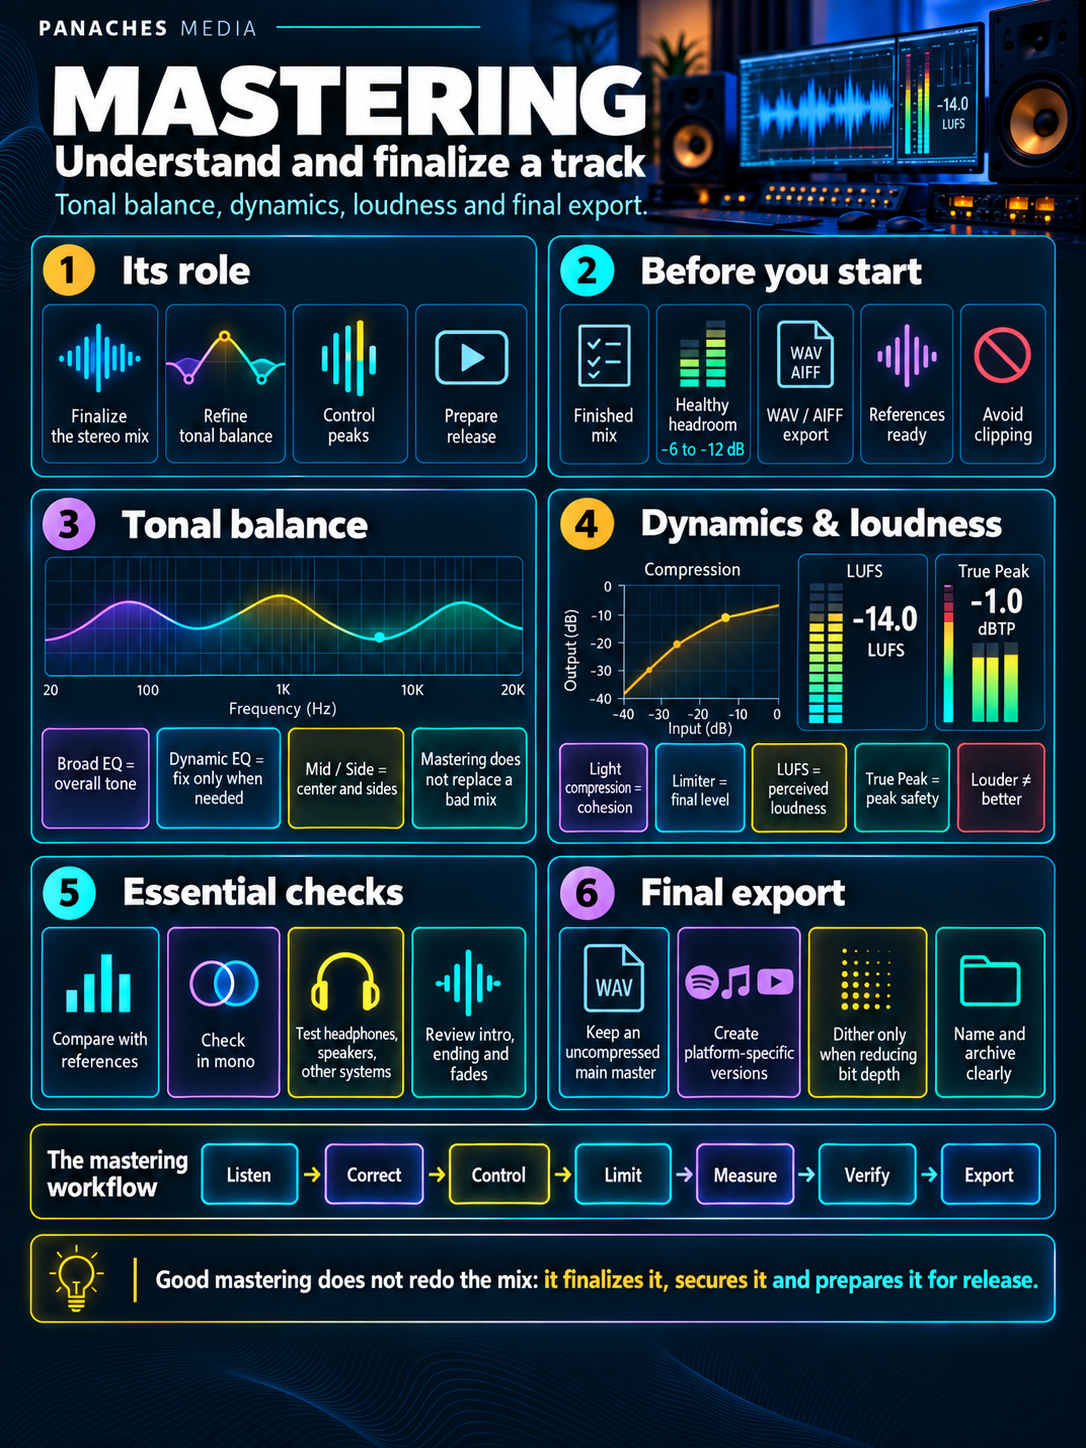
Mastering is the final step before release
Mastering takes place after mixing.
At this stage, the levels between tracks, panning, effects, dynamics and overall balance of the song have already been built. Mastering generally works on the final stereo mix, rather than on each individual instrument.
Its role is therefore not to rebuild the track.
It consists of making the final adjustments needed to obtain a coherent, technically clean file suited to its destination.
Mixing = balancing the elements inside the track
Mastering = finalizing the track as a whole
Mastering can slightly correct the frequency balance, control certain dynamic variations, adjust the final level, check peaks and prepare files for distribution.
But it cannot replace a good mix.
A master cannot fix everything
When a major problem remains in the mix, mastering has limited options.
If the vocal is far too quiet, boosting the mids may also strengthen guitars, synthesizers or other elements present in that range.
If the kick completely masks the bass, processing applied to the entire track will not always separate them cleanly.
If the reverb is excessive, it is already part of the stereo signal.
The more a problem concerns one specific element, the more it should ideally be corrected in the mix.
Mastering works especially well when the track is already balanced and the necessary interventions remain global and relatively subtle.
You therefore need to accept returning to the mix when that is the best solution.
When is a mix ready?
A mix intended for mastering does not need to be extremely loud.
Above all, it needs to be finished.
The main elements should be in the right place, the low end should be controlled, effects should be coherent and automation should already be complete.
Before exporting the mix, a few checks are useful:
| Point to check | Question to ask |
|---|---|
| Balance | Are the important elements clearly audible? |
| Low end | Do kick and bass work together? |
| Stereo | Does the image remain coherent? |
| Dynamics | Does the track breathe properly? |
| Peaks | Is the master clipping? |
| Automation | Are the track’s movements finished? |
| Transitions | Are section beginnings and endings clean? |
Mastering should not begin while you are still unsure about the vocal level or snare placement.
Do you need exactly -6 dB of headroom?
You often see the recommendation to always export a mix with a maximum peak of -6 dBFS.
That figure can provide a comfortable margin, but it is not a universal requirement.
What really matters is avoiding clipping and providing a file with enough margin to work cleanly.
A mix peaking at -5, -4 or -3 dBFS can be perfectly usable if its dynamics are healthy and no destructive processing has been applied simply to raise the level.
Mastering needs headroom, not a magic number.
It is also preferable to avoid artificially pushing the mix level immediately before export.
Exporting the premaster correctly
The file sent to mastering is sometimes called the premaster.
It should preserve the quality of the project without destructive compression.
For a typical workflow, an uncompressed PCM format such as WAV or AIFF is a suitable choice.
The bit depth used during production should ideally be preserved when available.
A project worked in 24-bit can therefore be exported in 24-bit for mastering.
There is no need to arbitrarily convert the sample rate simply to obtain a higher value.
The premaster should transmit the mix as faithfully as possible, without trying to anticipate the final delivery file.
MP3, AAC and other lossy formats are therefore poor intermediate formats for mastering.
Corrective mastering and creative mastering
Not every mastering move has the same purpose.
Some are corrective: reducing harshness, controlling a resonance or slightly improving tonal balance.
Others are more creative: adding a touch of saturation, subtly changing the sense of width or giving the track a particular color.
Both approaches can coexist.
But the more dramatic the processing becomes, the more useful it is to ask whether the issue should instead be addressed in the mix.
Effective mastering does not need to be spectacular to be important.
Start by listening
Before loading a plugin chain, listen to the track.
This may sound obvious, but it determines everything that follows.
You are trying to understand, among other things:
- whether the track is too dark or too bright;
- whether the low end is balanced;
- whether certain frequencies become tiring;
- whether the dynamics suit the style;
- whether the stereo image feels stable;
- whether the level changes coherently.
It is useful to listen through once without touching any settings.
Mastering begins with a diagnosis, not with a preset chain.
An intervention only makes sense if it responds to something you can actually hear.
Use reference tracks
Reference tracks are particularly useful during mastering.
After working on a track for a long time, the ear becomes accustomed to its balance.
A reference track provides an external point of comparison.
It can help you assess low-end level, midrange presence, brightness, dynamics or the overall sense of width.
The comparison should, however, be made at a similar listening level.
A louder track can very easily sound more impressive.
Compare the sound, not simply the level.
The goal is not to reproduce another master exactly, but to keep realistic reference points.
Mastering EQ affects the entire track
The equalization used during mastering works according to the same principle as during mixing: it changes certain frequency ranges.
The major difference is that it now affects the entire track.
A boost in the highs affects the vocal, cymbals, synthesizers and every other source present in that range.
That is why adjustments are often relatively moderate.
| General impression | Possible intervention |
|---|---|
| Too dark | Slight opening in the upper spectrum |
| Too bright | Gentle reduction in highs or upper mids |
| Too heavy | Adjustment of bass or low mids |
| Lacks body | Targeted adjustment of lows or mids |
| Occasional resonance | Narrow or dynamic correction |
A difference of only a few decibels can already change the overall perception significantly.
Broad corrections often sound more natural
In a master, a relatively broad EQ curve can be useful for changing the general tonal balance.
A gentle wide boost in the highs can add more openness.
A soft cut in the low mids can lighten a track that feels slightly crowded.
Very narrow corrections remain useful when a specific resonance needs to be controlled, but they should not become a systematic hunt for frequencies.
A musical spectrum naturally contains peaks and dips.
A perfectly flat curve is not the goal of a musical track.
EQ should improve the perceived balance, not turn the signal into a theoretically perfect graph.
Dynamic EQ only intervenes when the problem appears
Some frequencies are problematic only at certain moments.
A cymbal may become harsh only during a chorus.
A bass may become excessive only on a few notes.
A dynamic EQ can then reduce a frequency range only when it exceeds a certain level.
This approach preserves more of the track’s character the rest of the time.
It sits somewhere between equalization and dynamic processing.
It can be extremely useful in mastering, but it needs to remain controlled: excessive correction can cause audible tonal changes.
Mastering compression is not only about making the track louder
Compression can reduce the difference between quieter and louder passages.
But during mastering, its role can also be to create slight cohesion or control certain peaks before final limiting.
Settings are often subtler than on an individual track.
Light compression can make the elements of the song feel more connected.
Too much compression can flatten transients, reduce movement and make the track tiring.
Mastering compression should generally support the mix, not replace it.
If several decibels of gain reduction are constantly required simply to make the track usable, it may be worth revisiting the mix.
Attack and release still influence the groove
As during mixing, attack and release remain essential parameters.
A very fast attack controls transients more strongly.
A slightly slower attack lets more of the impact from the kick, snare or other percussive elements pass through.
Release determines how quickly the compressor stops acting.
A poor setting can create pumping or unintentionally alter the rhythm.
Mastering works on the whole song, so a dynamic change can affect drums, vocals, bass and instruments at the same time.
That explains why small adjustments can produce large differences.
Multiband compression: controlling different ranges separately
A multiband compressor splits the spectrum into several regions that can be processed independently.
The low end can therefore react differently from the mids or highs.
This can be useful when one specific part of the spectrum has problematic dynamics.
For example, the low end may become excessive only on certain bass notes.
But this added power also makes the processing more complex.
Each band split can alter the overall behavior of the signal.
Using multiband processing simply because it offers more controls is not a good enough reason.
If there is no specific problem to solve, simpler processing may be preferable.
Saturation: adding density and harmonics
A small amount of saturation can add density to the track.
It generates harmonics and can make certain elements feel more present without simply increasing their volume.
Depending on the processor used, it can also add a color reminiscent of certain analog machines or create a much more modern character.
At low levels, saturation can be almost imperceptible.
You mainly notice that the track feels slightly denser or more connected.
At higher levels, it becomes genuine distortion.
In mastering, that transition needs to be monitored carefully because the processing affects the entire mix.
Stereo should be handled carefully
Some tools allow you to widen or alter the stereo image.
This can be useful when a master feels slightly too narrow.
But excessive widening can damage mono compatibility or make certain elements unstable.
The low end deserves particular attention.
A large amount of side information in the bass can produce difficult results on different playback systems.
Mastering can therefore improve the sense of space while preserving a solid center image.
Wider is not automatically better. Good stereo should remain stable.
Mid/Side: processing the center and sides separately
Mid/Side processing allows different treatment of the central content and the lateral information.
The Mid mainly corresponds to what the left and right channels share.
The Side represents more of their differences.
This approach can, for example, slightly brighten the sides while preserving the center.
It can also help control certain lateral low frequencies or correct the sense of space.
But Mid/Side is not a magic button for widening a track.
Excessive processing can alter the stereo balance or create phase problems.
The limiter: controlling the final peaks
The limiter often appears near the end of the mastering chain.
It behaves like an extremely fast compressor designed to prevent the signal from exceeding a certain limit.
By lowering its threshold or increasing the level feeding into the limiter, you can obtain a louder master.
But that increase comes at a cost.
The harder the limiter works, the more it changes transients and reduces dynamics.
A kick can lose impact. A snare can become less lively. The whole track can feel more compact.
A limiter can increase level, but it does not create power for free.
The right setting therefore finds a balance between perceived loudness, dynamics and sound quality.
Loudness and LUFS: measuring perceived level
Peaks only tell part of the story.
Two tracks can reach almost the same maximum peak while having very different perceived loudness.
Measurements in LUFS aim to represent perceived loudness more accurately.
Several values can be observed.
| Measurement | Use |
|---|---|
| LUFS Integrated | Average loudness across the whole track |
| LUFS Short-Term | Loudness over a short period |
| LUFS Momentary | Very fast evolution of perceived loudness |
| Loudness Range | Indication of loudness variation |
These measurements provide useful references.
But they do not determine the quality of a master on their own.
There is no perfect LUFS value for every type of music
Trying to reach one single loudness value for every track quickly leads to poor decisions.
An acoustic piece, a dense electronic production and a cinematic soundtrack do not necessarily need the same dynamics.
Platforms can also apply loudness normalization, reducing the value of pushing every track to the maximum.
An extremely compressed master may simply be turned down during playback without recovering the dynamics that were destroyed.
Reaching a LUFS number should never become more important than keeping a track that sounds good.
Loudness is a finalization parameter, not a competition.
Platform normalization does not remaster the track
When a platform adjusts playback level, it does not create another master.
It mainly changes the level at which the file is played.
A very loud track can therefore be played back more quietly.
A more dynamic track may retain more of its transients while being brought closer in listening level depending on the system used.
Normalization therefore changes the context in which the loudness race should be understood.
Dense and powerful masters are still possible, but the objective should remain musical rather than purely numerical.
Peak and True Peak do not measure exactly the same thing
A traditional digital meter can measure sample peaks, meaning the maximum values present in the digital samples.
But during conversion and reconstruction of the signal, slightly higher peaks can appear between those samples.
True Peak measurement attempts to estimate these inter-sample peaks.
It is especially useful for checking that a master does not sit too close to the digital limit.
A limiter capable of True Peak handling can help preserve a safer margin.
A displayed 0 dBFS is not always the full story of the reconstructed peak.
That is one reason why the maximum level of a master may be set slightly below the absolute limit.
Crest factor gives an idea of the relationship between peaks and average level
The crest factor roughly describes the difference between the peaks of a signal and its average level.
A track with a larger difference between its transients and average level generally retains more short-term dynamics.
A heavily limited track often has a smaller difference.
This concept helps explain why two masters with similar loudness can feel very different.
One may preserve very transient drums.
The other may feel denser and more constant.
There is no universally ideal value: the result depends on style and artistic intention.
Dynamics are part of the music
For a long time, the pursuit of ever-higher levels led to extremely compressed masters.
But dynamics play an essential role in the perception of energy.
A chorus feels more powerful when there is a real difference compared with what comes before it.
A snare feels punchy when its transient can briefly rise above the rest of the signal.
If everything is constantly at the same level, the track can paradoxically feel less impressive.
Power comes from contrast as much as from average level.
Mastering should therefore preserve enough movement for the arrangement to keep breathing.
A mastering chain does not need to be long
A mastering chain could contain:
EQ → compression → saturation → dynamic EQ → limiter
But that is only an example.
One track may need only a light EQ followed by a limiter.
Another may need almost no tonal correction but benefit from subtle compression.
The order of processing itself depends on the desired result.
An EQ placed before saturation does not behave exactly like an EQ placed after it.
The best chain is the one that contains only the tools the track actually needs.
Adding processors simply because they are available mainly increases the number of decisions you need to make.
Bypass should remain a reflex
Every processing step should regularly be compared with the previous version.
Bypass makes it possible to check whether the plugin is genuinely improving the track.
This comparison should be made at as similar a level as possible.
Otherwise, the louder version will often appear better.
When disabling a processor immediately makes the track feel more natural, clearer or more alive, you need to accept that the plugin may not actually be necessary.
Mastering often rewards restraint.
Listening level influences decisions
As with mixing, mastering benefits from being done at a reasonable level.
Constantly loud listening quickly fatigues the ears and can alter the perception of frequency balance.
At low volume, it becomes easier to judge the general hierarchy and sense of density.
Occasional checks at different levels remain useful.
But continually raising the volume to make the track feel more impressive distorts judgment.
Mastering should improve the file, not simply the temporary experience of listening to it.
Acoustics and monitoring become especially important
Mastering often involves very fine adjustments.
A room that artificially reinforces certain bass frequencies can cause you to reduce them unnecessarily.
Very flattering monitors can hide problems.
Headphones can reveal a great deal of detail, but they do not present exactly the same stereo image as a pair of speakers.
That is why mastering requires particularly reliable monitoring.
In a Home Studio, cross-checking on several systems and using references becomes even more important when the environment is not perfectly controlled.
Check the master in mono and on several systems
The final version needs to work beyond the system used to produce it.
It is useful to check the track in mono, on headphones, on the studio monitors and on a few common playback systems.
A small speaker may reveal that a bass relies almost entirely on very deep frequencies.
Earbuds may expose harshness in the upper mids.
A mono check can reveal stereo elements that disappear significantly.
The goal is not for the master to sound identical everywhere.
It should preserve its intention, balance and essential elements.
Mastering several tracks requires overall coherence
When an album, EP or project contains several songs, mastering also plays a role in overall coherence.
Two consecutive tracks should not feel like they belong to completely different technical worlds unless that is an intentional artistic decision.
You can compare their loudness, frequency balance, sense of low end, width and dynamics.
That does not mean making every track identical.
A ballad and a highly energetic track can keep very different characters.
Coherence means the differences feel intentional, not accidental.
Track order can also influence decisions.
Dithering is used during certain bit-depth reductions
Dithering is a specific process used especially when reducing the bit depth of a file.
It adds a very low level of controlled noise to reduce certain quantization artifacts.
This operation generally takes place at the very end of the chain.
If a 24-bit project needs to produce a 16-bit final file, dithering can be used during that conversion.
It is not designed to make the track brighter, wider or louder.
Dithering is a digital conversion tool, not a creative effect.
It therefore does not need to be added repeatedly throughout the workflow.
Exporting the final master
Once processing is complete, the final file should be exported according to its destination.
It is useful to keep a high-quality uncompressed master as the main reference file.
The required versions for different uses can then be created from that file.
| Destination | General preparation |
|---|---|
| Archive / main master | High-quality uncompressed PCM |
| Digital distribution | File matching distributor specifications |
| Audio CD | Format and bit depth suited to the standard |
| Video | Export adapted to the video workflow |
| MP3 / AAC | Derived versions from the master, not working files |
Because technical requirements can vary depending on the service and project, it is preferable to check the requested specifications at the time of delivery.
Do not forget the beginning and end of the track
Finalization does not concern only sound processing.
The beginning and end of the file also need to be checked.
A track should not cut off a reverb or delay that is still audible.
An excessively long silence before the first note may be accidental.
Fades should be checked on headphones to avoid clicks or abrupt cuts.
These details can seem minor during production, but they become very noticeable once the file is distributed.
Metadata, naming and archiving
A finished mastering session can produce several files.
Without organization, it quickly becomes difficult to know which one is truly the final version.
Clear naming helps avoid mistakes:
Artist — Title — Master — Version
It is also useful to keep the premaster, main master and any versions intended for specific uses separately.
Metadata can then be added depending on the format and distribution process.
Technical finalization therefore also includes proper file management.
A progressive mastering method
A simple workflow helps maintain a clear logic.
| Step | Goal |
|---|---|
| 1. Listen | Identify the real problems |
| 2. Compare | Use appropriate references |
| 3. Correct the spectrum | Slightly adjust tonal balance |
| 4. Control dynamics | Compress only when necessary |
| 5. Add character | Optional saturation or coloration |
| 6. Check stereo | Control width, phase and low end |
| 7. Limit | Adjust peaks and final level |
| 8. Measure | LUFS, True Peak and dynamic behavior |
| 9. Check elsewhere | Mono, headphones, monitors and other systems |
| 10. Export | Produce and archive the final files |
The order can be adapted.
Its main purpose is to provide a framework for understanding why each processor is being added.
Mistakes to avoid
| Mistake | Why it causes problems |
|---|---|
| Mastering an unfinished mix | Major problems remain difficult to correct globally |
| Only chasing more volume | Dynamics and transients can disappear |
| Targeting a LUFS value without listening | The number gradually replaces the musical decision |
| Compressing automatically | A good mix does not necessarily need more compression |
| Widening the stereo image too much | Mono compatibility and stability can suffer |
| Using too much processing | Every plugin can unnecessarily alter the signal |
| Comparing at different levels | The louder version sounds artificially better |
| Making the limiter work too hard | Transients and dynamics are crushed |
| Ignoring True Peak | Some peaks may exceed what a basic peak meter shows |
| Exporting directly to a compressed format | You lose a high-quality main master |
These mistakes often have the same cause: trying to transform the track instead of simply finalizing it.
Mastering is not a loudness race
A very loud master can sound impressive for a few seconds.
But if that loudness is achieved at the expense of transients, depth and movement, the track can become much more tiring.
Platform normalization also makes the idea of always pushing every production to the maximum less relevant.
The right level depends on the track.
A master that is loud enough but still alive can be far more effective than a louder master that has been crushed.
Dynamics, tone and impact should remain the priority.
The best mastering sometimes does almost nothing
Some productions reach mastering with an already excellent balance.
In that case, a few very light adjustments may be enough.
The work does not become less serious because only two plugins are used.
On the contrary, knowing when not to change a mix unnecessarily is an essential skill.
Mastering requires judgment just as much as technical knowledge.
The question is not:
Which plugins can I add?
but rather:
What does this track genuinely need before release?
Finalize without erasing the mix
Mastering marks the transition between production and the file that will actually be heard.
It can improve tonal balance, control certain variations, adjust loudness, secure peaks and properly prepare the export.
But its role remains to preserve what is already working.
A good mix has an intention, dynamics, hierarchy and sonic identity.
Mastering should reinforce that coherence without replacing it.
A good master does not try to show that it has been mastered: it allows the track to preserve its identity, impact and balance all the way to release.
The final stage is therefore less about pushing the signal and more about making a few precise decisions.
When those decisions are right, the result often feels obvious: the track sounds finished.