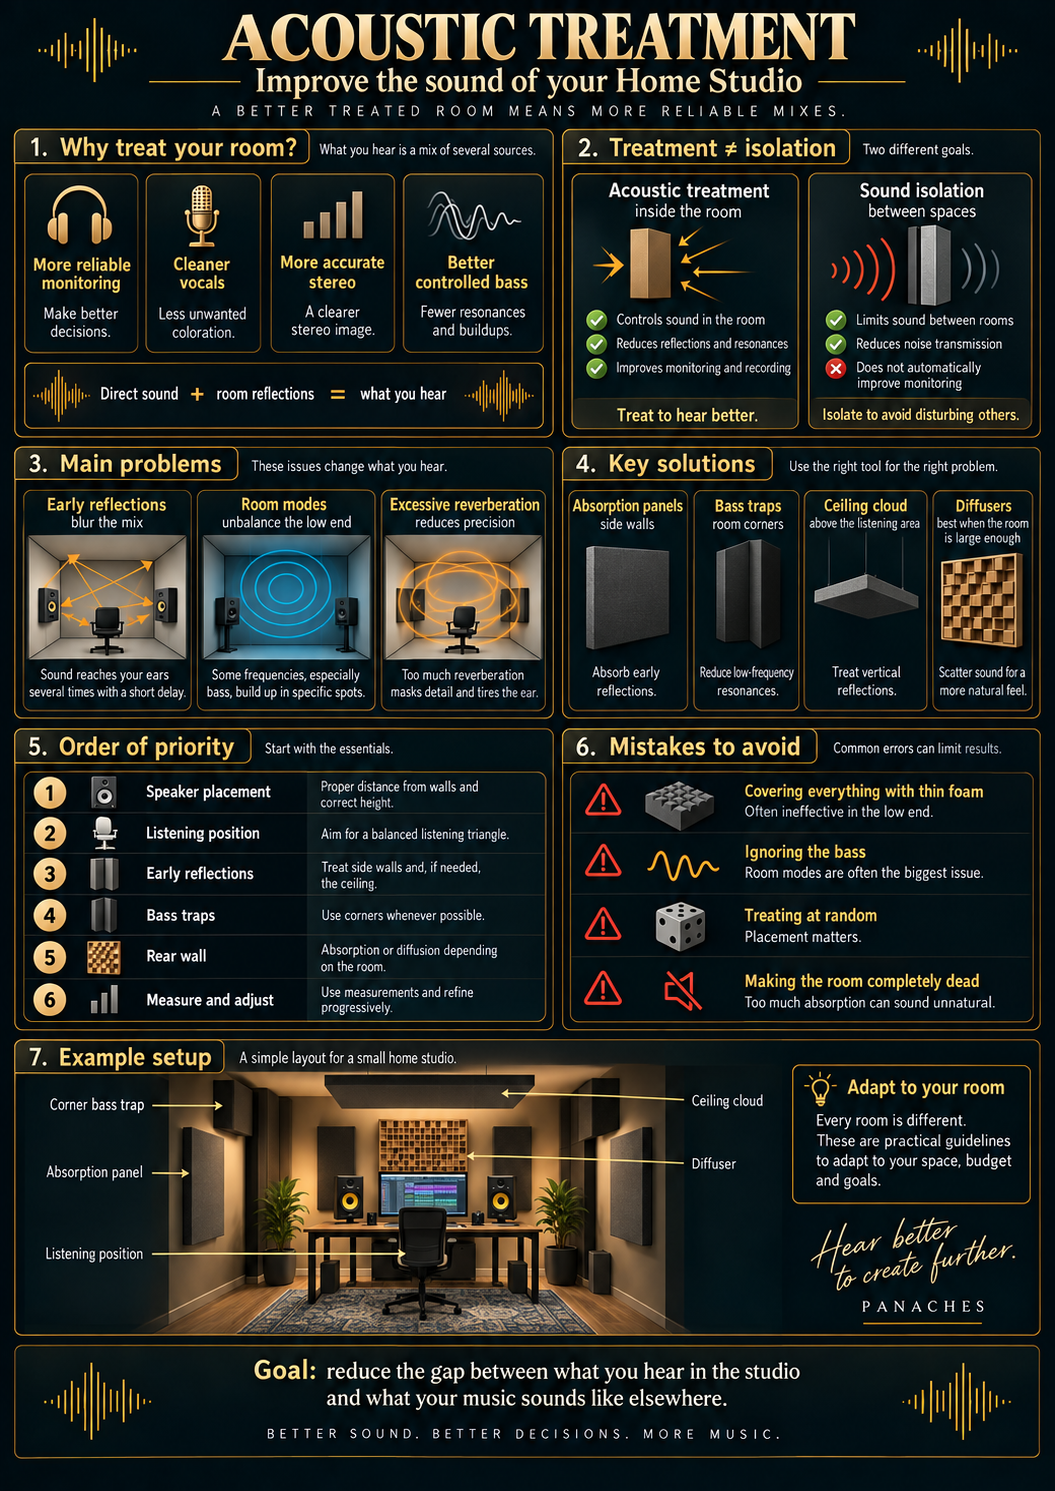
The room directly affects the sound
In a Home Studio, good equipment alone is not enough to guarantee reliable monitoring.
The sound produced by the speakers reaches your ears directly, but part of that energy also reflects from the walls, ceiling, floor, desk and furniture before reaching the listening position.
What you hear is therefore always a combination of:
Direct sound + room reflections
These reflections can boost certain frequencies, weaken others, blur the stereo image or artificially extend some sounds.
The same issue exists during recording. A microphone does not capture only the voice or instrument placed in front of it: it also records part of the surrounding acoustics.
Treating a room does not mean making it completely silent. It means controlling how sound behaves inside it.
Acoustic treatment and sound isolation are not the same thing
The confusion between these two concepts is extremely common.
| Acoustic treatment | Sound isolation |
|---|---|
| Controls sound inside the room | Limits sound transmission between two spaces |
| Reduces certain reflections and resonances | Reduces sound entering and leaving |
| Uses panels, bass traps or diffusers | Often requires mass, airtight construction and decoupling |
| Improves listening and recording | Improves isolation from the outside environment |
Acoustic panels fixed to the walls will therefore not stop a drum kit or powerful monitors from being heard in the next room.
Likewise, a perfectly isolated room can still have very poor internal acoustics.
Both problems can be addressed together in a purpose-built studio, but in an existing Home Studio, acoustic treatment is generally much more accessible.
Why small rooms are especially difficult
Small rooms are convenient for setting up a Home Studio, but they create several acoustic problems.
The surfaces are close together, so reflections return very quickly toward the listener or microphone.
The low end is often the main difficulty. Room dimensions reinforce certain resonances known as room modes.
At some frequencies, several reflections can combine and produce a strong increase in level. In other positions, they can almost completely cancel each other out.
This explains why the bass can sound huge in one part of the room and much weaker only a short distance away.
In the low end, moving the listening position can sometimes change the sound more than changing the speakers.
Early reflections blur the monitoring
The first reflections arrive only a very short time after the direct sound.
They come mainly from the side walls, ceiling or desk.
Because they arrive almost immediately after the main signal, the ear does not always perceive them as separate echoes. They combine with the direct sound and can alter the perceived tone or stereo image.
In a mixing room, controlling these early reflections helps provide a more accurate representation of what is actually coming from the monitors.
The areas where they appear depend on the geometry of the room, speaker position and listening position.
Absorb, diffuse or let the room breathe?
Acoustic treatment mainly relies on two broad approaches: absorption and diffusion.
| Absorption | Diffusion |
|---|---|
| Reduces reflected energy | Redistributes energy in multiple directions |
| Reduces certain resonances and reflections | Prevents reflections from being overly concentrated |
| Very useful in small rooms | More useful when the room provides enough space |
| Porous panels, bass traps | Geometric diffusers |
The goal is not necessarily to eliminate every reflection.
An extremely absorbent room can become uncomfortable and unnaturally dry.
Treatment instead aims to create a controlled balance between direct sound, absorption and reflection.
Absorption panels
Absorption panels are among the most common elements in a Home Studio.
They generally use porous materials capable of dissipating part of the acoustic energy.
Their effectiveness depends on factors such as thickness, material and distance from the wall.
A relatively thick panel works over a wider frequency range than a very thin layer of foam.
This becomes especially important in the mid and low frequencies.
The thinner the treatment, the more its action tends to concentrate on higher frequencies.
That is one reason why covering every wall with thin foam usually does not solve the main acoustic problems of a Home Studio.
Why acoustic foam is not enough
Acoustic foam has genuine absorption properties, but its effectiveness depends heavily on its thickness and design.
Thin foam panels mainly absorb part of the mid and high frequencies.
If they are used everywhere without proper planning, the room may lose a lot of high-frequency energy while still keeping major low-frequency resonances.
The result can become unbalanced: a room that sounds very dull in the highs but remains difficult to control in the bass.
Foam can therefore be useful for a specific purpose, but it should not be confused with complete acoustic treatment.
Bass traps: controlling the low end
Bass traps are designed to absorb more energy in the low frequencies.
Bass is difficult to treat because its wavelengths are long. It therefore generally requires thicker or larger treatment than higher frequencies.
Room corners are often used for bass traps because significant low-frequency energy can accumulate there.
In a small Home Studio, they can be among the most useful forms of treatment.
A room with too much bass does not necessarily need less bass from the speakers: it may mainly need better control of its resonances.
The goal is not to remove all low frequencies, but to make their behaviour more consistent around the listening position.
The first areas to treat
When working with monitors, some areas generally deserve particular attention.
The first side-wall reflection points are among the most important. The ceiling above the listening area can also create a significant early reflection.
A suspended panel placed there is often called an acoustic cloud.
The rear of the room can then be treated according to its size and layout, using absorption, diffusion or a combination of both.
In a simple Home Studio, the priority is therefore usually to work around the listening position and speakers, rather than covering every wall uniformly.
Placement before treatment
Acoustics begin before the first panel is installed.
The position of the speakers and listener has a major influence on the result.
A symmetrical left-right layout helps maintain a coherent stereo image.
A listening position pushed directly against a wall or placed in a corner is generally difficult to use, especially in the low frequencies.
Similarly, moving the monitors relative to the front wall can noticeably alter their response.
The best acoustic panel will never completely fix a badly chosen listening position.
Before buying treatment, it is therefore useful to test several possible positions for the desk and monitors.
Symmetry is essential for stereo
For mixing, both sides of the listening position should ideally encounter as similar an acoustic environment as possible.
A monitor placed very close to a side wall while the other faces a large open area can create major asymmetry.
The room does not need to be architecturally perfect, but the area around the workstation should be as balanced as possible.
This includes:
- the distance between the monitors and side walls;
- the placement of treatment at first-reflection points;
- the orientation of the monitors toward the listener.
The goal is to give the left and right channels similar propagation conditions.
The ceiling and desk are acoustic surfaces too
Walls naturally attract most of the attention when thinking about acoustic treatment.
But the ceiling and desk can also create significant reflections.
A large desk placed between the monitors and listener can reflect part of the signal toward the ears.
The ceiling creates another surface parallel to the floor and can contribute to early reflections.
An acoustic cloud above the listening position can therefore be very useful, especially in rooms with low ceilings.
The objective remains the same: reduce reflections that directly interfere with judging the mix.
Should you use diffusers?
Diffusers do not primarily absorb sound.
Their shape redistributes acoustic energy in several directions instead of creating one strong, concentrated reflection.
They can help preserve a sense of life in the room while reducing certain problematic reflections.
However, they generally need more distance to work effectively.
In a very small room, the listener may sit too close to the diffuser to benefit properly from its behaviour.
That is why absorption is often the first priority in a small Home Studio, while diffusion becomes more useful when the room dimensions allow it.
A room does not need to be completely dead
Too much treatment can create a new set of problems.
If every surface strongly absorbs high frequencies while doing very little in the bass, the room can become unnaturally dark and unbalanced.
An extremely dry room can also make some recordings feel unnatural.
The purpose of treatment is therefore not to eliminate every sense of space.
Good acoustics do not mean zero reverberation: they mean reverberation controlled enough not to mask the signal.
For a versatile Home Studio, the goal is usually a relatively controlled room that still feels comfortable for listening and recording.
Treating the recording area
Acoustic treatment is not useful only for mixing.
During a vocal or instrumental recording, room reflections are captured along with the source.
A very reverberant room can produce a vocal that is difficult to integrate into the mix later.
A few absorption panels placed correctly around the recording area can reduce these reflections.
It is not always necessary to surround the singer completely.
Absorption behind or around the source, combined with suitable microphone directivity and placement, can already make a significant difference.
The problem with improvised booths that are too absorbent
Creating a small area surrounded by blankets or foam can reduce certain reflections.
But a tiny space that is heavily absorbed in the high frequencies can sound strange if the bass and low mids remain uncontrolled.
The result may sound muffled without actually becoming clean.
A temporary setup can be useful for certain recordings, but it does not automatically replace good room acoustics.
It is often better to find a balance between microphone distance, polar pattern and localised treatment.
Measure instead of relying only on your ears
Listening remains essential, but some room characteristics are difficult to identify precisely without measurement.
A measurement microphone and analysis software can help show the frequency response or the decay of certain frequencies.
This can reveal:
- major peaks in the low end;
- dips caused by cancellations;
- resonances that take a long time to decay.
Measurement does not replace listening.
It mainly helps verify whether changes in placement or treatment are actually improving the situation.
Treat, measure, move, then measure again is often more effective than adding equipment at random.
Reverberation and decay time
When a sound stops, the acoustic energy in the room does not disappear immediately.
Reflections continue for a certain amount of time before fading away.
In large rooms, this is often discussed in terms of reverberation time. In a small room, the analysis is more complex, but observing how different frequencies decay over time remains very useful.
A low frequency that persists for too long can make kicks and bass lines difficult to distinguish.
Long reflections in the midrange can make vocals or guitars less precise.
Acoustic treatment therefore aims to control the duration of resonances as well as their level.
A simple method for treating a Home Studio progressively
There is rarely a need to buy everything at once.
A logical progression makes it easier to understand the effect of each change.
| Step | Priority |
|---|---|
| 1. Placement | Listening position, monitors, symmetry |
| 2. Early reflections | Side walls and possibly ceiling |
| 3. Low end | Bass traps and placement optimisation |
| 4. Rear wall | Absorption or diffusion depending on the room |
| 5. Measurement and adjustment | Check the results and correct remaining problems |
This prevents treating the room like decoration.
Each element should respond to an identifiable acoustic problem.
Mistakes to avoid
| Mistake | Why it causes problems |
|---|---|
| Confusing treatment and isolation | The technical solutions address different problems |
| Covering every wall with thin foam | High frequencies are absorbed without properly controlling the bass |
| Ignoring low frequencies | They are often the main problem in small rooms |
| Treating before finding the right placement | A poor position can create avoidable problems |
| Making the room completely dead | The listening environment can become unnatural and unbalanced |
| Installing panels only for appearance | Their position determines their usefulness |
| Never measuring changes | It becomes difficult to know whether treatment is actually improving the room |
Acoustic treatment is therefore not about adding as many panels as possible.
It is about understanding where the problem is, which frequencies are involved and which tool can actually address it.
Acoustic treatment mainly improves your decisions
A Home Studio does not need to become a custom-built mastering room to benefit from better acoustics.
A few coherent changes can already transform the experience: moving the monitors, improving symmetry, controlling early reflections, adding bass traps or treating the recording area.
The benefits appear at several levels.
Recorded vocals contain fewer troublesome reflections. Bass becomes easier to judge. Stereo imaging becomes more precise and the corrections made during mixing become more reliable.
The real objective is therefore not to obtain a perfect curve or an impressive-looking room.
Good acoustic treatment is treatment that reduces the difference between what you hear in the studio and what your track will sound like elsewhere.
A better controlled room ultimately allows you to get more from the equipment you already own.
Before replacing microphones, monitors or plugins, improving the room in which you use them can be one of the most important upgrades to a Home Studio.