Producing a track means turning an idea into a finished work
A music production can begin in many different ways.
A few piano chords, a bass line, a drum loop, a sample, a hummed melody or simply an atmosphere can become the starting point for an entire track.
The real work comes next: turning that first idea into a structured, coherent and finished production.
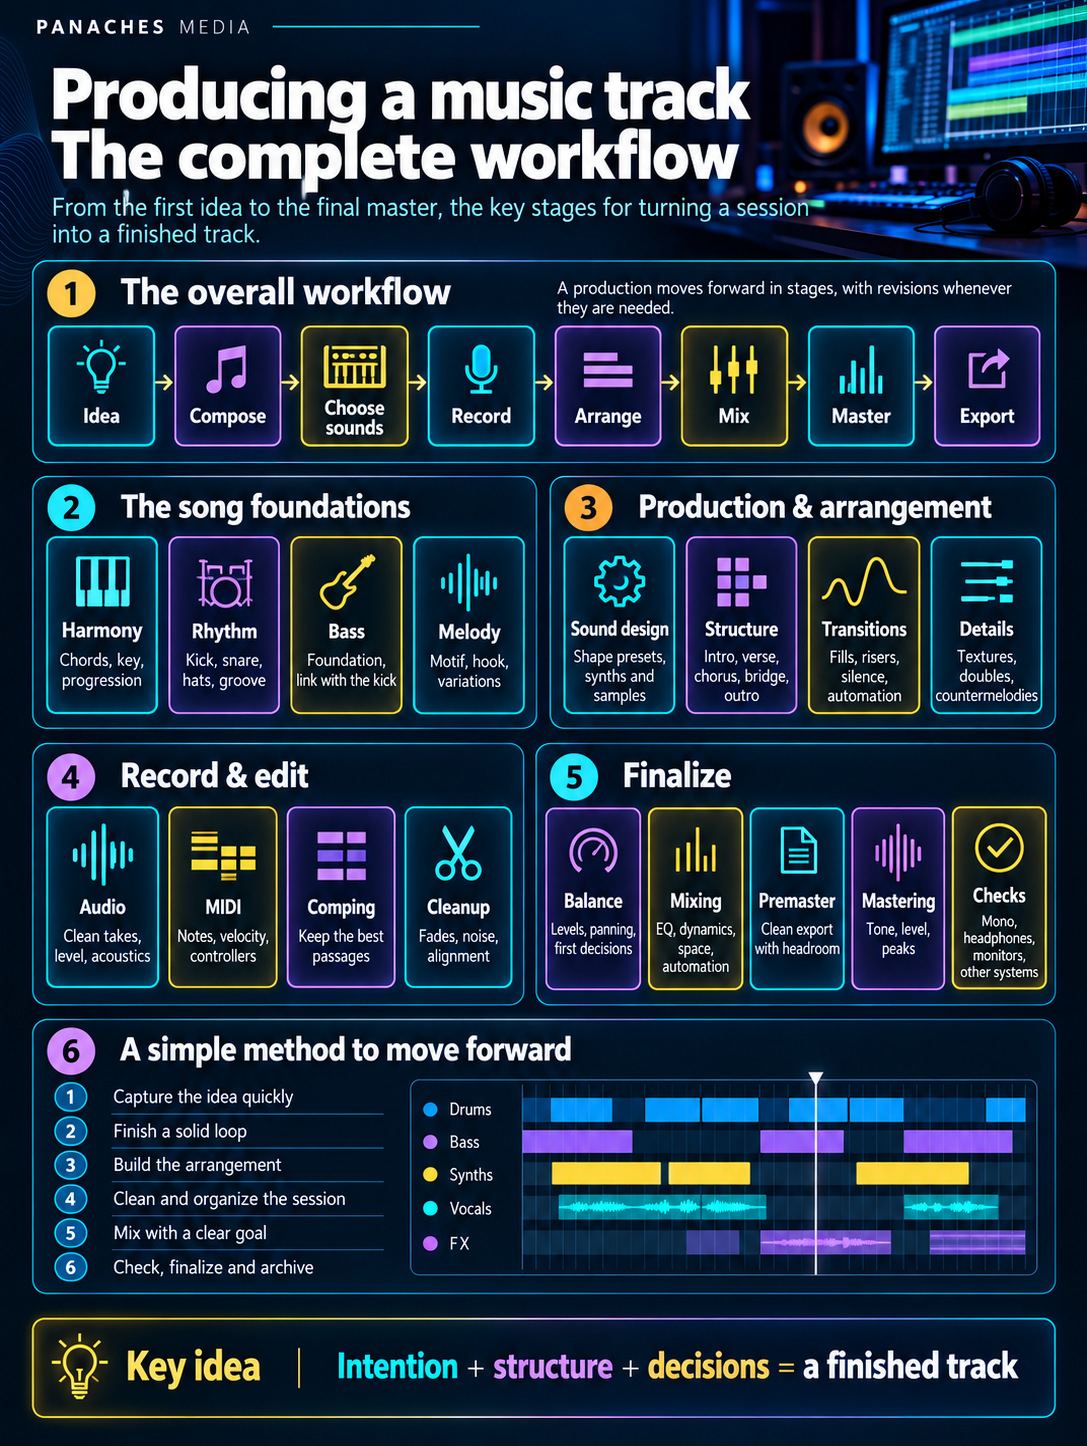
A complete workflow can be summarized like this:
Idea → composition → sound selection → recording → arrangement → editing → production → mixing → mastering → export
This chain provides a clear view of the process, but it should not be understood as a perfectly rigid sequence.
You often go back.
An arrangement change may require a new recording. A problem discovered during mixing may lead to removing an instrument. A new transition may appear when the track seemed almost finished.
Music production is progressive and iterative: each step brings the track closer to its final intention.
Before the software, define an intention
Opening a DAW and immediately adding plugins can feel like the beginning of production.
But before the tools comes a more important question:
What kind of track are you trying to create?
You do not need an extremely precise concept.
A few elements can already provide direction:
| Element | Example question |
|---|---|
| Emotion | Calm, dark, euphoric, aggressive, melancholic? |
| Energy | Intimate, progressive, danceable, massive? |
| Tempo | Slow, moderate, fast? |
| Sonic world | Acoustic, electronic, hybrid? |
| Main element | Vocal, riff, beat, synthesizer, piano? |
| Structure | Song, evolving loop, instrumental composition? |
This intention acts like a compass.
It makes it easier to decide whether a new element genuinely enriches the track or pulls it away from the original idea.
Not every production starts the same way
There is no single correct entry point.
A songwriter may start with voice and guitar.
A beatmaker may begin with rhythm.
An electronic producer may design a synthesizer sound before even having a melody.
A composer may start with a chord progression.
| Starting point | Possible natural continuation |
|---|---|
| Chords | Melody → bass → rhythm |
| Beat | Bass → sample → arrangement |
| Melody | Harmony → rhythm → instrumentation |
| Sample | Chopping → groove → bass |
| Vocals | Accompaniment → structure → production |
| Sound design | Motif → rhythm → arrangement |
The workflow can therefore change in order.
What matters less is the first step than the ability to develop the idea into a complete form.
Step 1: capture the idea before it disappears
At the beginning of a track, speed is often more important than perfection.
If a melody works, it is better to record it immediately than spend twenty minutes choosing the perfect microphone.
If a rhythm creates the right feeling, it can be kept even with temporary sounds.
A simple demo is often enough:
Tempo + chords + rhythm + main melody
This first version acts as musical memory.
It helps preserve the intention while technical choices begin to multiply.
A phone voice memo, an imperfect MIDI part or a temporary piano can all serve perfectly well as sketches.
At this stage, capturing is often more useful than perfecting.
Step 2: choose the tempo and build the grid
Tempo directly influences the feel of the track.
The same motif can feel heavy at 80 BPM, relaxed at 100 BPM or much more energetic at 140 BPM.
Tempo also affects:
- note duration;
- groove placement;
- synchronized delays;
- synchronized LFOs;
- rhythmic divisions;
- the overall density of the arrangement.
Once the tempo is defined, the DAW provides a time grid that makes the project easier to organize.
That does not mean everything must be perfectly aligned.
Groove can depend precisely on small offsets around that grid.
Step 3: establish the harmonic foundation
Harmony gives the melody a context.
It can be extremely simple.
A progression of just a few chords can support a great deal of music.
The goal is not necessarily to create complex voicings immediately, but to establish a foundation clear enough to develop the other elements.
The key or scale can also become useful reference points.
They make it easier to work on bass, secondary melodies and virtual instruments.
Simple but coherent harmony is often more useful than a complex progression that is difficult to develop.
Step 4: build the rhythm and groove
Rhythm forms the temporal structure of the track.
In many productions, the first skeleton is built around a few elements:
Kick → Snare / Clap → Hi-hats / Percussion
The kick can establish the main points of impact.
The snare or clap can mark the strong beats.
Hi-hats and percussion then add movement.
But groove does not come only from note placement.
Velocity, micro-timing, silences and interactions between the elements also contribute to the rhythmic feel.
A perfectly quantized beat can work.
Another may benefit from small variations.
The right solution depends on the style and intention.
Step 5: build the bass with the rhythm
Bass often connects harmony and rhythm.
It can follow the chord roots, respond to the kick or become a real melody of its own.
In electronic or urban production, the kick + bass relationship can determine much of the track’s energy.
In a more acoustic production, the bass may support the harmony more directly.
The main question remains the same:
Does the bass support the track, or does it unnecessarily compete with the other elements?
A relatively simple line can create more impact than a complex part filling every available space.
Step 6: develop the main melody
The melody is often one of the elements the listener remembers most easily.
It can be carried by a vocal, synthesizer, guitar, piano or any other source.
A good melody does not need a large number of notes.
Rhythm, repetition and variation are just as important.
An effective musical phrase can be repeated and then slightly transformed:
A → A → A' → B
Repetition allows the listener to recognize the motif.
Variation prevents it from becoming completely predictable.
Step 7: choose sounds before stacking processing
Sound selection directly influences how difficult the future mix will be.
Two instruments with exactly the same register, timbre and function are likely to mask each other.
By contrast, complementary sounds can work together before a single EQ is added.
A few roles are often enough to structure the production:
| Role | Examples |
|---|---|
| Foundation | Kick, bass |
| Harmony | Piano, guitar, synths |
| Main element | Vocal, lead, riff |
| Secondary rhythm | Percussion, hats |
| Textures | Pads, sound effects, atmospheres |
| Transitions | Risers, impacts, reverses |
Good sound selection often simplifies the mix more than a long plugin chain.
The same applies to samples.
Processing can improve a source, but it does not automatically turn a poor choice into a good one.
Step 8: sound design and personalization
Presets and samples are excellent starting points.
They do not have to be used exactly as they are.
A synthesizer can be adapted by changing its filter, envelope, LFO or effects.
A sample can be chopped, transposed, filtered, reversed or time-stretched.
The goal is not to modify every sound simply for the sake of saying it has been changed.
It is about adapting it to the track.
A sound becomes interesting when it serves exactly the function the production needs.
A bass can be shortened to leave more space for the kick.
A pad can be darkened so it sits behind the vocal.
A lead can receive more modulation to become more expressive.
Step 9: record what needs to be played
The production can then include recorded sources: vocals, guitar, bass, percussion or another acoustic instrument.
The basic chain remains simple:
Source → microphone or instrument input → audio interface → DAW
Recording quality depends heavily on what happens before the plugins.
Microphone placement, input level, room acoustics and performance matter enormously.
A properly recorded take generally requires less repair later.
It is also preferable to avoid clipping during recording.
A reasonable amount of headroom leaves more freedom for the following stages.
Several takes can serve one performance
It is not always necessary to perform an entire part perfectly in a single take.
Comping consists of recording several versions and then building the final take from the best passages.
This is particularly common with vocals.
One phrase may come from the first take, another from the third, and a breath may be retained from another version.
The goal is not necessarily to erase every imperfection.
It is to create a coherent performance that still feels alive.
Step 10: record and edit MIDI
MIDI makes composition and correction easier.
A performance played on a master keyboard can be recorded and then edited in the Piano Roll.
Notes can be moved, shortened or transposed.
Velocity can be adjusted.
MIDI controllers can also record filter, expression or modulation changes.
That does not mean everything must then be corrected perfectly.
Overly rigid quantization can remove some of the nuance from the performance.
MIDI editing should improve the performance without necessarily removing its human character.
Step 11: clean up the takes before adding more plugins
A large part of production simply consists of cleaning up the project.
This can include:
- cutting unwanted noise;
- creating clean fades;
- aligning certain takes;
- correcting a few notes;
- controlling certain breaths;
- removing unused tracks.
This stage may seem less spectacular than choosing a new plugin, but it can have much more impact.
A clean track is easier to arrange and mix.
Step 12: move from the loop to the arrangement
An eight-bar loop can contain all the ideas needed for a track.
But a loop is not yet a complete structure.
You then need to organize how the track evolves over time.
One possible structure could be:
Intro → verse → pre-chorus → chorus → verse → chorus → bridge → final chorus → outro
An instrumental or electronic production might instead use:
Intro → build-up → drop → break → build-up → second drop → outro
These models are not mandatory.
They mainly show that the track needs development.
Arrangement depends as much on subtraction as addition
To create a new section, the first instinct is often to add something.
But removing can be just as powerful.
Dropping the kick for four bars can prepare its return.
Removing the bass can make the following chorus feel much heavier.
Temporarily isolating the vocal can create tension.
| Action | Possible effect |
|---|---|
| Add | Increase density |
| Remove | Create contrast |
| Filter | Prepare a transition |
| Change octave | Alter energy |
| Create silence | Emphasize the next return |
| Change rhythm | Refresh a section |
The energy of an arrangement comes from contrasts between sections.
A track that is constantly at maximum intensity can eventually feel like it never really rises.
Step 13: create transitions
Transitions connect the different parts of the track.
They can be very obvious or almost invisible.
A drum fill can announce the chorus.
A reversed note can pull the ear toward the beginning of a new section.
Filter automation can gradually increase tension.
A simple silence can sometimes be more effective than a huge effect.
Transitions mainly prepare the listener for change.
They give the track a sense of continuity.
Step 14: produce the details without losing the bigger picture
Once the main structure is established, the production can be enriched.
Vocal doubles, countermelodies, textures, secondary percussion or small variations can appear.
This is a very creative phase, but also a dangerous one.
It becomes easy to add a huge number of details simply because the DAW allows hundreds of tracks.
Every new element should have a function.
If removing a track changes almost nothing, it may not be necessary.
Space itself is also a production tool.
Step 15: organize the session
As the project grows, good organization allows much faster work.
Tracks can be grouped by family:
| Group | Possible content |
|---|---|
| Drums | Kick, snare, hats, percussion |
| Bass | Bass, 808 |
| Music | Piano, guitars, synths |
| Vocals | Lead, doubles, backing vocals |
| FX | Reverbs, delays, transitions |
| Buses | Drums Bus, Music Bus, Vocal Bus |
Naming tracks clearly, deleting unnecessary versions and using groups prevents wasting time searching for a source.
A well-organized session also makes mixing easier.
Step 16: create a first balance before the real mix
Mixing does not necessarily begin only after the entire production is finished.
Levels are adjusted throughout the work.
But before moving into more precise processing, it is useful to create a simple balance with the faders.
The track should already work reasonably well using:
Volume + panning + mute
This stage immediately reveals arrangement problems.
If three instruments cannot work together without complex EQ, it may be more effective to change their role or register rather than trying to force them into the mix.
Step 17: mix the track
Mixing turns separate tracks into a coherent whole.
It mainly organizes:
- level hierarchy;
- stereo space;
- frequency balance;
- dynamics;
- depth;
- movement over time.
The exact order of processing is not universal.
A common workflow can nevertheless follow this logic:
Levels → panning → EQ → dynamics → space → automation → checks
Each stage addresses a different problem.
EQ creates space in the spectrum.
Compression controls dynamics.
Reverb and delay build depth.
Automation makes the mix evolve.
But no plugin replaces a good initial balance.
The mix must remain in service of the arrangement
It is easy to spend a huge amount of time making one track sound beautiful in solo.
But the song is not listened to one track at a time.
A piano may sound relatively thin by itself but work perfectly under a vocal.
A very wide guitar may need to lose some low end to leave more space for the bass.
A secondary element does not need to occupy the whole spectrum.
Mixing means deciding what should be heard, where and at what moment.
A track may therefore intentionally sound less impressive alone in order to work better with everything else.
Step 18: use automation to create movement
A completely static mix can quickly become rigid.
Automation allows different parameters to evolve throughout the track.
The level of a vocal can be slightly adjusted phrase by phrase.
A reverb can increase on the final note of a section.
A filter can open during a build-up.
A delay can appear only on certain words.
Automation can often create a more musical result than very aggressive processing applied permanently.
Step 19: compare with references
After hearing the same track repeatedly, the ears adapt.
A reference song helps restore perspective.
You can compare things such as:
| Element | What the reference helps reveal |
|---|---|
| Low end | Amount and depth |
| Vocal / lead | Position in the mix |
| Brightness | High-frequency balance |
| Stereo | Sense of width |
| Dynamics | Density and movement |
| Structure | Length and evolution of sections |
The comparison should ideally be made at a similar listening level.
Otherwise, the louder track may simply appear better.
Step 20: check the mix elsewhere
A track will not be heard only in the Home Studio where it was produced.
It may be listened to on headphones, in a car, on a Bluetooth speaker, on a phone or on a hi-fi system.
It is therefore useful to check its translation.
A problem that appears on only one system may come from that system.
A problem that appears everywhere deserves more attention.
The goal is not to create a mix that sounds identical on every device.
It is to preserve its essential elements:
identifiable vocal or lead + coherent low end + overall balance + musical intention
Knowing when to stop mixing
A production can always be changed.
You can move an automation by a tenth of a decibel, replace a sample or tweak a reverb almost indefinitely.
At some point, these changes stop genuinely improving the track.
They simply make it different.
A useful question is:
What concrete problem am I trying to solve?
If there is no clear answer, the track may be advanced enough to move to the next stage.
Step 21: prepare the premaster
Once the mix is finished, it can be exported for mastering.
The premaster should be clean, unclipped and retain reasonable headroom.
There is no need to target one exact headroom value.
The essential thing is to avoid artificially pushing the signal against 0 dBFS before mastering.
The file should ideally remain in an uncompressed PCM format such as WAV or AIFF.
Mastering should receive the mix as faithfully as possible.
Step 22: master the track
Mastering works on the production as a whole.
It can, among other things:
- refine tonal balance;
- control certain dynamic variations;
- slightly adjust the stereo image;
- manage peaks;
- establish the final level;
- prepare release files.
A possible chain might look like:
EQ → light compression → optional saturation → limiter
But this chain is not mandatory.
A track may require far less processing.
Mastering should not be an attempt to rescue a poor mix.
It finalizes what already works.
Loudness: aim for the track, not just a number
The final level can be observed with different tools, including LUFS and True Peak measurements.
This information is useful for controlling loudness and peaks.
It should not, however, replace listening.
An acoustic production and a very dense electronic production can naturally have very different dynamic behavior.
Normalization used by some platforms also makes the pursuit of the highest possible level less useful.
A slightly quieter but more alive track can be more convincing than a very loud track whose transients have disappeared.
Step 23: check the final file
Before considering the project finished, listen to the actual exported file.
This check can reveal simple but important problems:
- beginning cut off;
- ending too long;
- reverb cut short;
- click in a fade;
- missing channel;
- wrong version exported;
- unintended silence;
- distortion introduced during rendering.
It is useful to listen to the master from beginning to end without working on the project at the same time.
You are then judging the actual final product, not the DAW session.
Step 24: create the necessary versions
A production may require several files.
A vocal track may, for example, also need an instrumental version.
A project intended for video may require a different format from one intended for music distribution.
The essential principle is to preserve an uncompressed main master.
The necessary versions can then be created from it.
| File | Possible use |
|---|---|
| Main master | Archive and reference source |
| Distribution version | Platforms and distributors |
| Instrumental | Video, performance, synchronization |
| Clean version | Distribution requiring adapted lyrics |
| MP3 / AAC | Lightweight listening or sharing |
| Stems | Collaboration or specific uses |
Needs vary from project to project.
There is no need to create every version systematically.
Step 25: name and archive properly
A finished track may represent dozens of hours of work.
It therefore deserves serious archiving.
Keeping only the latest exported file is not enough.
It can be useful to preserve:
- the DAW project;
- the audio files used;
- the premaster;
- the final master;
- important alternate versions;
- any stems that may be needed.
Clear naming also avoids files like:
final_v2_final_definitive_3.wav
A clearer structure might look like:
Artist — Title — Master — 2026-09-06.wav
A date or version number makes the history easier to understand.
The complete workflow at a glance
Production can ultimately be summarized into several major phases.
| Phase | Main objective |
|---|---|
| 1. Intention | Define what the track should communicate |
| 2. Idea | Capture melody, chords, rhythm or sample |
| 3. Composition | Develop harmony, melody, bass and rhythm |
| 4. Sound selection | Choose complementary timbres |
| 5. Recording | Capture vocals and instruments |
| 6. Editing | Clean up audio and MIDI |
| 7. Arrangement | Build the track’s evolution |
| 8. Production | Add details, textures and transitions |
| 9. Mixing | Balance, spatialize and control |
| 10. Mastering | Finalize the track |
| 11. Quality control | Check the actual file |
| 12. Export / archive | Prepare and preserve final versions |
This structure provides direction.
It does not mean you are forbidden from returning to an earlier stage.
A real workflow often works in loops
Music production is rarely as clean as its theoretical diagram.
A real workflow often looks more like this:
Compose → arrange → listen → modify → record → arrange → mix → change the arrangement → remix → finalize
Moving back and forth between stages is not an organizational failure.
It is part of the creative process.
The real problem appears when you no longer know which phase you are working in.
Spending two hours choosing a compressor when the chorus is not even written can become a form of technical procrastination.
Conversely, continuing to add instruments when the track is already rich enough can prevent you from moving on to mixing.
A good workflow does not eliminate back-and-forth: it helps you understand why you are doing it.
A few checkpoints help you know when to move forward
Each major phase can be validated with one simple question.
| Stage | Checkpoint question |
|---|---|
| Idea | Is there something here I genuinely want to develop? |
| Composition | Do melody, rhythm and harmony work together? |
| Arrangement | Does the track evolve over time? |
| Production | Does every element have a function? |
| Recording | Are the performances good enough? |
| Mixing | Are the important elements clearly organized? |
| Mastering | Is the track ready for release? |
| Export | Have I checked the actual final file? |
These questions prevent you from waiting for some abstract perfection.
They make it possible to move to the next stage once an objective has genuinely been reached.
The mistakes that slow production down the most
| Mistake | Consequence |
|---|---|
| Searching for the perfect sound before having an idea | Technique replaces composition |
| Accumulating too many tracks | The arrangement becomes unreadable |
| Constantly changing tempo or structure | The track never stabilizes |
| Trying to repair a bad take only with plugins | The original problem remains |
| Mixing only in solo | Tracks are no longer judged in context |
| Mastering before finishing the mix | Mastering becomes a way to hide problems |
| Constantly changing tools | The workflow becomes slower |
| Never comparing with references | Listening perspective drifts |
| Never listening elsewhere | Translation problems appear too late |
| Continuing to make changes without an objective | The project remains unfinished forever |
Most of these mistakes do not come from a lack of equipment.
They come from a lack of direction.
You do not need a huge studio
A complete workflow can be achieved with relatively little equipment.
For an entirely virtual production:
Computer → DAW → headphones or speakers
For recording a vocal or instrument:
Source → microphone / instrument → audio interface → computer → DAW → monitoring
A MIDI keyboard can speed up composition.
Good speakers can improve mixing decisions.
Acoustic treatment can make monitoring more reliable.
But none of these elements replaces an understanding of the process.
The studio should make decisions easier, not become the project instead of the music.
Tools become more useful when the workflow is clear
Throughout this series, every Home Studio element has a specific function.
The audio interface routes and converts the signal.
The microphone captures a source.
MIDI transmits musical instructions.
Synthesizers create sounds.
Beatmaking organizes rhythm, samples and groove.
Monitoring makes it possible to judge decisions.
Acoustic treatment improves the reliability of listening.
Mixing organizes the different tracks.
Mastering finalizes the song.
Taken separately, these tools can seem like many different technical subjects.
Combined in one project, they form a single chain:
create → hear → decide → improve → finish
Finishing a track is a skill
Starting a track is often exciting.
Finishing it can be much harder.
The first few minutes quickly bring new ideas.
The final part of the work requires more decisions: remove, simplify, correct, compare and accept that a production will never be absolutely perfect.
Yet finishing has essential value.
Every completed track allows you to go through the entire workflow.
You then learn things that a hundred abandoned loops can never teach: managing a full arrangement, solving mixing problems, preparing a master and making a final decision.
Finishing a track is part of learning music production.
From the first sound to the final master
Producing music is not simply about stacking instruments inside software.
It is a succession of decisions.
Which idea deserves to be developed?
Which element should guide the track?
What should be added?
What should disappear?
When should you stop composing and start arranging?
When is the mix developed enough?
When is the master genuinely finished?
The complete workflow provides structure for all these questions.
Idea → composition → production → arrangement → mixing → mastering → release
But behind that chain, the principle is much simpler:
start with an intention, progressively build what serves it and remove what prevents it from being heard.
A finished track is not one in which every possible option has been used.
It is one in which the essential choices have been made.
And when those choices work together, the project finally stops being an open session in a DAW: it becomes a piece of music.