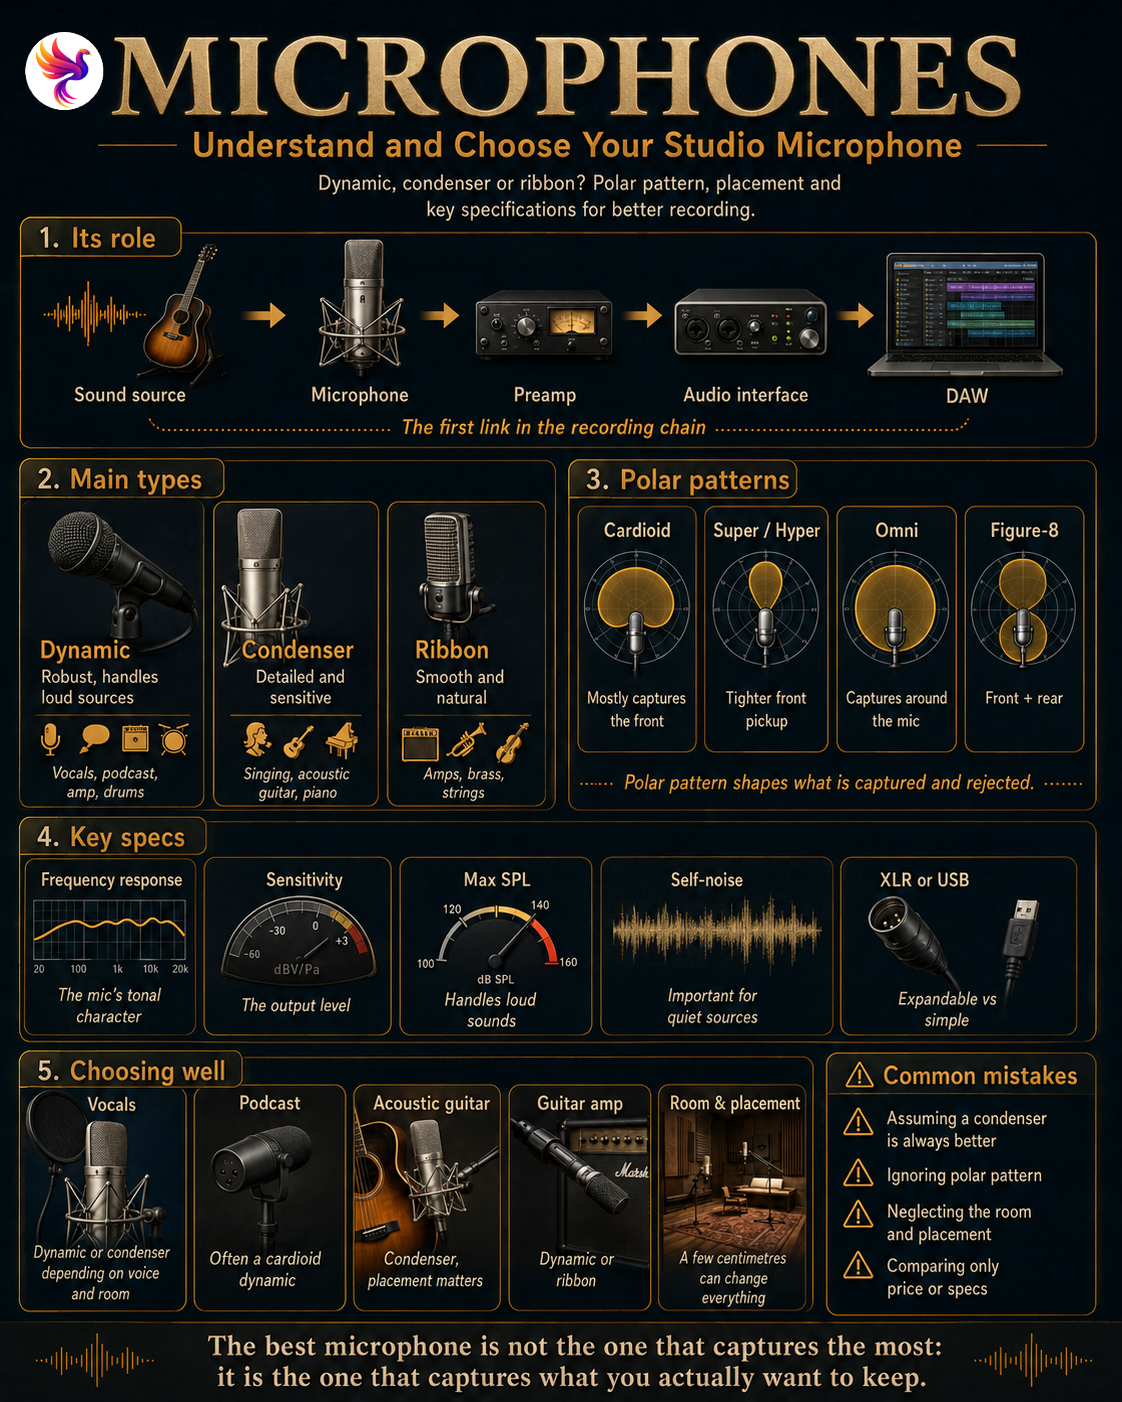
The microphone, the first link in the recording chain
Before the audio interface, the DAW and the plugins, the microphone performs an essential transformation: converting the pressure variations created by sound into an electrical signal.
In a Home Studio, the recording chain can be summarised like this:
Voice or instrument → microphone → preamp → audio interface → DAW
The microphone therefore directly influences the material that will be recorded. But that does not mean a more expensive model will automatically produce a better take.
A voice, an acoustic guitar, an amplifier or a drum kit do not necessarily require the same microphone. The room matters enormously too: a highly sensitive model placed in a reverberant bedroom may record as much of the environment as the intended source.
Choosing a microphone means choosing a combination: source + room + polar pattern + placement.
This is the logic that helps move beyond the overly simple question of the “best microphone”.
Dynamic, condenser or ribbon?
Studio microphones can use different technologies. Three major families appear especially often: dynamic, condenser and ribbon.
| Type | General behaviour | Common uses |
|---|---|---|
| Dynamic | Robust, often lower output level, handles loud sources well | Vocals, podcast, amps, drums |
| Condenser | Sensitive, detailed, good transient response | Singing, acoustic guitar, piano, ambience |
| Ribbon | Often smooth and natural sounding, more specialised use | Amps, brass, strings, some vocals |
This table is meant to explain broad tendencies, not to lock each technology into one specific use.
A dynamic microphone can work perfectly well for studio vocals. A condenser can be placed in front of a guitar amplifier, and a ribbon can work on a voice.
The dynamic microphone
A moving-coil dynamic microphone generally uses a diaphragm connected to a coil placed inside a magnetic field. Its relatively simple construction contributes to its reputation for robustness.
It usually handles high sound pressure levels very well and, in most cases, does not require phantom power. Its often lower sensitivity can even become useful in an imperfect Home Studio because it may reveal less room noise and fewer reflections than a very sensitive condenser.
This family is therefore widely used for vocals, amplifiers and drums, as well as podcasting and streaming.
The condenser microphone
A condenser microphone uses an extremely light diaphragm paired with a backplate. Its operation requires active electronics and, for many XLR models, 48 V phantom power supplied by the audio interface or preamp.
Its sensitivity and ability to capture fine detail explain why it is so common in studios. Vocals, acoustic guitars, pianos, strings and drum overheads are all classic applications.
That precision has a downside, however. A condenser can also reveal bedroom reverberation, computer fan noise or outside traffic more easily.
Condenser therefore does not automatically mean “better for the studio”. Everything depends on the environment.
The ribbon microphone
A ribbon microphone uses an extremely thin strip of metal suspended inside a magnetic field. This technology behaves differently from the two previous types and is often chosen for a smoother high-frequency response.
Ribbon microphones are commonly used on guitar amplifiers, brass, strings and some room recordings.
Passive models can produce a relatively low output level and may require more preamp gain. Phantom power also needs some nuance: certain active ribbons require it, while passive models may have different requirements.
With a ribbon microphone, checking the manufacturer’s documentation before enabling 48 V remains the safest rule.
Polar patterns: understanding what the microphone hears
Capsule technology alone is not enough to understand a microphone. Its polar pattern describes how it reacts to sounds coming from different directions.
| Polar pattern | Behaviour | Main advantage |
|---|---|---|
| Cardioid | Mainly captures the front and reduces the rear | Vocals, instruments, Home Studio |
| Supercardioid / hypercardioid | Tighter front pickup area with a small rear lobe | Greater isolation |
| Omnidirectional | Captures around the microphone | Ambience, ensembles, good acoustics |
| Figure-8 | Captures front and rear, rejects the sides | Stereo, Mid/Side, two opposite sources |
The cardioid pattern is especially common in Home Studios because it makes it easier to isolate the source and reduce some of the sound coming from behind the microphone.
An omnidirectional pattern, by contrast, captures more of the natural acoustics of the room. This can be extremely useful in a good space and much less useful when the walls create troublesome reflections.
Some microphones provide several selectable polar patterns. This flexibility opens up more possibilities, but it is not essential when starting out: a good fixed cardioid already covers a huge number of situations.
Proximity effect: a few centimetres can change the sound
With many directional microphones, moving the source very close to the capsule increases the low-frequency response. This is known as the proximity effect.
On a voice, this can create more warmth and depth. When overdone, it can instead produce a heavy or muddy result.
This is why microphone distance is an integral part of the recording.
Changing microphone position can sometimes alter the result more than changing the microphone itself.
For vocals, adding a few centimetres of distance can reduce proximity effect. On an acoustic guitar, moving the microphone away from the soundhole toward the neck-body joint changes the balance significantly. In front of an amplifier, moving from the centre toward the edge of the speaker also changes the tone.
Placement should therefore be tested before automatically trying to fix the sound with EQ.
The technical specifications that are actually useful
Microphone specification sheets contain many numbers. Some genuinely help explain how a microphone behaves, provided they are not treated as a ranking system.
| Specification | What it tells you |
|---|---|
| Frequency response | How the microphone reacts to different frequencies |
| Sensitivity | Electrical output produced for a given sound pressure |
| Maximum SPL | High sound level the microphone can handle under the stated conditions |
| Self-noise | Noise generated by the microphone’s electronics |
| Signal-to-noise ratio | Relationship between useful signal and noise |
| Impedance | Electrical characteristic related to the preamp |
Frequency response
A microphone does not necessarily reproduce every frequency at exactly the same level. Some have more presence in the high frequencies, while others sound smoother or respond differently in the low end.
A perfectly flat response is not automatically preferable either. A slight presence boost may help one voice stand out, while the same characteristic may become harsh with another singer.
The curve therefore describes a behaviour, not a quality score.
Sensitivity and gain
A sensitive microphone produces more electrical output for the same source and generally requires less preamp gain.
Dynamic microphones often have lower sensitivity than condensers. With some models and quieter sources, it therefore becomes important for the interface to provide enough clean gain.
Again, more sensitive does not mean better. A very loud source does not have the same requirements as a soft voice recorded from farther away.
Maximum SPL
SPL, or Sound Pressure Level, represents acoustic sound pressure.
Maximum SPL becomes especially important with very loud sources such as snare drums, percussion, brass or a guitar amplifier pushed to high levels.
For a quiet voice recorded at a normal distance, choosing the microphone with the most impressive maximum SPL figure generally provides little practical benefit.
Self-noise
Self-noise mainly concerns microphones with active electronics. It becomes more noticeable when recording a very quiet source with a lot of gain.
For a delicate voice, an acoustic guitar recorded from a distance or certain ambience recordings, this specification may matter. In front of a loud amplifier or drum kit, its influence becomes much less important.
Large or small diaphragm?
Among condenser microphones, a distinction is often made between large-diaphragm and small-diaphragm designs.
Large-diaphragm microphones are very popular for vocals and are often used as versatile microphones in Home Studios. They are also used for acoustic guitars, amplifiers and many other instruments.
Small-diaphragm condensers are widely used on acoustic instruments, cymbals, piano and stereo recording. Their precise transient response makes them particularly useful for certain sources.
| Large diaphragm | Small diaphragm |
|---|---|
| Very common for vocals | Very common for instruments |
| Good versatile studio choice | Valued for transient response |
| Many cardioid models available | Often used in stereo pairs |
Once again, the goal is not to decide which is superior, but which better matches the recording you want to make.
XLR or USB?
A microphone does not necessarily require an external audio interface.
USB microphones integrate digital conversion and part of the required electronics directly into the microphone. They can connect straight to the computer and offer an extremely simple solution for voice, podcasting, streaming or a first setup.
An XLR microphone separates the different parts of the signal chain more clearly. The microphone connects to an interface or preamp, and the interface then communicates with the computer.
| XLR microphone | USB microphone |
|---|---|
| Usually requires an audio interface | Connects directly to the computer |
| Very wide choice of models | Particularly simple installation |
| Easy to expand over time | Requires little additional equipment |
| Multiple microphones possible depending on interface | Convenient for an individual setup |
| Preamp and conversion can be upgraded separately | Conversion integrated into the microphone |
A USB microphone is therefore not inherently less serious. It simply follows a more integrated approach.
For a studio expected to grow toward several microphones, instruments or studio monitors, the XLR ecosystem is generally more flexible.
The room is part of the microphone
A microphone never hears only the source placed in front of it.
To different degrees, it also captures reflections from the walls, ceiling, desk and floor, as well as noise from the computer, ventilation, traffic or other people in the room.
This is especially important with sensitive microphones and more distant placements.
An empty bedroom with hard surfaces can create very audible reflections. Buying a more expensive microphone will not make them disappear; it may actually capture them with even greater precision.
It is also important to distinguish acoustic treatment from sound isolation. Treatment affects reflections inside the room. Isolation attempts to prevent sound from entering or leaving it.
In a Home Studio, the first improvement is often simply finding the best available position before buying more equipment.
Close-miking or distant recording?
Distance determines the balance between the direct source and the room.
A close recording generally emphasises the direct sound and reduces the importance of room acoustics. It is therefore particularly practical in an imperfect space.
A more distant position captures more of the environment and can produce a more natural result when the room sounds good.
| Close recording | Distant recording |
|---|---|
| More direct sound | More room sound |
| Generally better isolation | More natural sense of space |
| Possible proximity effect | Acoustics become more important |
| Practical in a Home Studio | Interesting in a good room |
There is therefore no universal ideal distance. The best placement depends on the sound you want.
Accessories that genuinely affect the recording
Some simple accessories have a much greater impact than yet another plugin.
For vocal recording, a pop filter reduces strong bursts of air caused by certain consonants. A shock mount can reduce vibrations transmitted through the stand or desk, while a stable stand helps maintain exactly the same distance and angle across several takes.
A good XLR cable simply completes the chain.
There is no need to turn these accessories into a collection. The important thing is having what allows the microphone to remain stable, correctly positioned and usable throughout the session.
Which microphone for which use?
There is no mandatory technology for each source, but a few general starting points can quickly narrow the options.
| Use | Relevant starting point |
|---|---|
| Singing vocals | Dynamic or condenser depending on the voice and room |
| Podcast / spoken voice | Cardioid dynamic or condenser in a controlled room |
| Acoustic guitar | Large- or small-diaphragm condenser |
| Guitar amplifier | Dynamic or ribbon, sometimes condenser |
| Drums | Several microphone types depending on the element |
| Piano | Condensers, often using several microphones |
| Ambience | Condenser or ribbon depending on the desired space |
For vocals
The condenser is often associated with studio singing because it captures a lot of detail. But in a noisy or highly reflective room, a cardioid dynamic microphone may be much easier to use.
The voice itself remains decisive. A microphone that adds useful presence to one singer may exaggerate sibilance on another.
For podcasting
Intelligibility, stable placement and control of background noise are generally more important than chasing extreme detail.
This is one reason cardioid dynamic microphones are so common for this use, even though a condenser can deliver excellent results in a sufficiently quiet room.
For acoustic guitar
Condenser microphones are very common, but placement immediately becomes critical.
Pointing directly at the soundhole can produce too much low end. Moving the microphone toward the point where the neck meets the body often creates a very different balance.
Before changing models, moving the microphone you already own remains one of the best tools available.
For a guitar amplifier
A dynamic microphone is a classic choice for close-miking a guitar amplifier.
Ribbon microphones are also appreciated for their smoother behaviour, while a condenser can complement the close microphone or be placed farther away to capture more room sound.
This makes it possible to combine several perspectives rather than searching for one microphone that is supposed to do everything.
A few reference models for understanding the different families
These models do not form a ranking or a mandatory shopping list. They simply provide reference points for understanding several common studio-microphone approaches.
| Family | Some well-known models |
|---|---|
| Dynamic | Shure SM57, Shure SM58, Shure SM7B |
| Condenser | Audio-Technica AT2020, RØDE NT1, Neumann TLM 102, Neumann TLM 103 |
| Ribbon | beyerdynamic M 160, sE Electronics X1 R, Coles 4038 |
The SM57, for example, illustrates a dynamic microphone widely used on instruments, while the SM7B represents a dynamic approach commonly associated with voice. The AT2020, NT1 and TLM models illustrate different levels of studio condenser microphones, while the M 160 and 4038 belong to the ribbon world.
The goal is not to move progressively toward “the best model”, but to understand that each microphone has its own behaviour.
How to test a microphone properly
Online demonstrations can help discover models, but they cannot reproduce your voice, your room and your equipment.
When several microphones can be compared, a few rules make the test much more useful:
- use the same source and the same phrase;
- keep distance and placement as comparable as possible;
- set the gain correctly without deliberately favouring one model;
- listen to the result in the real context of the project.
The goal is not simply to determine which microphone sounds the most detailed when heard alone.
A microphone needs to work with the source and inside the mix. A model that sounds spectacular in isolation may sometimes require more correction than a less impressive microphone that is naturally better balanced for the particular voice or instrument.
Mistakes to avoid
| Mistake | Why it causes problems |
|---|---|
| Assuming a condenser is always better | Its sensitivity can reveal more of a bad room |
| Choosing only by price | An expensive microphone does not suit every source |
| Ignoring polar pattern | It largely determines what is captured and rejected |
| Neglecting placement | A few centimetres can transform the recording |
| Comparing specifications only | Sensitivity or SPL alone do not describe the sound |
| Forgetting the preamp | Some microphones require more gain |
| Enabling 48 V without checking | Certain equipment, especially some ribbons, requires caution |
Most of these mistakes have one thing in common: they treat the microphone as an isolated device.
A recording always depends on a complete system.
Source → room → microphone → polar pattern → placement → preamp
Improving one of these elements can sometimes have a greater impact than replacing the microphone itself.
The right microphone is the one that suits the recording
There is no perfect microphone for every situation.
A dynamic can sound excellent on a voice recorded in a bedroom. A condenser can capture an acoustic guitar with great precision in a controlled room. A ribbon can provide exactly the character needed on an amplifier or brass instrument.
Technical specifications are useful for understanding these differences, but they should not become a ranking system. Higher sensitivity, greater maximum SPL or a higher price do not guarantee a better result.
The choice becomes much simpler when you begin with three questions: what am I recording, in what room and at what distance?
From there, the microphone technology, polar pattern and specifications begin to make real sense.
The best microphone is not the one that captures the most: it is the one that correctly captures what you want to keep.
For a first Home Studio, one well-chosen and properly positioned microphone can already cover a huge range of needs. With experience, other models can then complement the studio by offering different behaviours rather than automatically replacing the first one.