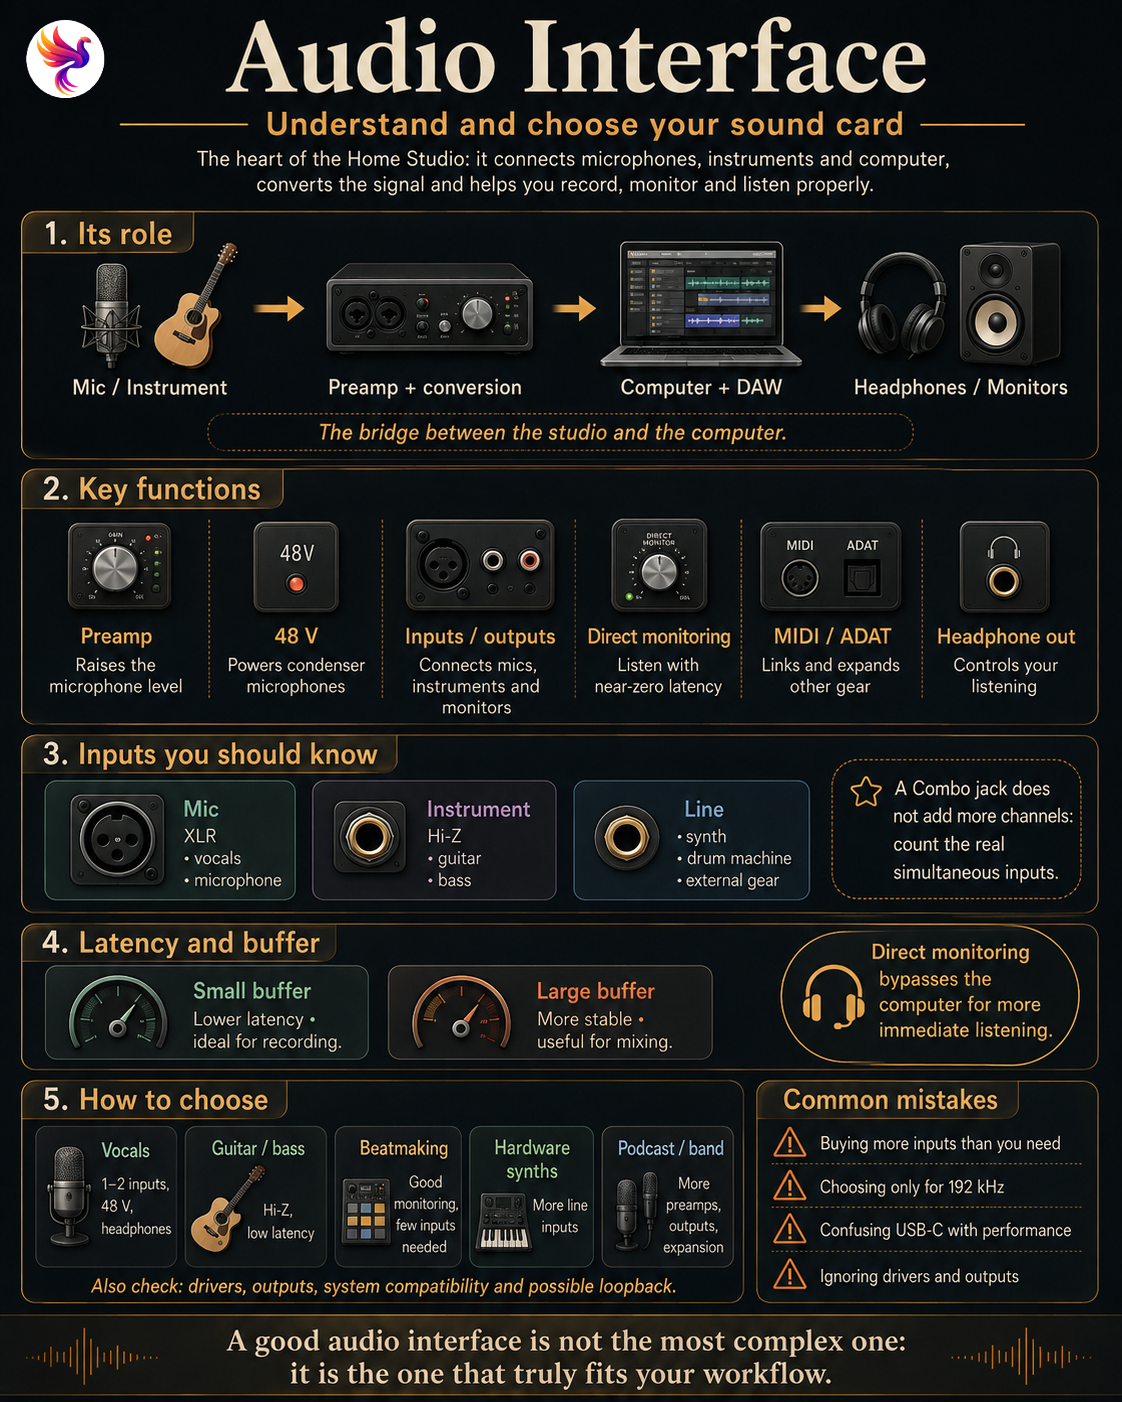
The audio interface, the bridge between the studio and the computer
As soon as you want to seriously record vocals, guitar, bass, synthesizers or another instrument on a computer, one piece of equipment quickly becomes central: the audio interface.
The term “sound card” is still frequently used, but in a modern Home Studio this usually refers to an external box connected to the computer.
Its role is to move sound in both directions.
For recording:
Microphone or instrument → audio interface → computer → DAW
For listening:
DAW → audio interface → headphones or studio monitors
The interface therefore combines several functions in a single device: analogue-to-digital conversion, preamplification, audio connections, headphone and monitor management, monitoring and sometimes MIDI or additional digital connections.
It is therefore less of a simple accessory and more of a genuine connection hub for the Home Studio.
Why not simply use the computer’s built-in sound card?
A computer already has an audio system that allows you to connect headphones, use a built-in microphone or play sound.
That is perfectly sufficient for listening to music, watching videos or joining a video call.
The limitations appear when you need to record and produce audio.
A dedicated interface makes it possible to have:
- inputs designed for professional microphones;
- instrument connections;
- preamplifiers;
- 48 V phantom power;
- outputs designed for studio monitors;
- a headphone output with independent control on some models;
- drivers designed for audio production;
- better-controlled latency;
- several simultaneous inputs and outputs.
It is therefore not simply used to “improve the sound”.
Its main purpose is to connect, record, monitor and control the different elements of the studio properly.
How does an audio interface work?
The physical world mainly produces analogue signals.
A microphone capturing a voice, for example, generates a continuous electrical signal representing the variations in sound.
A computer, on the other hand, works with digital data.
The interface therefore has to perform a conversion.
Analogue-to-digital conversion — A/D
During recording:
Sound → microphone → analogue signal → interface → digital data
The A/D converter, or ADC for Analog-to-Digital Converter, transforms the analogue signal into data that the DAW can record.
Digital-to-analogue conversion — D/A
During playback, the path is reversed:
DAW → digital data → interface → analogue signal → headphones or monitors
The D/A converter, or DAC for Digital-to-Analog Converter, then allows you to hear the result.
An audio interface therefore generally contains both systems.
An interface is not only a converter
Reducing an interface to its converters would still be incomplete.
Inside a small box, you may find:
- several preamplifiers;
- A/D and D/A converters;
- microphone inputs;
- instrument inputs;
- line inputs and outputs;
- a headphone amplifier;
- a volume controller for monitors;
- a direct monitoring system;
- a MIDI interface;
- digital audio connections;
- sometimes an internal routing system.
This concentration of functions is what makes the interface so important in a Home Studio.
Understanding the different types of inputs
Not all audio inputs are designed for the same type of signal.
This is one of the first things to understand before choosing an interface.
Microphone input
A microphone input is generally equipped with an XLR connector.
The signal coming from a microphone is relatively weak and needs to be amplified before being converted.
This is the role of the microphone preamp built into the interface.
Instrument input
An electric guitar or passive bass does not produce the same type of signal as a microphone or a line-level device.
Interfaces therefore often provide an Instrument mode, sometimes labelled:
- INST;
- Hi-Z;
- Guitar.
This mode adapts the input to the electrical characteristics of the instrument.
Line input
Line level is used by many audio devices that already output a stronger signal:
- synthesizers;
- drum machines;
- external preamps;
- effects processors;
- mixing consoles;
- other studio equipment.
You should therefore not confuse microphone, instrument and line level, even when they sometimes use the same physical connector.
Combo XLR / Jack inputs
Many small interfaces use so-called Combo connectors.
A single socket can accept:
- an XLR connector;
- a 6.35 mm jack in the same socket.
This saves space.
But a Combo socket does not necessarily mean that it can record two sources at the same time.
An interface with two Combo sockets usually has two input channels, not four.
What matters is the number of channels that can actually be used simultaneously.
Preamps: giving the microphone enough level
The electrical signal produced by a microphone is generally too weak to be used directly by the converter.
The preamp increases that level.
The Gain control located near a microphone input controls this amplification.
A good setting should produce a sufficiently strong signal while keeping enough headroom before clipping.
If the gain is too low:
- the recorded signal will be weak;
- it will need to be amplified more later;
- noise may become more noticeable.
If the gain is too high:
- the signal may clip;
- peaks can be cut off;
- recorded digital distortion is usually impossible to fully repair.
The goal is therefore not to push the level as high as possible, but to obtain a clean recording with enough headroom.
Do you absolutely need the best preamp?
Differences between preamps do exist, but they should not overshadow the most important criteria for a first studio.
A preamp should provide:
- enough gain;
- sufficiently low noise;
- good headroom;
- a response suited to the microphones being used.
For most modern Home Studios, the preamps built into audio interfaces are already perfectly usable.
An external preamp becomes especially useful when a more specific need appears: more gain, a particular sonic colour, a specific analogue chain or expansion of an existing system.
It is therefore not a mandatory purchase for beginners.
48 V phantom power
Some microphones, especially many condenser microphones, require electrical power.
Audio interfaces generally provide a function labelled:
48 V
or:
Phantom Power
This power is sent through the XLR cable.
It allows the microphone’s internal electronics to be powered without a separate power supply.
However, not all microphones need it.
Standard dynamic microphones generally work without phantom power, while some specific equipment requires greater caution.
Before enabling 48 V, it is therefore preferable to check the manufacturer’s recommendations for the microphone or connected equipment.
How many inputs do you need?
This is probably the most important criterion when choosing an interface.
Start by asking:
How many sources will I actually record at the same time?
One source
To record:
- one vocal;
- one guitar;
- one bass;
- a solo podcast;
a single input can technically be enough.
Two sources
Two inputs already provide much more flexibility.
For example:
- voice + guitar;
- two microphones;
- a stereo synthesizer;
- a two-person interview.
This is a particularly versatile configuration for a small Home Studio.
Four inputs and more
They become relevant for:
- several musicians;
- several synthesizers;
- drums with multiple microphones;
- multiple stereo recordings;
- more hardware equipment.
Recording a band or drum kit
An acoustic drum kit can quickly require several microphones.
In this context, 8 inputs or more may become useful.
The choice therefore depends less on the apparent size of the interface than on the number of sources actually being recorded simultaneously.
Outputs matter just as much
People often look only at the inputs.
Yet the outputs also determine what the studio will be able to do.
A small setup generally needs at least:
- two main left/right outputs for studio monitors;
- one headphone output.
Additional outputs can be used to:
- connect a second pair of monitors;
- create several headphone mixes;
- send sound to external hardware;
- use hardware effects;
- send tracks to a mixing console;
- create more complex routing setups.
For a first studio, two main outputs are often enough.
For a setup that is likely to evolve, extra outputs can become much more important.
One or several headphone outputs?
In a personal studio, one headphone output is generally enough.
The situation changes when several people record at the same time.
A singer and engineer may, for example, need two separate headphones.
An interface with several independent headphone outputs can then provide different levels, or even different mixes depending on the model.
It may seem like a minor detail when buying, but it can quickly become important in a collaborative studio.
Direct monitoring
When recording a voice, the signal normally follows this path:
Microphone → interface → computer → DAW → interface → headphones
This path introduces a delay called latency.
If the delay becomes noticeable, the singer hears their own voice slightly after producing it.
This can make performing extremely uncomfortable.
Direct monitoring bypasses a large part of this path.
The signal is sent directly from the interface input to the headphones or outputs.
This provides monitoring with negligible latency caused by computer processing.
The signal is still recorded in the DAW at the same time.
For singers and instrumentalists, this function is particularly useful.
Understanding latency
Latency is the delay between an action and the moment its result is heard.
For example:
Play a note → computer processing → hear the note
It is usually measured in milliseconds.
Several elements can contribute to latency:
- audio buffer size;
- sample rate;
- interface drivers;
- computer performance;
- DAW;
- plugins;
- virtual instruments;
- routing.
During simple mixing, a few extra milliseconds usually cause no problem.
During recording or when playing a virtual instrument in real time, they can become much more noticeable.
The buffer: balancing responsiveness and stability
The DAW and interface exchange audio in blocks called buffers.
A small buffer generally reduces latency.
But the computer then has less time to complete its calculations.
If the system cannot keep up, you may encounter:
- clicks;
- crackles;
- dropouts;
- instability.
A larger buffer increases stability but also increases latency.
A common strategy is therefore to use:
A small buffer while recording
To maintain good responsiveness.
A larger buffer while mixing
When latency matters less and many plugins need to be processed.
There is therefore no single ideal buffer size for every situation.
Drivers matter a great deal
Two interfaces with similar specifications on paper can behave differently in a real-world environment.
Audio drivers handle communication between the interface, operating system and DAW.
Their stability and efficiency can influence:
- latency;
- CPU load;
- stability;
- the number of usable tracks;
- the frequency of audio errors.
On Windows, many interfaces use dedicated ASIO drivers.
On macOS, the ecosystem relies in particular on Core Audio.
On Linux, compatibility with the audio system also needs to be checked, especially the availability of any configuration tools required for routing or advanced functions.
Official compatibility with your operating system should therefore be checked before purchasing.
USB, USB-C and Thunderbolt
The connection between the interface and computer is another area that often causes confusion.
USB
USB is extremely common on audio interfaces.
For many Home Studios, it provides more than enough performance.
USB-C
USB-C primarily describes a connector type.
A USB-C socket does not automatically mean that the device uses the fastest USB protocol available.
Two interfaces using the same USB-C connector can therefore rely on different USB technologies.
You need to check the actual specification used by the device, not just the shape of the connector.
Thunderbolt
Thunderbolt offers high bandwidth and is used on some professional interfaces or systems with many channels.
But a Thunderbolt interface does not automatically “sound better” than a USB interface.
The connection mainly affects communication with the computer, not directly the artistic quality of the converters or preamps.
For a small Home Studio, Thunderbolt is therefore generally not a requirement.
Sample rate: what do 44.1, 48, 96 or 192 kHz mean?
During digital conversion, the analogue signal is measured several thousand times per second.
This rate is called the sample rate.
Some common values are:
- 44.1 kHz;
- 48 kHz;
- 88.2 kHz;
- 96 kHz;
- 192 kHz.
A 48 kHz sample rate means, for example, that the signal is sampled 48,000 times every second.
Modern interfaces often advertise very high maximum sample rates.
But the presence of 192 kHz in a specification does not automatically mean that one interface is better than another.
Higher rates also increase:
- the amount of data;
- file sizes;
- processing load.
For many music projects, the standard sample rates commonly used in production are already perfectly suitable.
Maximum sample rate should therefore not become the main purchasing criterion.
Bit depth: 16, 24 and 32 bits
Bit depth is another important parameter in digital audio.
It affects, among other things, the range of levels the system can represent.
You will mainly encounter:
- 16-bit;
- 24-bit;
- 32-bit floating point in some modern workflows.
For studio recording, 24-bit has become extremely common and provides comfortable headroom without needing to record close to clipping.
32-bit float can appear on some recorders and interfaces, but it should not be confused with the internal 32-bit float processing already used by many DAWs.
Again, the highest number is not automatically the most relevant criterion when choosing an interface.
Why the numbers do not tell the whole story
Specification sheets often highlight:
- 24-bit;
- 192 kHz;
- dynamic range;
- noise level;
- distortion figures;
- headphone power.
These figures are useful.
But they need to be considered within the real context of the studio.
An interface that looks impressive on paper but does not fit your needs can be less useful than a technically simpler model that provides exactly:
- the right number of inputs;
- the right outputs;
- practical monitoring;
- stable drivers;
- clear routing.
The specification sheet should help you decide, not replace analysis of your workflow.
MIDI: useful even though MIDI does not carry audio
Some interfaces include traditional MIDI DIN connectors.
MIDI does not carry sound.
It carries control information that allows devices to communicate, including:
- notes;
- velocity;
- commands;
- synchronisation;
- parameter changes.
A built-in MIDI connection can be useful with:
- synthesizers;
- drum machines;
- keyboards;
- controllers;
- older hardware devices.
However, a USB MIDI keyboard connected directly to the computer does not necessarily need this.
The presence of MIDI on the interface therefore depends on the equipment you want to connect.
ADAT: adding inputs without replacing the whole interface
On more advanced interfaces, you may find an optical ADAT connection.
It can carry several channels of digital audio over a single connection.
Its main advantage is studio expansion.
An interface with only a few preamps can, for example, be connected to an external ADAT preamp or converter to add several more inputs.
This makes it possible to evolve gradually:
small Home Studio → larger multitrack system
without necessarily replacing the main interface.
For someone who plans to record drums or several musicians in the future, an ADAT input can therefore provide useful room for growth.
S/PDIF and other digital connections
Some interfaces also provide:
- S/PDIF;
- AES/EBU;
- Word Clock;
- network audio depending on the system.
These connections mainly concern more advanced setups or external digital hardware.
They are generally not essential for beginners.
Their presence becomes relevant when the studio already has a specific need.
Buying an interface simply to have many connections you do not yet understand provides no immediate advantage.
Loopback: useful for streaming and content creation
Some interfaces offer a function called Loopback.
It allows a signal already being played by the computer to be routed virtually back into an input.
This can be useful for:
- streaming;
- podcasts;
- tutorials;
- software demonstrations;
- live broadcasting;
- recording application audio together with a microphone.
For example, a creator can record simultaneously:
their voice + the sound from a DAW or application
without using external physical cabling.
For pure music production, this function is not essential.
For content creators, it can be extremely useful.
USB-powered interface or external power supply?
Many small interfaces are USB bus-powered.
They receive their power directly from the computer.
Advantages include:
- fewer cables;
- quick installation;
- better portability;
- convenient laptop use.
Interfaces with more preamps, outputs or advanced functions may require an external power supply.
This is neither an advantage nor a drawback in itself.
It simply reflects different requirements.
The interface as a monitoring controller
An interface is not only used for recording.
It often becomes the centre of the monitoring system.
Its large main knob generally controls the volume of the studio monitors.
Depending on the model, you may also find:
- mute;
- dim;
- selection between several pairs of monitors;
- mono;
- several headphone outputs;
- independent mixes.
In a simple Home Studio, the interface can therefore replace a separate monitor controller.
How should you choose an interface for your use case?
Rather than searching for “the best audio interface”, it is more useful to start with your actual needs.
Singer
Priorities:
- at least one good microphone input;
- 48 V phantom power;
- headphone output;
- direct monitoring;
- enough gain.
One or two inputs may be more than enough.
Guitarist or bassist
Priorities:
- Instrument / Hi-Z input;
- low latency;
- monitoring;
- good integration with software amp simulators.
Singer-songwriter
A two-input interface is often a very flexible configuration:
- vocals;
- guitar;
- two microphones;
- stereo instrument depending on the setup.
Beatmaker or electronic producer
If almost everything is created inside the DAW, having many microphone inputs is unnecessary.
The priorities may instead be:
- monitoring quality;
- headphone output;
- MIDI;
- line inputs for synthesizers;
- number of outputs.
Hardware synthesizer user
Line inputs become especially important.
A stereo synthesizer can use two inputs on its own.
With several machines, the number of required inputs increases very quickly.
Podcast or streaming
Check:
- number of microphone inputs;
- headphone outputs;
- loopback;
- routing flexibility;
- accessible controls.
Band or acoustic drums
Priorities:
- many preamps;
- high simultaneous channel count;
- headphone outputs;
- expandability;
- ADAT;
- advanced routing.
Quick needs table
| Situation | Inputs to consider | Particularly useful functions |
|---|---|---|
| Solo vocals | 1 to 2 | XLR, 48 V, direct monitoring |
| Voice + guitar | 2 | XLR, Hi-Z, headphones |
| Two-person podcast | 2 | Two preamps, monitoring |
| Software beatmaking | 1 to 2 | Good monitoring, MIDI if needed |
| Stereo synth | 2 minimum | Line inputs |
| Several synths | 4 or more | Line inputs, MIDI |
| Drums | 8 or more depending on setup | Multiple preamps, ADAT |
| Band | Several | Many I/O, headphone mixes, expansion |
These figures are not strict requirements.
They mainly help illustrate how quickly needs can grow.
Plan for growth without oversizing
Buying exactly the minimum can sometimes force you to replace the interface very quickly.
On the other hand, buying a huge interface for a hypothetical need five years from now ties up budget unnecessarily.
The right compromise is to allow a realistic amount of room for growth.
If you currently record only one voice but genuinely plan to add guitar soon, two inputs make sense.
If you work exclusively with virtual instruments and have no intention of recording drums, eight preamps probably provide no benefit.
The question therefore becomes:
What do I use today, and what evolution is realistically likely?
Criteria to check before buying
A simple checklist can prevent many mistakes.
Inputs
- How many simultaneous sources?
- How many microphone inputs?
- How many line inputs?
- Do I need a Hi-Z input?
Outputs
- One pair of monitors?
- Several monitoring systems?
- Several headphones?
- External hardware?
Microphones
- Do I need 48 V?
- Is the available gain suitable for my microphones?
Recording
- Is direct monitoring available?
- Are latency and drivers handled properly?
External hardware
- Do I need MIDI?
- ADAT?
- S/PDIF?
- Several line outputs?
Content creation
- Do I need loopback?
Computer compatibility
- Is the interface officially compatible with my operating system?
- Are drivers available?
- Does the control software work on my platform?
- Does my computer have the required connection?
Common mistakes when choosing an interface
Buying only based on the number of inputs
More is not automatically better.
Unused inputs do not improve your recordings.
Choosing only based on specifications
192 kHz or another impressive number on a specification sheet does not automatically guarantee a better experience.
Confusing USB-C with performance
The connector alone does not identify the protocol or real performance.
Ignoring drivers
An interface works as part of a complete system: hardware, operating system, DAW and drivers.
Forgetting about outputs
Future monitoring upgrades or external hardware may require more outputs.
Buying too small without thinking ahead
A single-input interface may be enough today but become limiting as soon as you need to record two sources.
Buying too large “for later”
A complex interface can cost more, take up more space and add functions that may never be used.
A good interface should disappear into the workflow
Ideally, the audio interface quickly becomes transparent in the creative process.
You connect a microphone.
You set the gain.
You open the DAW.
You record.
You listen.
Technology should not become a succession of obstacles.
That is why the best choice is not necessarily the interface with the most functions or the most impressive specifications.
It is the one that matches how your studio actually works.
For many creators, a small interface with two inputs, a headphone output, 48 V phantom power and reliable monitoring will already cover a huge range of situations.
For others, several preamps, ADAT, multiple headphone mixes and many outputs will be essential.
The right choice therefore always begins with the same questions:
What do I want to connect?
What do I want to record at the same time?
How will I monitor it?
And how is my studio likely to evolve?
Once you know these answers, the specification sheet becomes much easier to read — and the audio interface stops being a box full of mysterious technical terms and becomes exactly what it should be: the link between your instruments, your computer and the music you create.