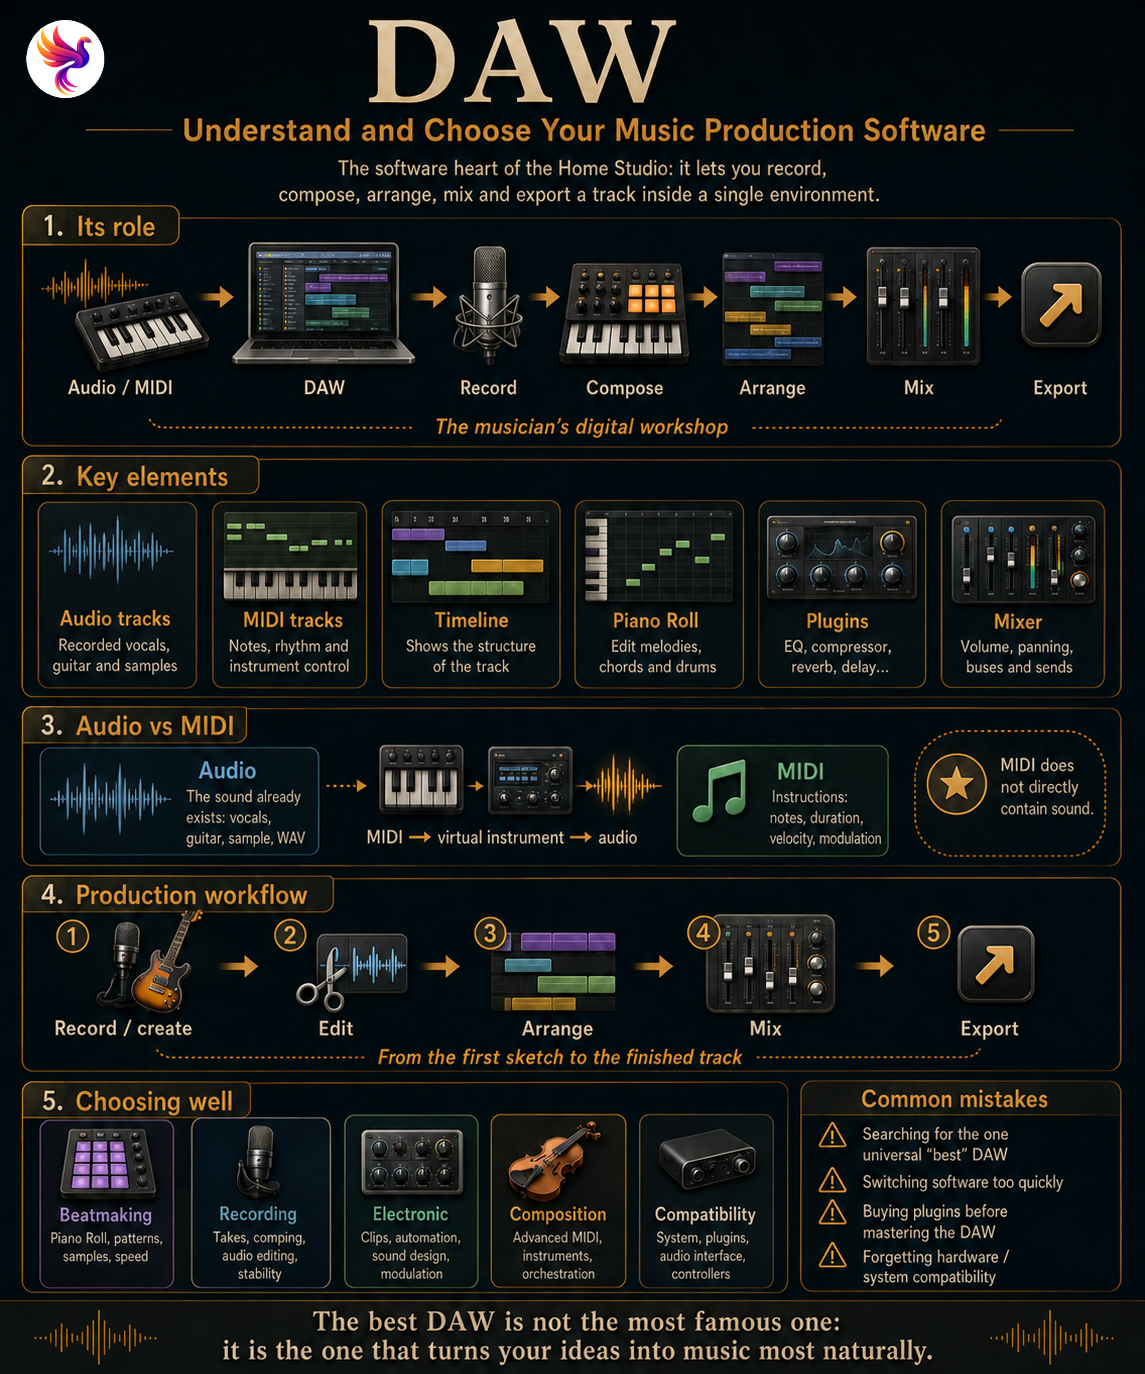
The DAW, the software heart of the Home Studio
A DAW, or Digital Audio Workstation, is the software environment in which a large part of modern music production takes shape.
You can use it to record vocals or guitar, program drums, play a virtual synthesizer, chop a sample, build a track arrangement, add effects and then mix everything before the final export.
The DAW therefore brings together inside the computer functions that were once spread across several devices: multitrack recorders, sequencers, mixing consoles, effects processors and electronic instruments.
A DAW is not just recording software: it is the space where the different stages of music production come together.
Ableton Live, FL Studio, Cubase, Logic Pro, Pro Tools, REAPER, Bitwig Studio and Studio One can all be used to produce a complete track. What mainly changes is the way they organise the work.
The most useful question is therefore not which one is “the best”, but which one best matches the way you create.
From the idea to the finished track
A project can begin with a few MIDI notes, a drum loop, a recorded guitar or simply a voice. The DAW then allows that idea to evolve without leaving the same environment.
| Stage | What the DAW lets you do |
|---|---|
| Create | Play MIDI, program rhythms, use virtual instruments |
| Record | Capture vocals, guitars, synthesizers or several sources |
| Edit | Cut, move, clean, realign or combine takes |
| Arrange | Organise the different sections of the track over time |
| Mix | Adjust volume, panning, effects, buses and automation |
| Export | Produce the final audio file or separate tracks |
This continuity is one of the major advantages of digital production. An idea recorded in a few seconds can be transformed, reorganised and developed until it becomes a complete project.
Tracks, timeline and clips: reading a DAW interface
Despite their visual differences, most DAWs rely on a few common elements.
Tracks represent the different parts of the project. A track may contain vocals, guitar, a synthesizer or drums, but it can also act as a group or effect return.
The timeline represents time. The track generally moves from left to right while the individual tracks are arranged vertically. This view makes it easy to understand the overall structure: intro, verses, choruses, transitions or instrumental sections.
Inside the tracks, you will often find clips, regions or items, depending on the software. These are blocks of audio or MIDI content that can be moved, cut, duplicated or looped.
The main interface can therefore be understood as a kind of map of the track:
Vertical tracks = the elements of the track
Horizontal timeline = their position in time
Once this logic is understood, the interface becomes far less intimidating.
Audio and MIDI: two very different types of material
A DAW can work with both audio and MIDI, but these two types of data do not represent the same thing.
| Audio | MIDI |
|---|---|
| Contains sound directly | Contains instructions |
| Vocals, guitar, drums, sample, WAV | Notes, duration, velocity, modulation |
| You work with an existing recording | The performance can be changed easily |
| The timbre is already recorded | The instrument can be replaced |
An audio track can, for example, contain a vocal recorded with a microphone. The sound already exists and the DAW usually displays its waveform.
MIDI does not directly contain sound. Instead, it tells an instrument what it needs to play.
MIDI → virtual or hardware instrument → audio
This difference offers a great deal of flexibility. A melody can be recorded with a piano sound and then control a synthesizer a few minutes later without the notes having to be played again.
The Piano Roll
The Piano Roll is one of the main MIDI editing tools. Notes appear on a grid: their vertical position represents pitch, their length represents duration and their horizontal position determines when they are triggered.
It can be used just as easily to correct a melody as to build a chord progression, bass line or drum pattern.
For someone who composes mainly with virtual instruments, the quality of the Piano Roll can become a genuine factor when choosing a DAW.
Recording without searching for the perfect take
Digital recording makes it possible to keep several attempts at the same part without overwriting the previous ones.
A singer can therefore record several versions of a verse, then select the best passages from each one to build a final take. This method is known as comping.
The same principle can be used with guitar, bass or other instruments. The DAW can then make it easier to clean up the recording, create fades between regions or make small timing adjustments.
These tools are not meant to replace performance. They mainly prevent an excellent take from being lost simply because one phrase or note caused a problem.
Virtual instruments, samples and plugins
A DAW can host instruments that exist entirely in software. A single computer can therefore contain synthesizers, pianos, drums, basses, samplers or orchestral libraries.
These instruments are usually controlled through MIDI and can be modified at any point during production.
Sampling follows a different logic: it starts from an existing audio file. A loop, percussion sound, vocal or texture can be chopped, transposed, reversed or loaded into a sampler to become new musical material.
Effect plugins then process the sound. Some of the fundamental treatments include:
- EQ to shape the frequency balance;
- compression to control dynamics;
- reverb and delay to create space and depth;
- saturation or distortion to change the character of the signal.
This short list already covers a large part of everyday production work. Modern DAWs generally include their own effects and instruments, so there is no need to immediately buy dozens of third-party plugins.
Mixing: organising the signal rather than stacking effects
The mixer built into the DAW allows you to control the level and position of every track in the mix.
Volume and panning form the foundation, but mixing becomes much more interesting once you begin grouping tracks or sharing certain processing chains.
Take a drum kit recorded across several tracks:
Kick + Snare + Toms + Overheads → Drum Bus
The bus allows the whole group to be controlled or processed together without having to adjust each element separately.
A send works differently. It sends part of a signal to an additional track. Several vocals can therefore share a single reverb while each one keeps its own effect level.
The term routing describes all the paths taken by the signal. In a simple project, you may barely need to think about it. In a complex project, it becomes essential for keeping the session organised.
Automation: bringing the track to life
A mix does not have to remain identical from beginning to end.
Automation allows a parameter to change automatically over time. You can gradually increase an instrument’s volume, move a sound across the stereo field or slowly open a synthesizer filter.
It can also be used much more subtly: bring out a single word in a vocal, slightly increase the reverb at the end of a phrase or reduce an instrument for a few seconds.
Automation therefore sits between mixing and creation. It does not merely correct sound: it contributes directly to the movement of the track.
Tempo, quantisation and time stretching
The DAW also organises the time dimension of music.
The tempo, expressed in BPM, provides the general reference. A grid makes it possible to position events according to this pulse, while the metronome provides a guide during recording.
Quantisation can automatically move certain MIDI notes or audio events closer to that grid. It is useful for correcting slightly inaccurate timing, but excessive correction can make a performance feel too mechanical.
Time stretching directly affects the duration of an audio file. A loop recorded at one tempo can therefore be adapted to a faster or slower project without necessarily changing its pitch.
These tools are extremely powerful, but they work best when they serve the music rather than trying to make everything perfectly regular.
Two main ways to build a track
Most DAWs use a traditional timeline, but some also provide more open-ended approaches.
Linear arrangement
With this approach, the track is gradually built from left to right. It naturally suits multitrack recording, songs, audio editing and music for picture.
Clip-based creation
Other workflows allow you to experiment with loops or independent musical fragments before deciding where they will appear in the final arrangement.
Ableton Live illustrates this difference particularly well with its Session View, designed for launching and experimenting with clips, and its Arrangement View, which uses a more traditional timeline.
This difference may look minor on a specification sheet, but it can completely change the way someone builds music.
The main DAWs do not follow the same philosophy
They can all broadly record, compose and mix. It is therefore more useful to compare their approaches than to try to rank them.
| DAW | Characteristic approach |
|---|---|
| Ableton Live | Clips, experimentation, electronic production, live |
| FL Studio | Piano Roll, patterns, beatmaking, MIDI composition |
| Cubase | Versatile production, advanced MIDI, recording |
| Logic Pro | Complete studio integrated into the Apple ecosystem |
| Pro Tools | Recording, audio editing, mixing, post-production |
| REAPER | Flexibility, efficiency, routing and customisation |
| Bitwig Studio | Modulation, sound design, electronic production |
| Studio One | Integrated workflow from recording to production and mixing |
This is not a ranking. The same track could be produced in any of these applications.
Ableton Live and Bitwig Studio may appeal to users who like experimenting with clips, modulation and sound design. FL Studio has an approach that is particularly popular for beatmaking and MIDI work.
Cubase and Studio One provide highly versatile environments, while Pro Tools remains strongly associated with recording and audio-editing workflows. REAPER offers a great deal of freedom when it comes to organisation and routing.
Logic Pro is also a very complete solution, but its place within the Apple ecosystem is obviously a decisive factor when choosing it.
Which DAW for which use?
A piece of software is not truly “specialised” in just one musical genre, but some workflows fit certain practices more naturally.
| If your priority is… | Focus mainly on… |
|---|---|
| Beatmaking | Piano Roll, patterns, sampling, speed |
| Recording | Comping, audio editing, stability, take management |
| Electronic music | Clips, automation, modulation, instruments |
| Composition | MIDI, track organisation, virtual instruments |
| Mixing | Mixer, buses, routing, automation |
| Live | Clip launching, controllers, stability |
The mistake would be to turn this table into an absolute rule. FL Studio can record instruments, Pro Tools can host virtual instruments and REAPER can be used for electronic music.
The goal is simply to identify which functions you will use for several hours every week. Those are the ones that should guide the decision.
Compatibility comes before features
Before comparing creative tools, you need to make sure the DAW fits your computing environment.
The first criterion is obviously the operating system. Logic Pro belongs to the Apple ecosystem, while REAPER and Bitwig Studio are also available on Linux. Studio One also offers Linux support, with some platform-specific differences compared with Windows and macOS.
Plugins add a second layer of compatibility. Depending on the software and platform, you may encounter formats such as VST3, AU, AAX, CLAP or LV2.
Hardware matters too. An audio interface or MIDI controller may work perfectly on one platform and require more configuration on another.
On Linux in particular, it is important to consider the entire chain: DAW, audio interface, plugins, hardware control tools and the audio environment being used.
A very powerful DAW becomes a poor choice if an essential part of your hardware or plugin library does not work with it.
What is included changes the real value of the software
Price alone does not allow two DAWs to be compared properly.
Some applications include a large library of synthesizers, samplers, effects and sounds. Others provide a more minimal environment that can gradually be expanded with external tools.
You therefore need to look at what is available after installation, not just the advertised price.
Different editions also deserve attention. Depending on the version, the number of tracks, included instruments or advanced functions may vary.
Finally, perpetual licences, subscriptions and upgrade policies can significantly change the long-term cost. These conditions change regularly, so they should be checked directly with the publisher when purchasing.
Testing a DAW properly
Reading comparisons helps reduce the number of options, but one hour of actual use often reveals more than several pages of specifications.
A small project is enough to test a DAW properly:
- create a few audio and MIDI tracks;
- record or import a sound;
- program a short sequence in the Piano Roll;
- add a few effects and create some simple routing;
- build a short arrangement and export it.
The goal is not to produce a great track. It is to see whether the fundamental operations feel natural.
If every action requires searching for the right command, the workflow may become frustrating. On the other hand, software that seems less impressive in a comparison may immediately fit the way you think.
Mistakes to avoid
| Mistake | Why it causes problems |
|---|---|
| Choosing the DAW used by a famous artist | Their workflow may be completely different from yours |
| Buying the maximum edition immediately | Many functions may remain unused |
| Collecting plugins from the start | Built-in tools are more than enough for learning |
| Changing DAW at the first obstacle | Some difficulties simply come from the learning process |
| Ignoring compatibility | Plugins or hardware may become unusable |
The search for the perfect application can easily become a distraction. The most important knowledge — audio, MIDI, arrangement, dynamics and mixing — remains valid from one DAW to another.
It is therefore generally more effective to master one DAW deeply before starting to collect several of them.
The best DAW is the one you eventually stop noticing
At first, the software takes up a huge amount of attention. You need to learn how to create a track, record, open a plugin, use a bus or export the project correctly.
Then these operations gradually become natural.
At that point, the DAW stops being the main subject. You stop constantly thinking about the software and start thinking about the music.
That is probably one of the clearest signs that an environment genuinely suits you.
Ableton Live, FL Studio, Cubase, Logic Pro, Pro Tools, REAPER, Bitwig Studio and Studio One can all lead to professional results. The choice depends less on some imaginary winner than on the relationship between the tool, the hardware and the way you work.
The right DAW is the one that reduces the distance between the idea in your head and the track you are actually able to finish.
Once you have found that software, there is mainly one thing left to do: stop constantly searching for the next one and start truly mastering it.