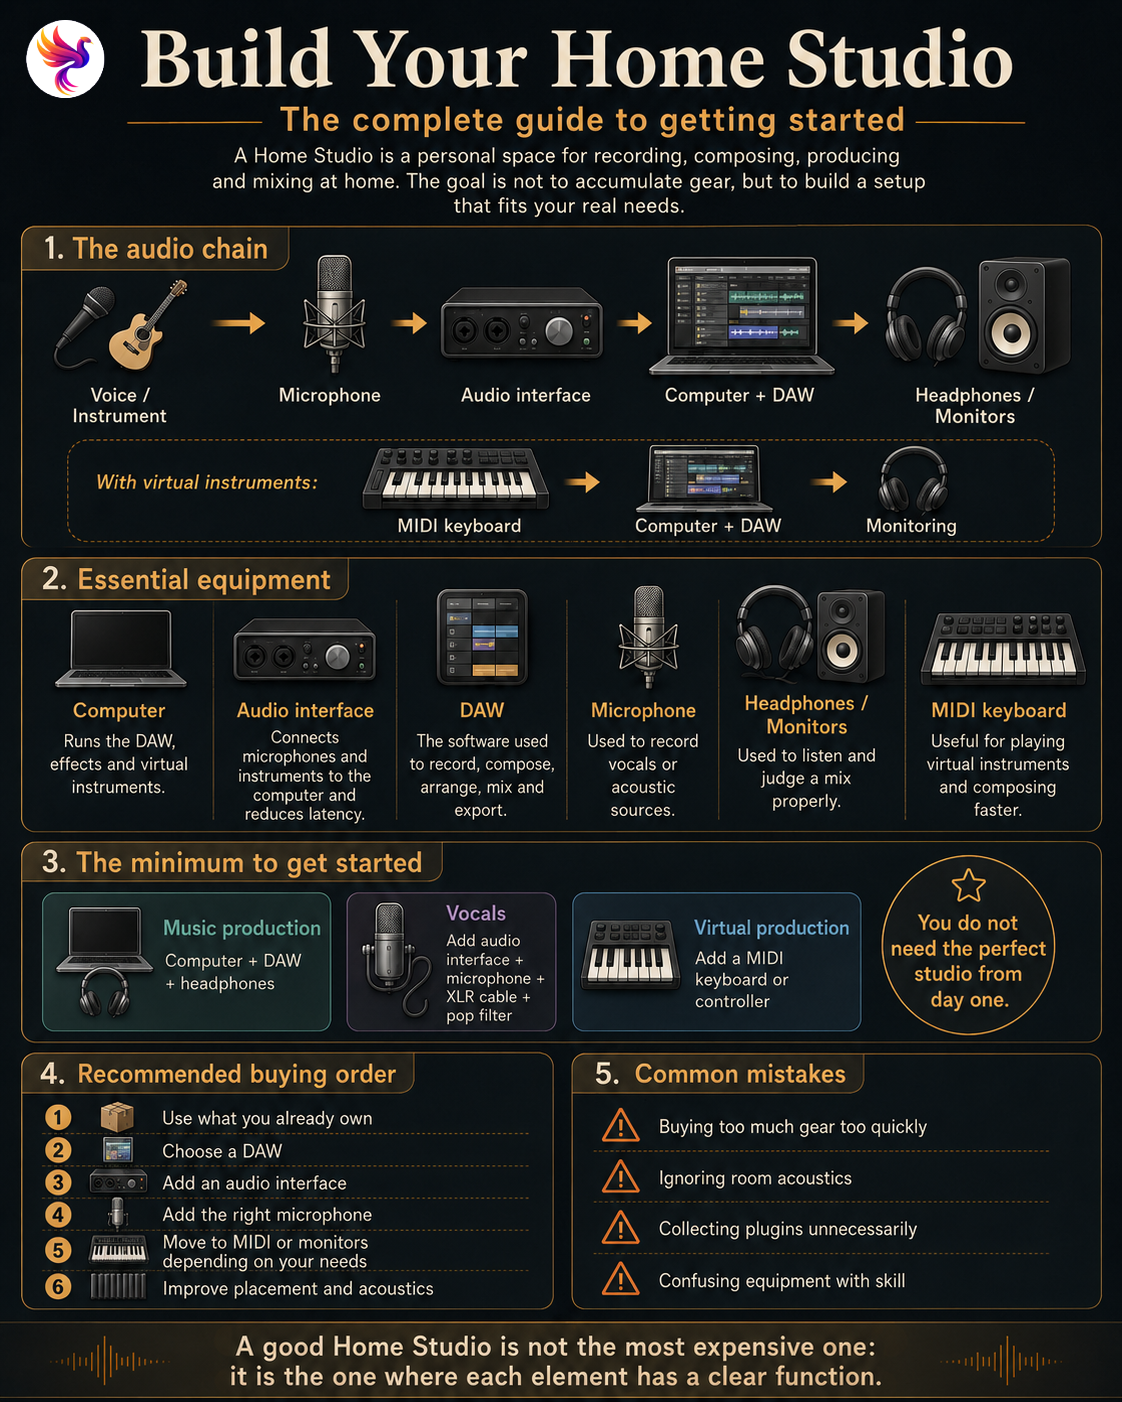
A Home Studio is more than a room filled with equipment
Creating music at home has never been more accessible. Where recording once required a studio equipped with a large mixing console, numerous peripherals and dedicated machines, much of that signal chain can now fit around a computer, an audio interface and a few carefully chosen pieces of equipment.
A Home Studio is simply a personal space dedicated to recording, composition, production or audio mixing. It can occupy an entire room, but it can also be reduced to a desk installed in a bedroom.
Its quality does not directly depend on the amount or price of the equipment.
A coherent setup adapted to its purpose and installed correctly will often be far more effective than a collection of high-end devices that are poorly used.
Before buying anything, the first question is therefore simple:
What do I actually want to do in my Home Studio?
Producing electronic music does not require exactly the same equipment as recording a singer, an acoustic guitar or a complete band.
Start by defining your needs
There is no single Home Studio configuration.
A beatmaker working mainly with virtual instruments can produce a great deal with a computer, a DAW, headphones and a MIDI controller.
A singer-songwriter who wants to record vocals and guitar will need an audio interface and microphone much more quickly.
A musician recording several instruments simultaneously will need more audio inputs.
Before thinking about brands or models, it is therefore useful to identify your main use case.
| Use | Particularly important equipment |
|---|---|
| Composition and music production | DAW, headphones or monitors, MIDI keyboard |
| Beatmaking | DAW, headphones, MIDI controller or pads |
| Vocals / voice | Audio interface, microphone, headphones |
| Guitar / bass | Audio interface, DAW, headphones or monitoring |
| Acoustic instruments | Microphone, audio interface, acoustics |
| Electronic production | DAW, MIDI, virtual instruments, monitoring |
| Mixing | Reliable monitoring, acoustics, DAW |
| Multitrack recording | Interface with several inputs, microphones |
This approach prevents the process of building a studio from turning into a shopping list.
Understand the audio signal chain
Before even choosing your equipment, understanding the path travelled by sound helps avoid a lot of confusion.
For recording a voice, a simple chain may look like this:
Voice → microphone → audio interface → computer → DAW
Then, to listen to the result:
DAW → audio interface → headphones or studio monitors
The audio interface therefore acts as the bridge between the physical world — voice, guitar, synthesizer, microphone — and the computer’s digital environment.
In a setup using only virtual instruments, the chain can be even simpler:
MIDI keyboard → computer → DAW → virtual instrument → headphones or monitors
Understanding this logic makes it easier to add equipment only when it serves a clear purpose.
1. The computer: the centre of the digital studio
In a modern Home Studio, the computer generally hosts the production software, virtual instruments, effects, samples and audio projects.
It can be a desktop or laptop computer running Windows, macOS or Linux depending on the software being used.
Requirements vary greatly depending on the projects.
A few audio tracks with simple processing require relatively few resources. By contrast, large orchestral libraries, numerous virtual synthesizers or projects containing dozens of tracks and effects can place heavy demands on the processor, memory and storage.
The main components to watch are:
- the processor, which handles audio processing and virtual instruments;
- the RAM, particularly important with large sound libraries;
- the SSD, which improves loading times for projects, samples and instruments;
- the connectivity, especially for audio interfaces and controllers.
However, an extremely powerful workstation is not necessary to get started.
In many cases, the computer you already own is more than capable of introducing you to music production.
2. The audio interface: the bridge between instruments and the computer
The audio interface, sometimes simply called a “sound card”, is one of the central components of a Home Studio designed for recording.
It can be used to connect:
- a microphone;
- a guitar;
- a bass;
- a synthesizer;
- studio monitors;
- headphones;
- and sometimes other MIDI or digital equipment.
Its essential role is signal conversion.
When a microphone captures a voice, it produces an analogue signal. The interface converts that signal into digital data that the computer and DAW can record.
During playback, the reverse process converts the digital data into an analogue signal for the headphones or speakers.
What you usually find on an audio interface
Depending on the model:
- XLR microphone inputs;
- line inputs;
- instrument inputs;
- preamps;
- 48 V phantom power;
- monitor outputs;
- headphone output;
- listening level controls;
- direct monitoring;
- MIDI connections;
- digital inputs and outputs.
The number of inputs you need mainly depends on what you want to record at the same time.
For recording a single voice or guitar, a small interface with one or two inputs may be enough.
Recording drums or several musicians simultaneously, however, requires far more channels.
There is therefore no need to buy a huge interface immediately “just in case”.
3. The DAW: the real production workspace
A DAW, or Digital Audio Workstation, is the software around which modern music production is generally organised.
This is where you:
- record;
- compose;
- edit;
- arrange;
- process;
- mix;
- automate;
- and export music.
Ableton Live, FL Studio, Cubase, Logic Pro, Pro Tools, Studio One, Bitwig, REAPER and Reason are among the many available options.
There is no universal best DAW.
Some focus more on traditional composition, others on beatmaking, live performance, multitrack recording or working with virtual instruments.
But they all rely on similar concepts.
You will generally find:
- audio tracks;
- MIDI tracks;
- a timeline;
- a virtual mixer;
- instruments;
- effects;
- automation;
- routing systems;
- editing tools.
For beginners, properly learning one piece of software is generally far more useful than constantly switching DAWs in search of the perfect solution.
4. Headphones and monitors: hearing what you produce
Creating music means being able to make reliable decisions based on what you hear.
This is the role of monitoring.
Unlike many consumer audio systems designed to make music sound pleasant, monitoring equipment aims to reproduce the signal faithfully enough to reveal problems in a recording or mix.
Two main solutions are used: headphones and monitors.
Monitoring headphones
Headphones are often the most accessible option for getting started.
They take up little space, allow you to work without disturbing people around you and reduce the influence of the room’s acoustics.
There are several main types.
Closed-back headphones
They provide better isolation from the outside world and reduce sound leakage.
They are particularly well suited to recording: a singer can hear the backing track without it being strongly picked up by the microphone.
Open-back headphones
They provide less isolation but often offer a more natural sense of space.
They are frequently used for mixing and analytical listening in a quiet environment.
No pair of headphones perfectly replaces monitors, but it is entirely possible to start producing seriously with a good pair of studio headphones.
Studio monitors
Studio monitors make it possible to hear the mix in the physical space around you.
In Home Studios, active monitors are very common because the amplification is built directly into the speakers.
The choice depends in particular on:
- room size;
- listening distance;
- low-frequency response;
- required sound level;
- available acoustic treatment.
Larger speakers are not automatically better.
In a small untreated room, a very powerful pair of monitors can even make acoustic problems harder to manage.
5. Monitor placement matters as much as monitor quality
Buying good studio monitors and placing them randomly on a desk can greatly reduce their effectiveness.
In a conventional stereo setup, the two speakers and the listening position should ideally form approximately an equilateral triangle.
The speakers are angled towards the listener and positioned as symmetrically as possible within the room.
The tweeters or acoustic axis are generally positioned around ear height.
The room itself also plays a major role.
Walls, ceiling, floor, furniture and the desk all reflect sound. These reflections mix with the direct sound coming from the speakers and can alter what you perceive.
This is why the studio layout should be considered before investing in increasingly expensive equipment.
6. Acoustics: the invisible equipment in a Home Studio
The room is part of the monitoring system.
When a speaker produces sound, that sound does not travel only towards the listener. It also reaches the walls, ceiling and floor.
Some of it is absorbed and some is reflected.
Low frequencies can also create significant resonances in a small room.
The result can be misleading:
- some frequencies sound exaggerated;
- others seem to disappear;
- the stereo image becomes less precise;
- room reverberation masks certain details.
Acoustic treatment and sound isolation are not the same thing
This distinction is important.
Sound isolation aims to prevent sound from entering or leaving the room.
Acoustic treatment aims to improve the way sound behaves inside the room.
Absorption panels, bass traps and other acoustic elements can therefore improve the listening environment without necessarily preventing neighbours from hearing the music.
Before buying more equipment, working on placement and room acoustics can produce a much greater improvement than many people expect.
7. The microphone: turning sound into a signal
A microphone converts acoustic vibrations into an electrical signal.
Several technologies exist, including three particularly common families used in studios.
Dynamic microphones
Robust and generally less sensitive to very quiet sounds and room details, they are especially popular for:
- live vocals;
- some vocal recordings;
- guitar amplifiers;
- drums;
- podcasting and broadcasting.
Condenser microphones
More sensitive, they can capture a great deal of detail.
They are widely used for:
- sung vocals;
- voice-over;
- acoustic guitars;
- piano;
- many other instrumental recordings.
Many condenser microphones require 48 V phantom power, usually supplied by the audio interface.
Ribbon microphones
They use a different technology and are often appreciated for their smooth sound and the way they handle certain high frequencies.
More specialised, they also require greater care depending on the model and the preamp being used.
There is no perfect microphone for everything
The choice depends on the source being recorded, the room, the desired character and the voice or instrument.
A more expensive microphone is therefore not automatically the best choice for every situation.
8. The MIDI keyboard: playing without carrying audio
A MIDI keyboard may look like a small piano, but it does not necessarily generate sound itself.
Instead, it sends MIDI instructions to a DAW or instrument.
When a key is pressed, the system can transmit information such as:
- which note was played;
- how hard it was played;
- when it started;
- when it stopped.
The sound is then generated by a synthesizer, sampler or virtual instrument.
Modern controllers may also include:
- pads;
- knobs;
- encoders;
- faders;
- transport controls.
A MIDI keyboard is therefore not essential for everyone, but it can significantly improve the comfort and speed of composition.
A keyboard player may prefer 49, 61 or 88 keys, while a mobile beatmaker may be perfectly happy with a much smaller controller.
9. Synthesizers and virtual instruments
A Home Studio is not only used to record sounds coming from the outside world.
It can also be used to create them.
A synthesizer generates and transforms sounds using different synthesis systems.
In a traditional approach, you will commonly encounter:
- oscillators;
- filters;
- envelopes;
- LFOs;
- different modulation systems.
A synthesizer can be hardware-based or entirely software-based.
Virtual instruments now allow you to load synthesizers, pianos, drum kits, orchestral instruments, samplers and many other sound sources directly inside the DAW.
This evolution makes it possible to produce a huge range of music without filling a room with physical instruments.
10. Beatmaking, pads and grooveboxes
For beatmaking, the required equipment can be especially minimal.
A computer, a DAW and a monitoring solution are already enough to create complete tracks.
Pad controllers, MIDI keyboards, samplers and grooveboxes mainly make the creative process more tactile and immediate.
They can help with:
- drum programming;
- sample triggering;
- melody creation;
- automation recording;
- mix control;
- performance.
They do not necessarily replace software: they give it a physical interface.
Again, it is usually better to add this type of equipment when a real need appears rather than treating every controller as essential.
11. The mixing console: essential or not?
The traditional image of a recording studio is often associated with a large console covered in faders.
Yet a physical mixing console is absolutely not mandatory in a modern Home Studio.
The DAW already includes a virtual mixer that can control:
- volume;
- panning;
- effects;
- buses;
- groups;
- routing.
A physical console becomes especially useful when several sources need to be managed simultaneously, in certain hybrid setups, with external hardware, for live use or simply when a tactile workflow is preferred.
For a first fully digital Home Studio, it can usually wait.
12. The accessories people often forget
The least spectacular pieces of equipment are sometimes the ones whose importance becomes obvious only after the studio has been installed.
Depending on the setup, you may need:
- XLR cables;
- TRS or TS jack cables;
- MIDI cables;
- adapters;
- microphone stands;
- pop filters;
- shock mounts;
- monitor stands;
- isolation pads;
- suitable power strips;
- cable management;
- headphone stands.
It is useful to reserve a small part of the budget for these items instead of spending everything on the main equipment.
What equipment do you actually need at minimum?
The answer depends on the use case.
To start making music with a DAW
The minimum may simply be:
- a computer;
- a DAW;
- headphones.
That is enough to explore composition, virtual instruments, sampling, arrangement and mixing.
To record vocals
You will generally add:
- an audio interface;
- a microphone;
- an XLR cable;
- a stand;
- a pop filter;
- closed-back headphones.
To produce with virtual instruments
A MIDI keyboard or controller becomes particularly useful.
To start mixing more seriously
You can gradually add:
- studio monitors;
- suitable stands;
- acoustic treatment;
- possibly calibration tools.
There is therefore no need to build your final studio immediately.
In what order should you buy your equipment?
To avoid unnecessary spending, a sensible progression can be:
Step 1 — Use what you already own
Computer and headphones.
Install a DAW and start learning production.
Step 2 — Add an audio interface
As soon as you need to record a microphone or instrument properly.
Step 3 — Add the appropriate microphone
Only if your project requires recording vocals or acoustic sources.
Step 4 — Add a MIDI controller
When working only with a mouse and computer keyboard starts slowing down your workflow.
Step 5 — Add studio monitors
When you want to work more seriously on mixing and have a proper listening system in the room.
Step 6 — Improve placement and acoustics
Before automatically replacing your monitors with more expensive models.
Step 7 — Add specialised equipment
External preamps, hardware synthesizers, consoles, samplers, control surfaces or physical effects become relevant only when they solve a real need.
Three example setups
Minimal Home Studio
Computer + DAW + headphones
Ideal for:
- learning music production;
- composing;
- programming beats;
- using virtual instruments;
- working on the move.
Versatile Home Studio
Computer + DAW + audio interface + microphone + headphones + MIDI keyboard
This setup already covers a huge range of situations:
- vocals;
- guitar;
- composition;
- beatmaking;
- virtual instruments;
- production.
Mixing-oriented Home Studio
Versatile setup + studio monitors + acoustic treatment
This makes it possible to work with greater confidence on tonal balance and on how well a mix translates to other listening systems.
Common mistakes when starting out
Buying too much equipment immediately
A Home Studio is more effective when it grows in response to real needs.
Ignoring acoustics
Expensive monitors placed badly do not guarantee reliable monitoring.
Accumulating plugins
Modern DAWs already include many tools capable of handling a large portion of production and mixing tasks.
Constantly changing software
Knowing one DAW deeply is generally more useful than knowing five applications superficially.
Confusing equipment with skill
An interface, microphone or plugin can improve certain technical possibilities.
They do not replace learning recording, arrangement or mixing.
Buying for hypothetical future needs
Eight audio inputs are unnecessary if you always record only one source.
Buying for your current use, with a reasonable amount of room for growth, usually leads to a more coherent studio.
A Home Studio is a system that evolves
The ideal Home Studio is not the one with the most equipment.
It is the one in which every element has a clear function.
At first, only a few devices may be enough. With experience, needs become more precise: better monitoring, more inputs, a different microphone, a more comfortable controller, acoustic treatment or specialised instruments.
This progression also makes it easier to understand why a new piece of equipment has become necessary before buying it.
A Home Studio can therefore begin with nothing more than a computer and headphones, then gradually evolve into a complete production environment.
The essential objective remains the same: creating a space in which ideas can be recorded, transformed and completed without technology becoming an obstacle to creativity.